Order Screen
This is the order screen where an employee can select items, take orders and charge customers for the orders. In this screenshot, each tab is given a numerical value for easy explanation.
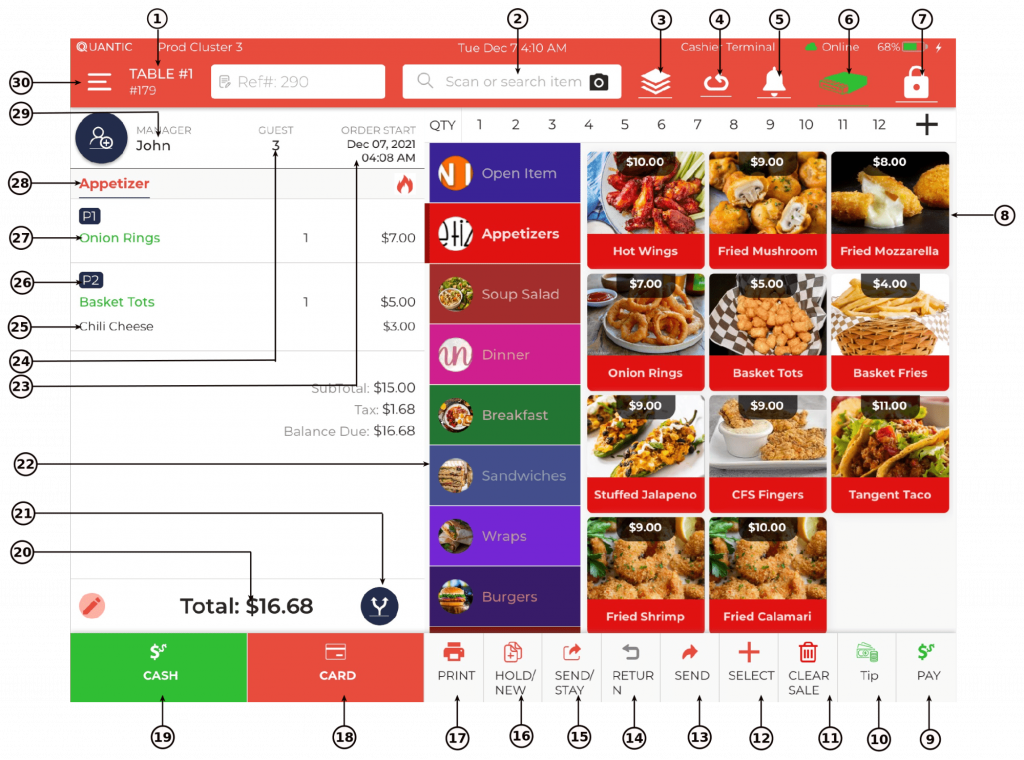
Description for the symbols are given below.
- Display the table number and order number.
- Scan or search any item from the menu here.
- Shortcut to service areas.
- Refresh button.
- Notifies if there are issues with the printers.
- Shortcut to open the cash drawer.
- Exit out of the order.
- Items in the menu.
- Pay button – Pay for the order by Cash/Credit or any other payment method.
- Tip button – To apply tips on closed orders.
- Delete button – To delete all items from the orders.
- Select button – Select items from the order to Comp/Discount/ Void, Delete, etc.
- Send the order to the kitchen and continue taking further orders.
- Return the items from the order.
- Send order to the kitchen but stay on the check.
- Hold items on the check and jump to a new order.
- Print the receipt.
- Pay via card.
- Pay via cash.
- Total cart value or amount due to be paid by the guest.
- Split the check evenly (max 50 checks).
- Item categories.
- Show the order start date and time
- Indicates the number of guests at the table.
- Modifier.
- Position on the table.
- Item added to the cart.
- Course, the guest has chosen.
- Displays the name of the server.
- Hamburger button or navigation button to expand the left menu.
Icons and their descriptions
Below each tab have been described thoroughly. Check them out to have a complete understanding of the order screen.
Top Header

The top header displays some useful buttons that have been described below
in the chart.

This is the navigation button located in the top left corner.
Click over it to explore more options in the POS.
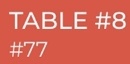
This shows order is being taken for table number 8 with order
number 77.
This is the shortcut button to open the service areas.
This is a refresh button.
Press this Bell button to check the notifications.
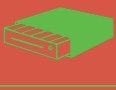
This is the Cash Drawer symbol. It will open the cash drawers
of a specific terminal that you are working on.
This is the screen lock button located in the top right corner.Clicking it will bring you back to the pin pad screen.


Bottom Navigation

You can see these buttons at the bottom of the order screen. The below chart
describes the information of each one of them.
Press this button if a guest is willing to pay in cash.
Press this button if a guest wants to pay through a credit
card.
Press this button to print an order receipt.
This button closes the order screen but keeps unsent items
on that order open, for later use. This is useful when you
want to add items to the order but do not want to send
them to the kitchen, giving your guests a few more minutes
to think. Till that time you can serve another guest.
Use this button if you want to send items to the kitchen but
keep the check open because the customer wants to add
more items. This is useful when a customer takes time to
decide what to order next.
This feature should be used when a guest wants to return an
item.
Press this button to send an order to the kitchen.
Using this button you can explore more options such as
discount, comp, change price, void, delete, etc.
Press this button to enter the tip amount paid in cash by the
customer in the POS.
You can use this option when a customer wants to pay
through a gift card, coupon, or some other pre-configured
payment type.
Press this button to delete all items from the cart.