How to Create a Subcategory in Portal?
Creating subcategories will break things further for easier navigation for large categories.
Note: It may be important to minimize subcategories to reduce the number of taps needed to get to an actual item.

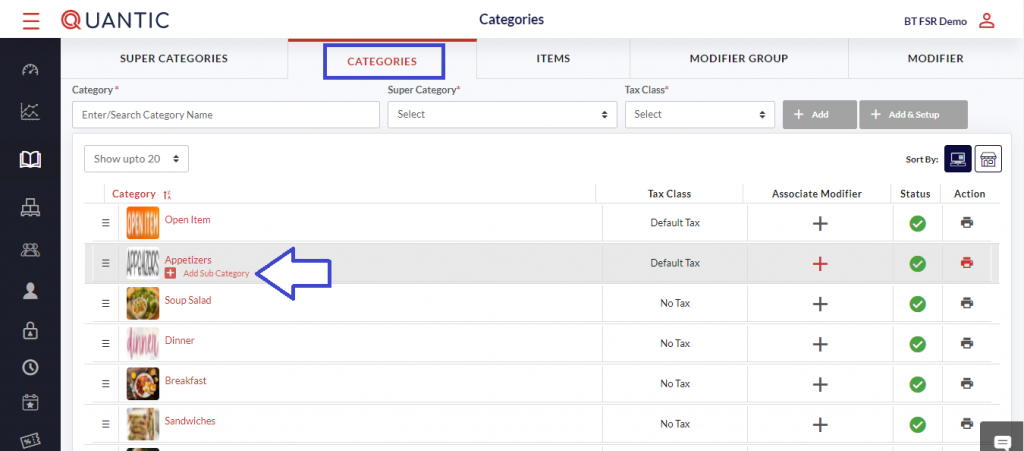
- Open the Catalog page as shown in the screenshot. Click the Categories tab on the top.
- Click on the ➕ Add Sub-category icon underneath the associated Category as displayed in the screenshot.

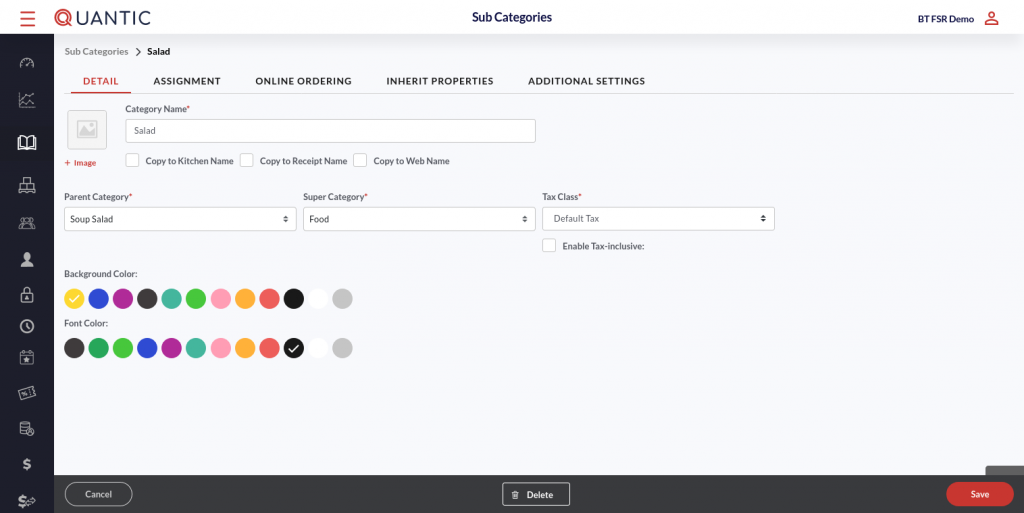
- Fill in all required fields as indicated in the screenshot. Add the image of the sub-category in the image box. Enter the sub-category name in the Category Name field.
- Tap the checkboxes next to Copy to Kitchen name, Copy to Receipt name and Copy to Web name (if you want to keep the same name of sub-categories at these places).
- Select the Parent Category, Super Category, and Tax Class from the dropdown.
- Set the Background color and the Font color for the sub-category name in the POS.

- Click the Assignment tab.
- Now select the Printer, KDS, and Course that you want to associate this sub-category with.

- Click the Online Ordering tab.
- To activate this sub-category for online ordering, turn on the switch next to Enable Web and enter the name with which you want this sub-category to be recognized for online order.
- To mark this as a featured sub-category, ✔️ the checkbox next to Mark as Highlighted/Featured.
Note: Enable Web will be enabled automatically for this sub-category, if the Enable Web is activated for its parent category and the Inherit Online is enabled for this sub-category. In such a scenario, the sub-category name will automatically appear in the web name.

- Click the Inherit Properties tab.
- Here you will see that by default all boxes are marked. If you do not want the sub-category to inherit a specific setting, uncheck the box next to that setting.
Note: If Inherit Online is selected, this sub-category will inherit the settings from the Online Ordering tab.

- Now go to the Additional Settings tab.
- Enter the name of the sub-category you want to display in the Kitchen printer and Receipt.
- Select the Terminal to be associated with this sub-category.
- Fill in the other details and click Save.


