CDS (Customer Display Screen)
What is a Customer Display Screen?
Quantic Customer Display Screen (CDS) is a digital screen that allows you to display the ordered items to the customers.
On this screen, the customers can view their orders, tax information, discounts (if any), the total amount to be charged, and loyalty points information.
CDS makes the checkout process smooth by displaying every piece of information in real-time
Connecting Quantic POS to the Quantic CDS
Quantic CDS works in sync with the Quantic POS.
The Quantic POS screen is a server-facing display where they can take the orders and process the payments, whereas the CDS or customer display screen faces the guests and shows the real-time activity running on the POS.
For Quantic CDS to start functioning, it needs to be connected to the Quantic POS.
The CDS will display the order information, such as items purchased, prices, a tax levied on orders, the total transaction amount, and loyalty points earned.
- Download and install the latest build of Quantic POS and CDS on separate iOS devices.
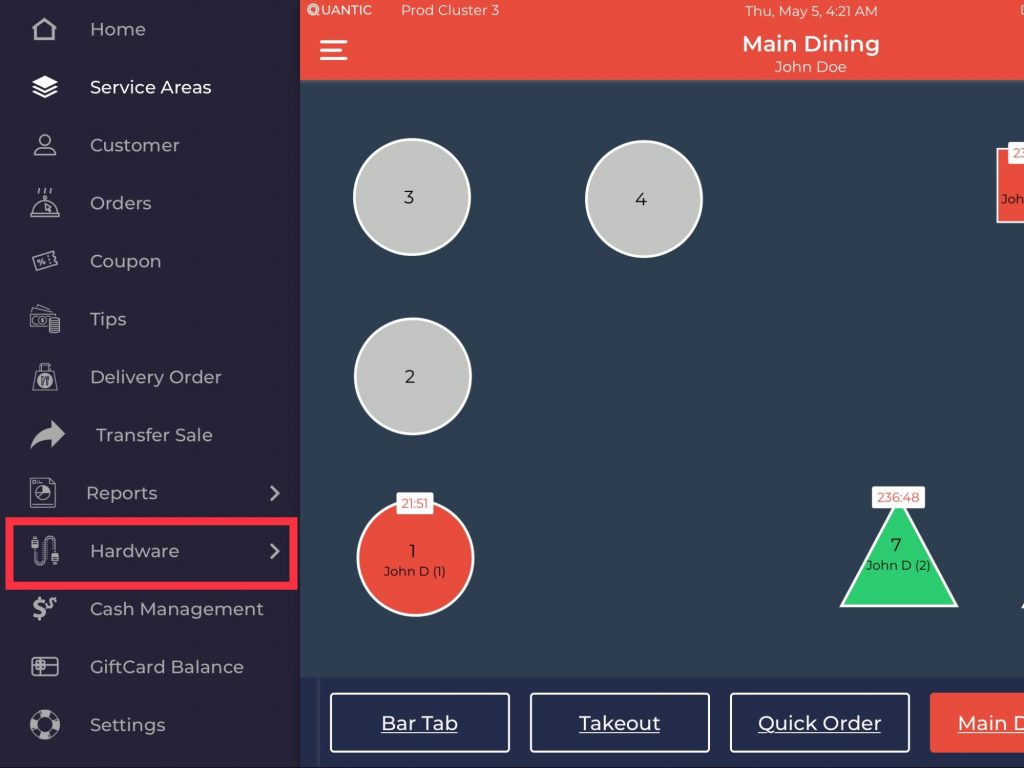
- Open the Quantic POS app, tap the Hamburger
 icon on the top left, and click the Hardware section on the left.

- Select CDS as shown in the screenshot.
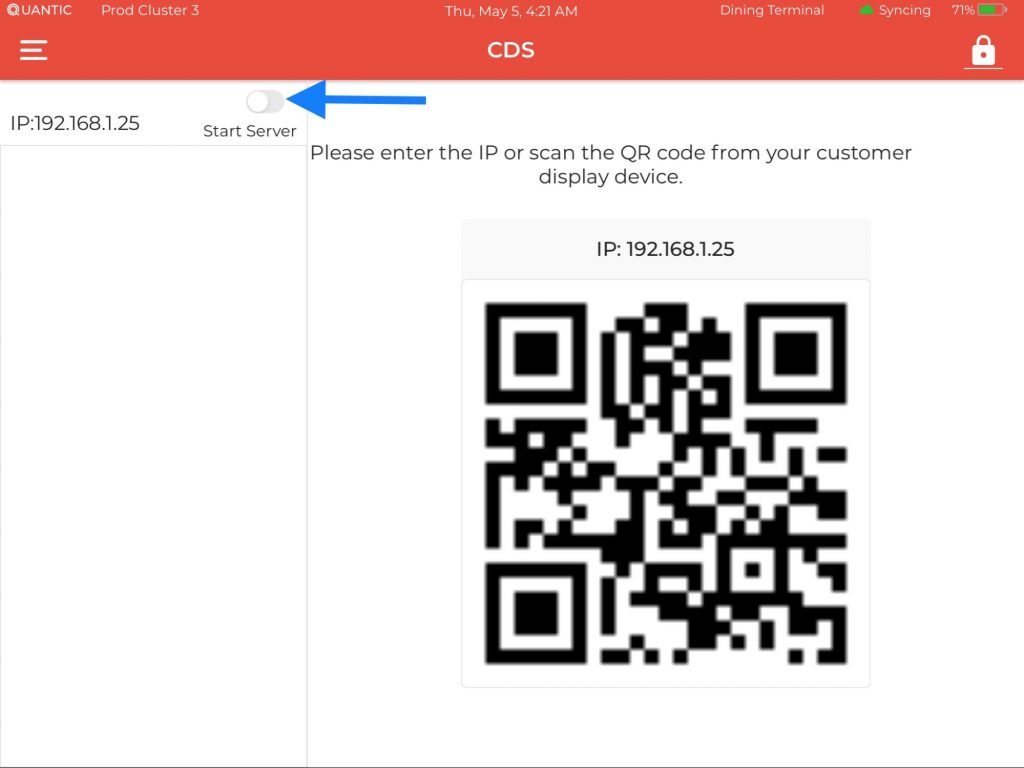
- Tap the toggle button
 over Start Server, next to the IP address. Do not close this screen as the QR code on the right will need to be scanned from the CDS scanner.

- Now open the CDS app on the other device.
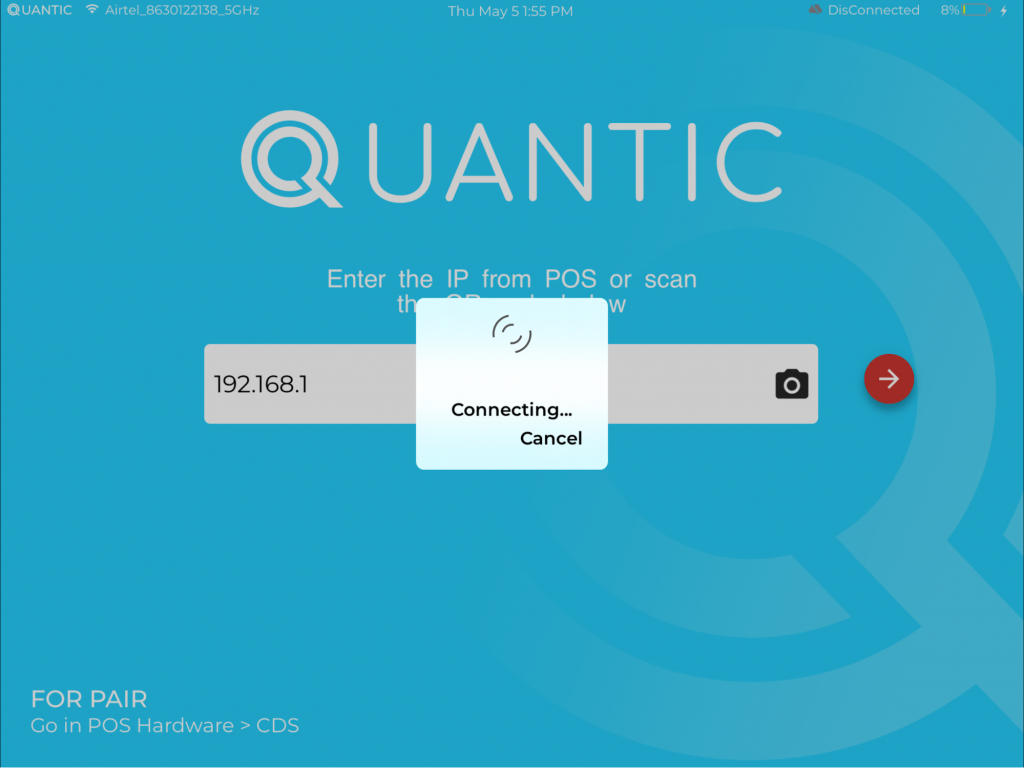
- Tap the
 icon and scan the QR code displayed on the POS. Or, you can manually enter the IP address of the POS in the given field. Once done, click
  .
.
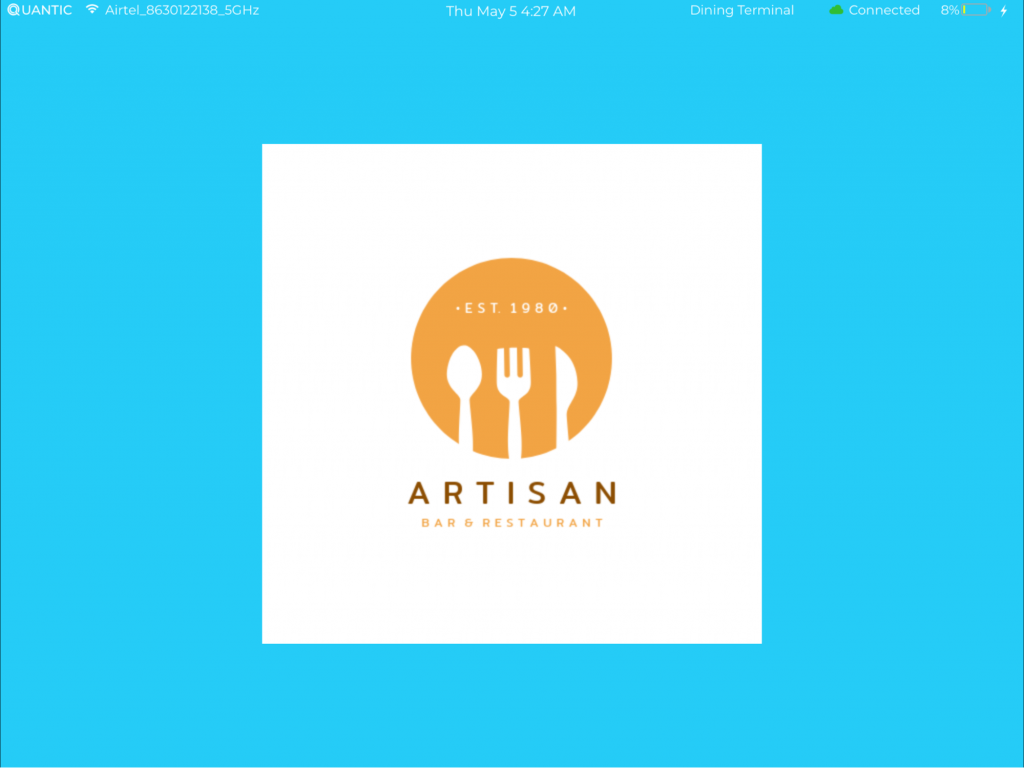
- Once the connection establishes between the POS and CDS, the business logo will start appearing on the screen.
Order Workflow on POS and CDS
Great! You have successfully configured the Quantic CDS with your POS device.
Now your CDS is ready to go, all set to serve your guests.
Please take a look at the steps below to see the workflow of your CDS device.
- This is how the Customer Display Screen home screen appears before the order starts
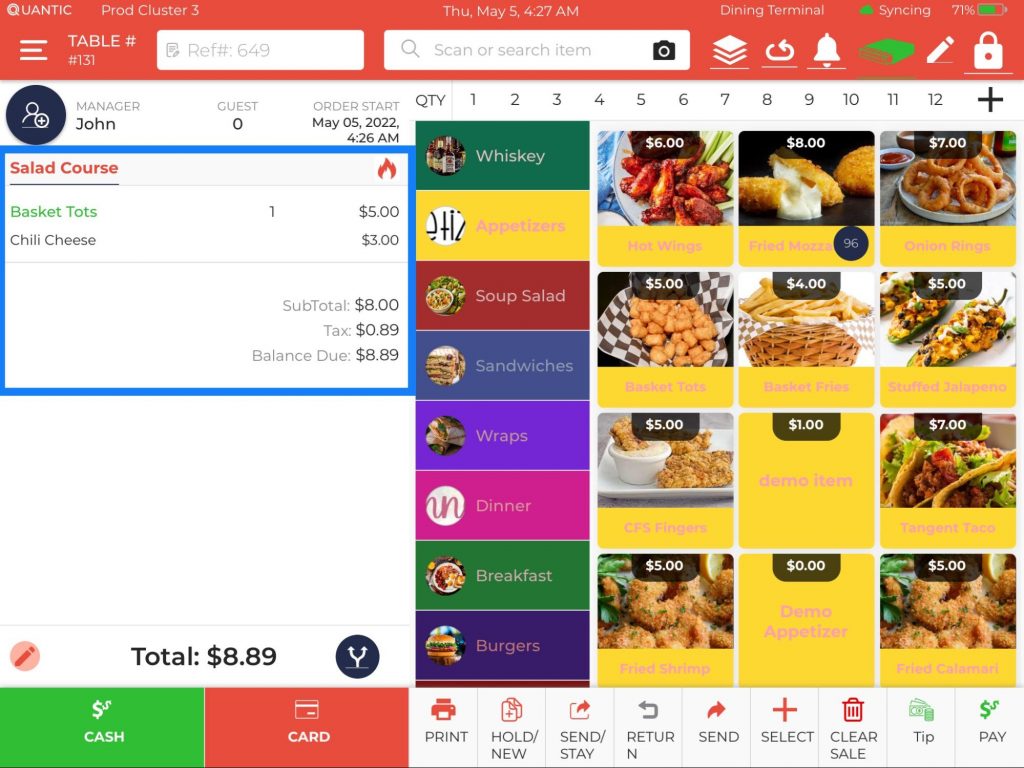

- The server enters the order on the POS app and the same order will reflect on the customer-facing display.
- To display the cash and card price on the CDS, please enable the configuration “Show Cash Credit Price”
- Guest verifies the order and pays for the order to the server.
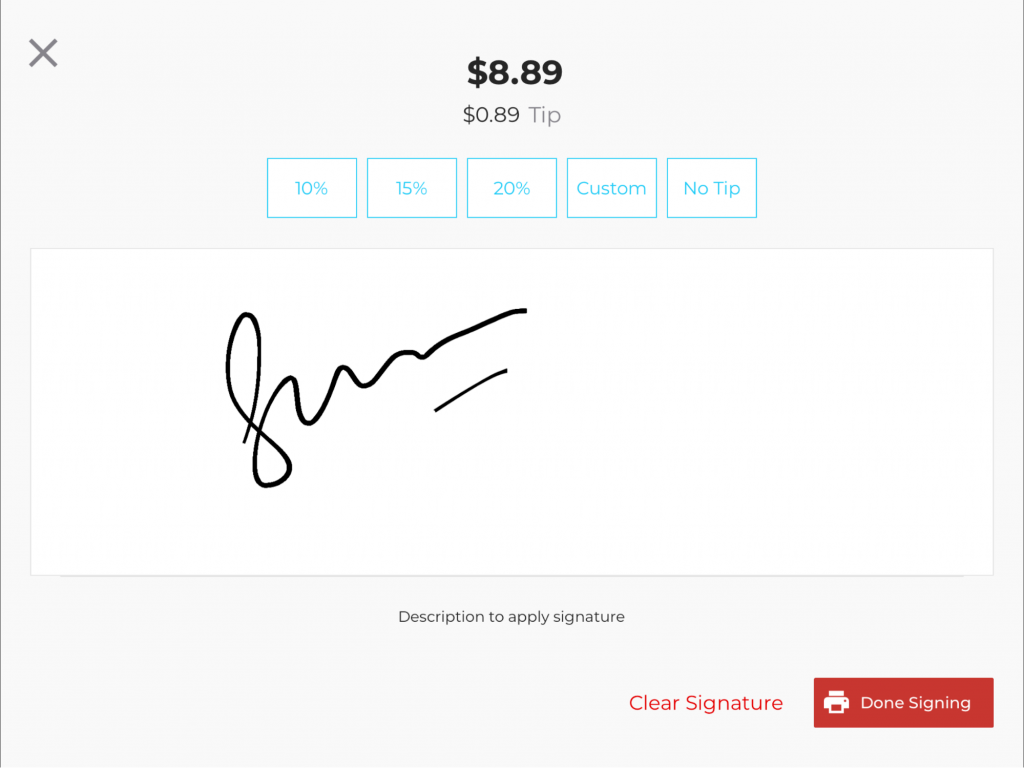
- Guest tips, signs on the CDS screen and clicks the Done Signing button at the bottom.
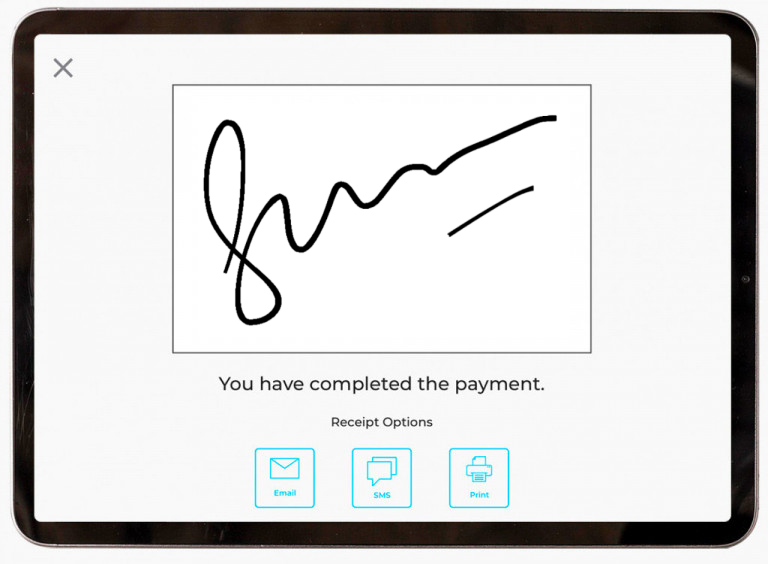
- On payment completion, the guest can choose the receipt options- email, SMS, or print.
Displaying Tip and Signature Pad on the CDS
You can allow your guests to choose the tip amount on the CDS screen and put their signature to authenticate the total transaction amount.
You can either show the default tips (10%, 15%, 20%) or the pre-defined tips to your guests to close the order.
Below is the complete overview of how you can display the tip and signature pad on the CDS screen.
Displaying the Default Tips on the CDS Screen
10%, 15%, and 20% are the default tips that are already configured in your system.
Checkout the steps below to learn how to display them on the CDS screen.

- Login to the location’s backend portal.
- Click the Configuration tab on the left navigation.

- Search the configuration- Enable Signature and turn it on.

- Search another configuration- Enable CDS Tip Signature and turn it on as well.

- Tap the Terminal Settings button and select the terminal for which you want to enable the CDS tip signature.

- Also, please make sure the Tip Prompt setting is disabled at the payment gateway level for a specific Station (Terminal) on the merchant portal. If this setting is left enabled, the tip and signature will display on the POS and not on the CDS. Hence, you should make sure to disable the Tip Prompt switch as shown in the above screenshot.

- Now you can take an order on the POS (the cart screen will replicate on the CDS), tap the Card option, and swipe the card on the terminal.

- The tips and signature pad will appear on the CDS screen.
- Guests can select the tip amount, put their signature on the Signature Pad and click the Done Signing button.
Displaying the Pre-Defined Tips on the CDS Screen
In case you want to display the customized tips on the CDS screen, you need to first add the pre-defined tips from the backend portal and turn on the configuration - Hide Default Tips. Here are the steps.
- Login to the location’s backend portal.
- Click the Configuration tab on the left navigation.

- Tap Pre-defined Tips under Setup.

- Click the Edit button on the top right.

- Click Add New to add a new row.
- Enter the Tip Label that should show up on the screen. For eg, 25%, Great Job 25% etc.
- Enter the tip value that should apply after clicking on this tip button. For eg, 25.
- Select the Tip Type (% or $) from the drop-down.
- Tap the Custom Tip checkbox if you want to make this tip a custom tip.
- Tap the Status box to enable the tip.
- Search the configuration- Enable Signature and turn it on.
- Search another configuration- Enable CDS Tip Signature and turn it on as well.
- Tap the Terminal Settings button and select the terminal for which you want to enable the CDS tip signature.

- In addition, please enable the configuration - Hide Default Tip Options from the backend portal.
- Also, please make sure the Tip Prompt setting is disabled at the payment gateway level for a specific Station (Terminal) on the merchant portal. If this setting is left enabled, the tip and signature will display on the POS and not on the CDS. Hence, you should make sure to disable the Tip Prompt switch as shown in the above screenshot.

- Now you can take an order on the POS (the cart screen will replicate on the CDS), tap the Card option, and swipe the card on the terminal.

- The pre-defined tips and signature pad will appear on the CDS screen.
- Guests can select the tip amount, put their signature on the Signature Pad, and click the Done Signing button.
