Printer Setup
How to Connect a POS Terminal to the Printer?
You can connect your POS to the kitchen printer and receipt printers. Kitchen printers, as the name suggests, are installed in the restaurant’s kitchen and print a kitchen ticket, whenever a new order is placed. It allows your chefs to quickly review a new order and start cooking the menu items.
On the contrary, the receipt printers are meant for the billing counters. Whenever a guest places an order, the staff at the billing counter will print a receipt through the receipt printers. Here we have put together an easy way for you to configure and set up a printer with the Quantic POS. You just need to follow these steps and get started with printing the kitchen tickets and receipts.
Setup the printer
- Unpack your printer and make sure to put it near the router.
- Open the printer feeder and put a paper roll inside. Please ensure to use the appropriate paper roll.
- Take a LAN cable and connect one end to the router and another end to the printer.
- Turn on the router and printer (it has a power button on the side).
- The red and green lights on the printer will start blinking together, wait until the green light becomes stagnant.
- Now your printer is ready to connect to the POS.
Setup from the POS

- Please ensure that your POS connects to the same router as your kitchen or receipt printer.
- Log in to the POS app using your location’s username and password.
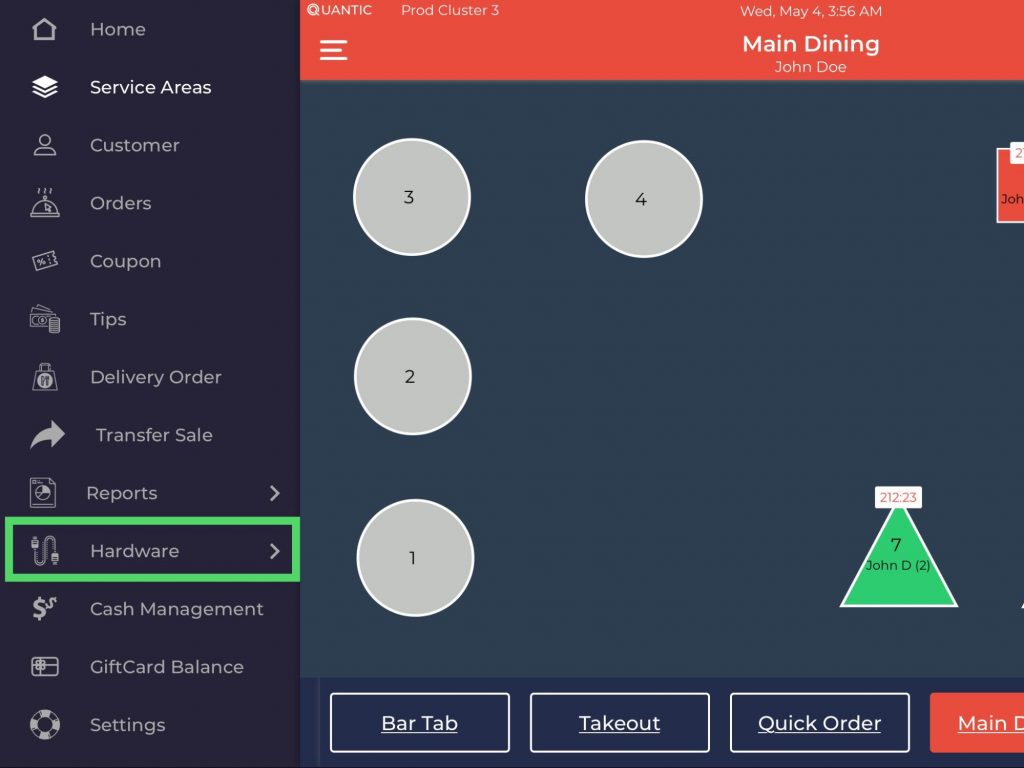
- Tap the Hamburger icon on the top left and click Hardware.

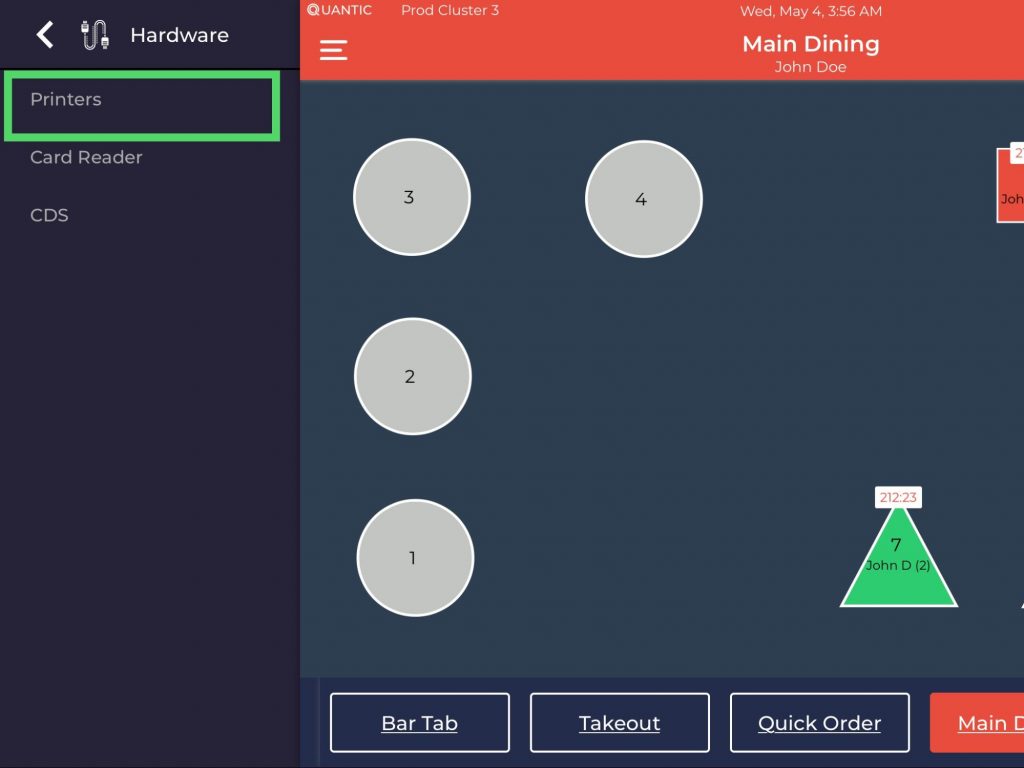
- Select Printers as shown in the screenshot.

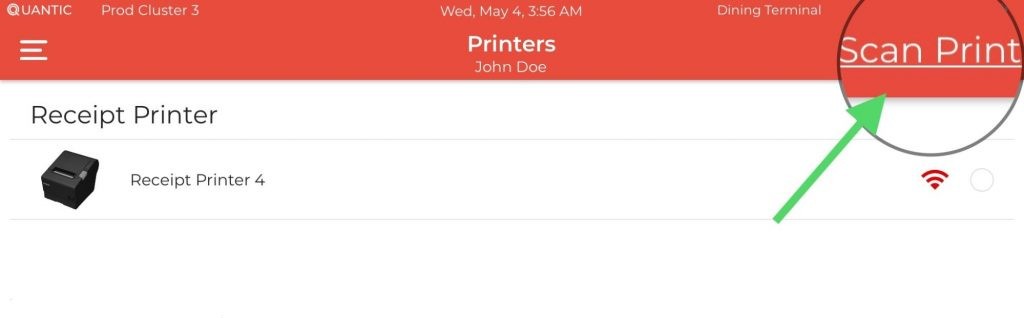
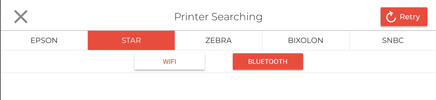
- On the Printers screen, click Scan Printers.

- Select the printer model from the top bar. Here we have chosen the Star.
- Select the connection mode- WIFI or Bluetooth.
- The list of available printers will be displayed underneath.
- Click Add next to the printer that you want to add to the POS.
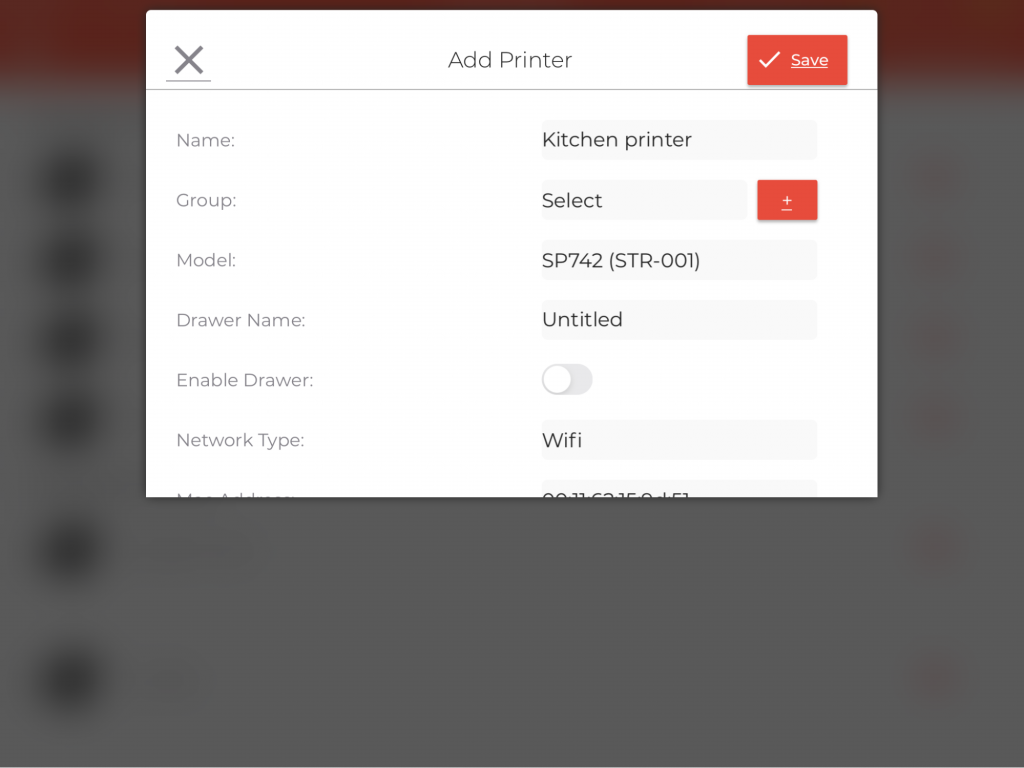
- On the Add Printer screen, you will be prompted to fill in the printer details.
- Name: Enter the printer’s name here. For example, a Kitchen printer.
- Group: Tap the
 and enter the group name in the field. This helps in grouping the related printer together with the same group name. For example, you can group all the receipt printers under a common group name and the same to the kitchen printers as well.
 - Drawer Name: Enter the name of the cash drawer that is connected to the printer.
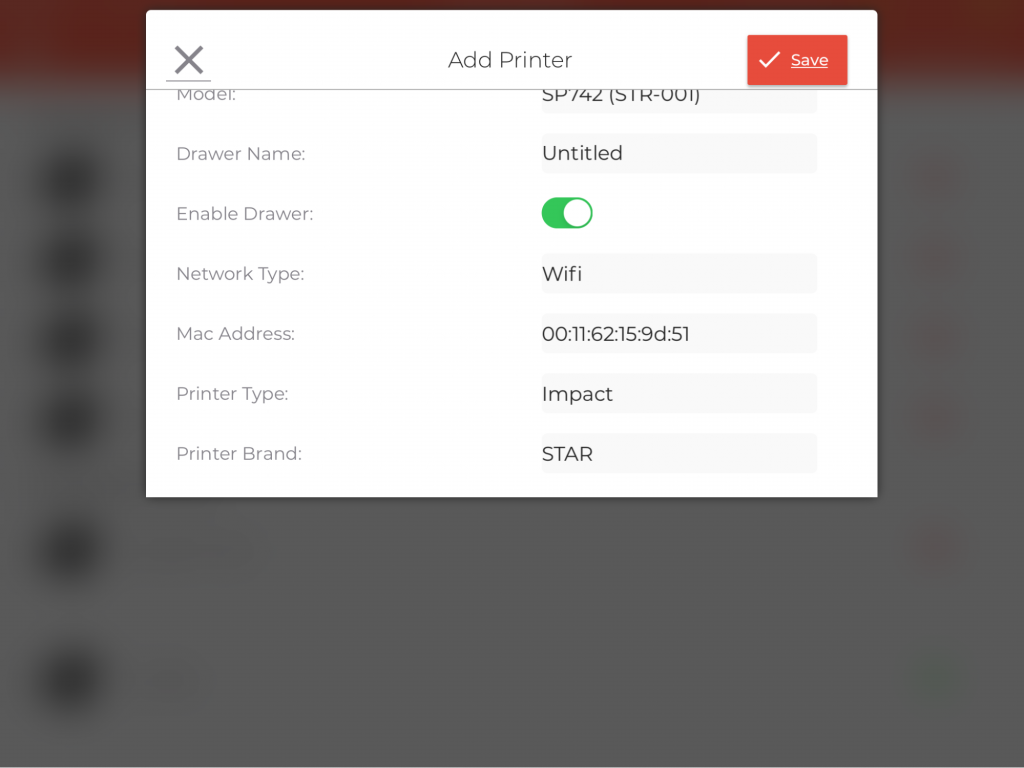
- Enable Drawer: Turn on the toggle switch to enable the cash drawer for this printer.
- Printer Type: Select the type of printer from the drop-down. Usually, the thermal printers are used as receipt printers and impact type printers are used as kitchen printers.
- Printer Brand: Select the printer brand from the drop-down.
- Once you have filled in all the details, please don’t forget to click the Save button on the top-right.

- After saving the details, the printer will appear added to the list. The
 next to the printer shows that the printer is connected and the
  means the printer is still not connected to the POS over the network.

- You can tap on the printer name and customize the printer as required.
- Demo Print: Tap the demo print button to check if the printer is connected to the POS or not. You should receive a print by clicking the Demo Print button.
- Brand: This is the printer brand.
- Model: This is the model of the printer.
- IP Address: This is the IP address of your printer. If it appears green, your printer is connected correctly. If the IP address appears red, you can tap the
 icon and enter the correct IP address.
 - Has Cash Drawer: Turn on the toggle button if you have a cash drawer attached to this printer.
- Printing: Turn on the toggle button to enable the printing for this printer.
- Online Order Printing: Turn on the toggle button to enable printing for online orders.
- Enable Drawers: Turn on this toggle button to enable the cash drawer for this printer.
- Print Unassigned Items: Turn on this setting if you want to print the items that have not been assigned a printer.
- Assign Terminal: Tap the select button and choose the terminal(s) for which this printer should remain operational.
- Assign Service Area: Tap the select button and choose the service area(s) for which this printer should remain operational.
- Show Item Price: Turn on this toggle button if you want the item price to show on the printed receipts.
- Label Printing: Turn on the toggle button to enable this printer to print labels.
Printing a Receipt from Receipt Printer
Receipt printers are generally placed at the billing counters to print the final order receipt. Now you can start taking orders and once the guest pays for the order, the receipt will be generated. Here is the complete overview.

- Go back to the Order screen.
- Select the items that the guest has ordered.
- Now click the payment mode at the bottom.

- On payment completion, the receipt will be generated by the receipt printer.
- This is how a typical receipt appears.
Printing a Ticket from the Kitchen Printer
Kitchen printers are installed in the kitchens. When a new order is placed, the order ticket is printed on the kitchen printer allowing the chefs to quickly review a new order and start cooking the menu items.
Assign Kitchen Printer to the Items/Categories
Before sending a ticket to the kitchen, please make sure you have assigned a kitchen printer to the item or category. Otherwise, you may not be able to send an unassigned item to the kitchen. Please follow the instructions given below to set up a printer for the items.
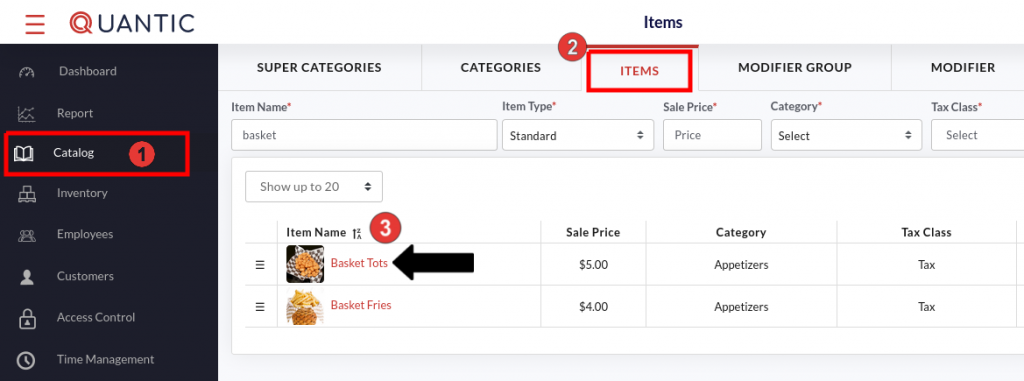
- Go to the location’s backend portal.
- Open the left navigation menu and click Catalog.
- Tap the Items tab and select the item to which you want to assign a printer.
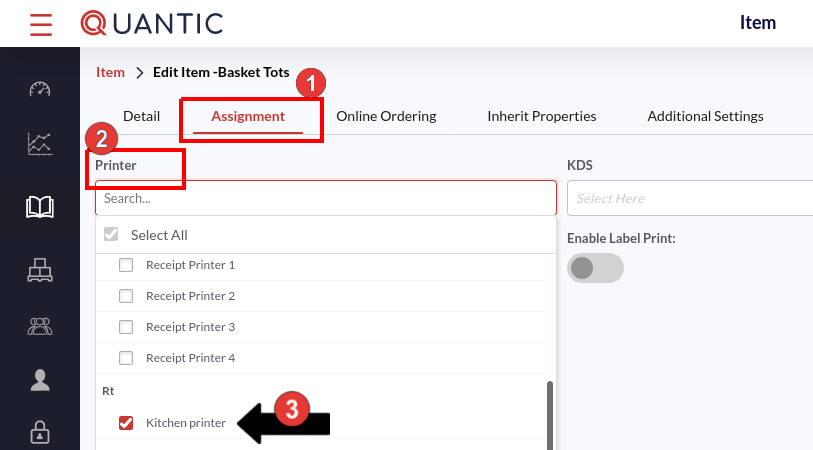
- Click the Assignment tab and tap the Printer field.
- Now select the kitchen printer from the drop-down menu.
- Click Save to save the changes.
Note : You can assign a printer on a category level as well. Simply, visit the Catalog section on the left navigation and follow this path- Categories tab > Select Category > Assignment > and select printer from the Printer field. With that said, the printer(s) will be assigned to the entire category.

- Go back to the Order screen.
- Select the items that the guest has ordered.
- Now click the Send icon to send the item to the kitchen. A ticket will be printed in the kitchen printer.

- This is how a kitchen ticket appears. It may not look as descriptive as the billing receipt but it has enough information for your chefs to cook meals.
- A typical kitchen ticket will consist of the item name, order number, name of the staff who took the order, and table number.
Note : In case you don’t want to show the item price on the kitchen tickets, please make sure to disable the “Show Item Price” setting from the printer setup page on the POS.
How to Connect Quantic POS to the Bluetooth Printers?
Below are the steps to help you connect the Quantic POS to the Bluetooth printers. Make sure your printer is within the adequate range of your POS.
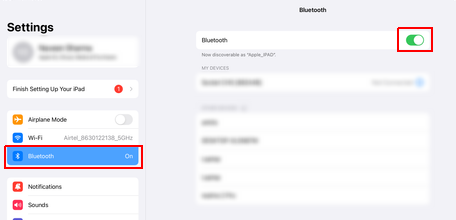
- Go to the Settings of your iOS device.
- Click Bluetooth and turn on the toggle button next to the Bluetooth.
- Now search for the mC-Print3-XXXX device (XXXX might refer to the serial number).
- Once it’s connected there, go to the Hardware section on the left panel of your POS.
- Click the Printers tab.
- Click Scan Printers on the top right corner.
- Now select the printer on the top and select the Bluetooth tab underneath.
- The list of available printers will be displayed, click Add next to the bluetooth printer.
- Wait for a few seconds, the printer should connect to your POS.