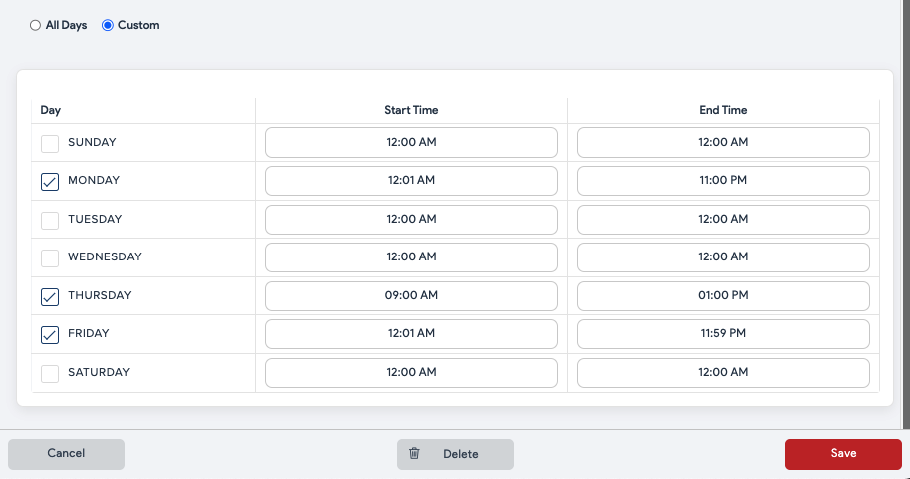
- Safe Deposit
- Suggested Gratuity on Initial Receipt
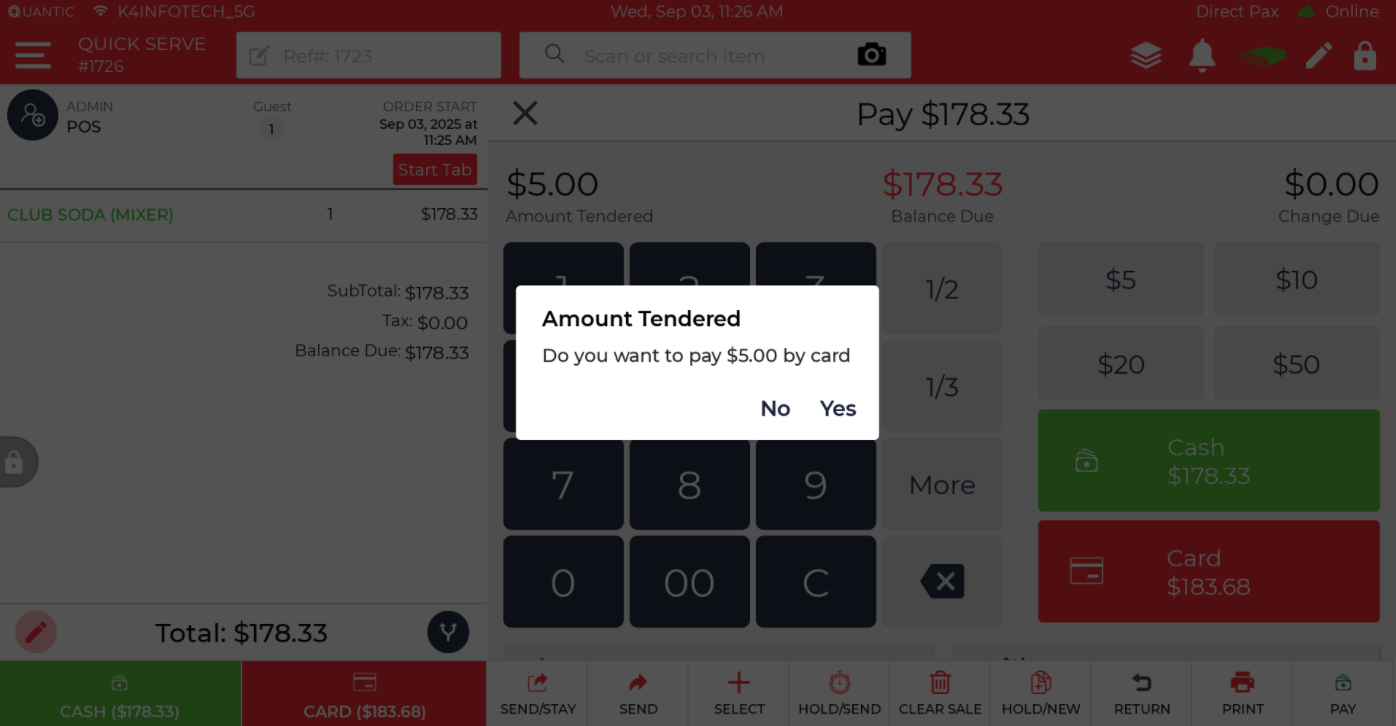
- Ability to open the drawer for card payments
- Ability to sort receipts alphabetically
- Line separator between items
- Mandatory Driver Assignment Before Closing Delivery Orders
- Ability to remove tax from item level extra charge
- Promotion Rule Enhancements
- Lyntek Printer Support
- Enterprise – Service Area-Based Item Pricing
- Label Templates Supported
| ENHANCEMENT |
|---|
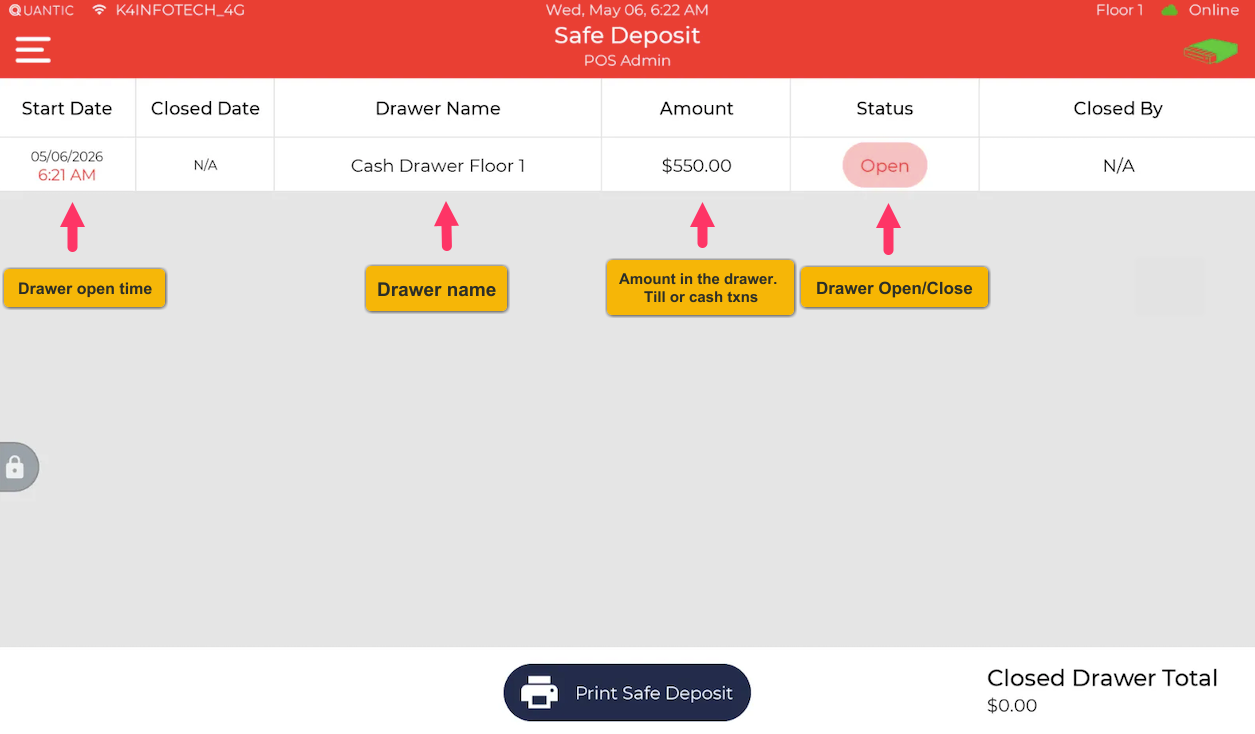
Safe Deposit
The Safe Deposit feature allows you to view information from all cash drawers on a single screen. This enables employees with safe deposit access to easily track and manage multiple drawers in one place. You can also print the total of all closed drawers by clicking the Print Safe Deposit button.
What details are displayed in Safe Deposit:
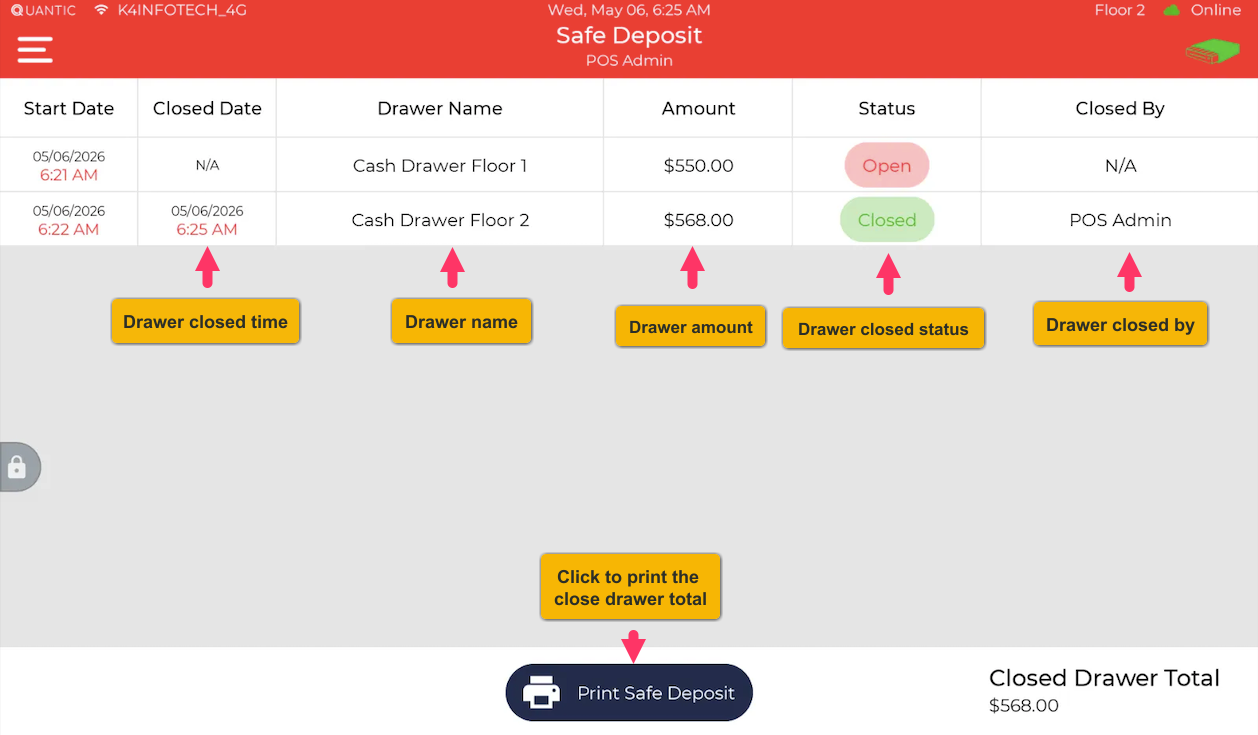
- Start date: Drawer open date.
- Closed Date: Drawer closed date
-
Amount: Till/physical cash in the drawer.
- Till when the drawer is in the open state.
- Actual cash drawer amount when the drawer is closed.
- Status: Drawer’s Open/Close status.
- Closed By: Employee who closed the drawer.
Prerequisites
- The terminal needs to be connected with the printer and the cash drawer for the physical drawers
- The user should have access to the cash drawer and be able to make cash payments.
- The employee who you want to be able to see the safe deposit should have access to it.
Backoffice Setup
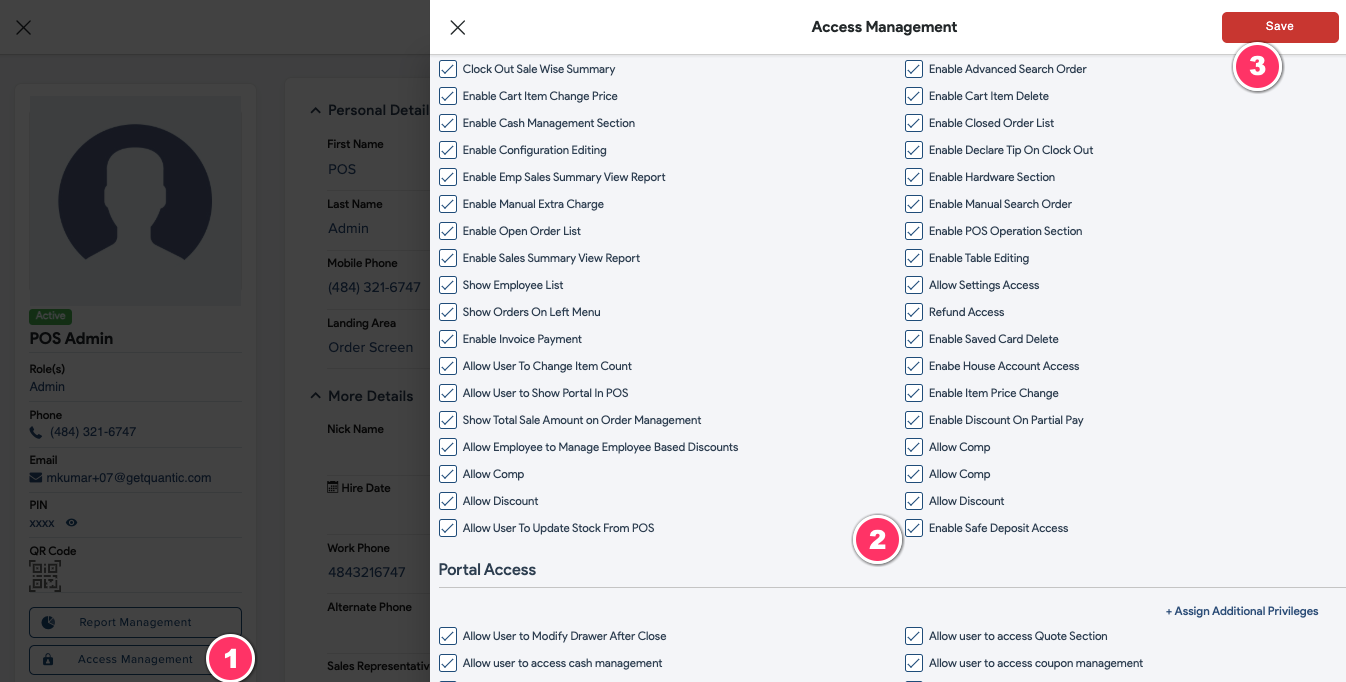
- Log in to the Backoffice of your store, go to Employees > Access Management
- Turn on the privilege – Enable Safe Deposit Access.
- By default, the toggle will be disabled.
- Once the toggle is enabled, the user can view/access the safe deposit option in POS > Cash Management > Safe Deposit.
- This user will be able to see all the drawers in the Safe Deposit section.
POS Workflow
Example:
- Your location has two floors, with two terminals, each with a Cash Drawer Floor 1 and a Cash Drawer Floor 2 attached to the printers.
- How to add a cash drawer to a printer on the terminal?
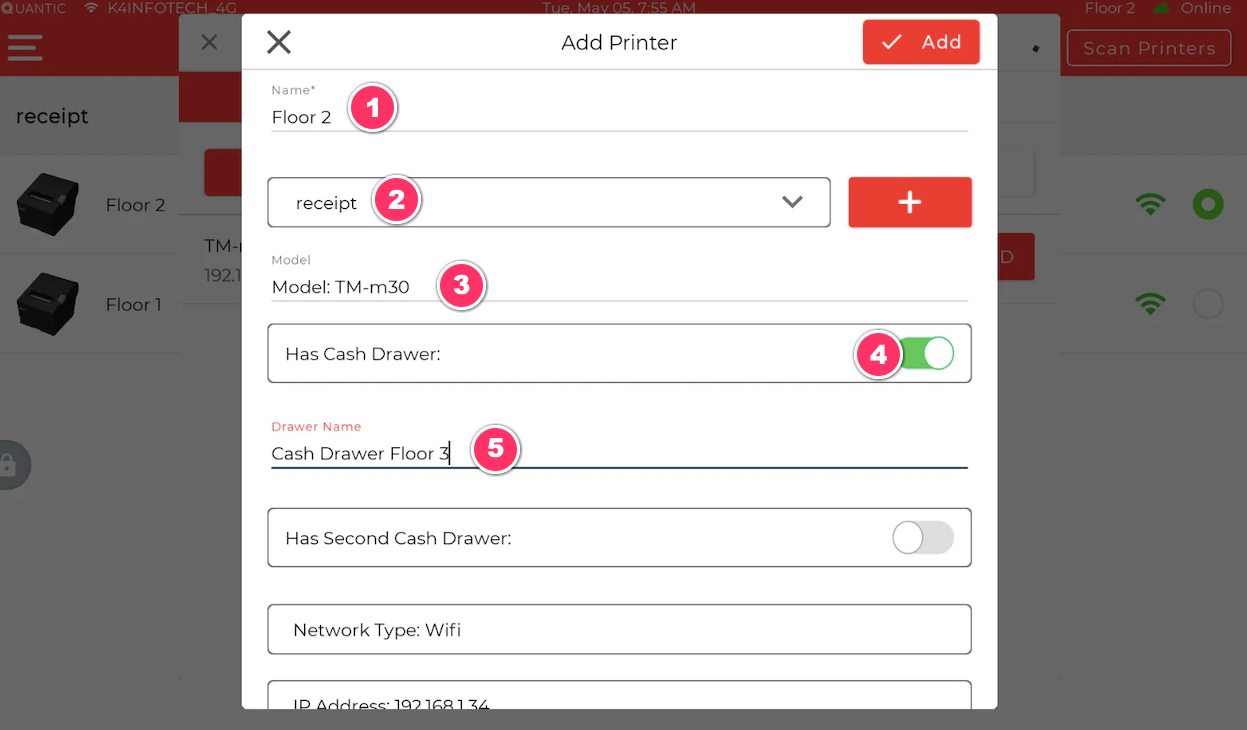
-
- Go to the POS > Hardware > Scan printer > Add Printer > Enable Has Cash Drawer > Enter Drawer name > Select the printer type as Thermal.
-
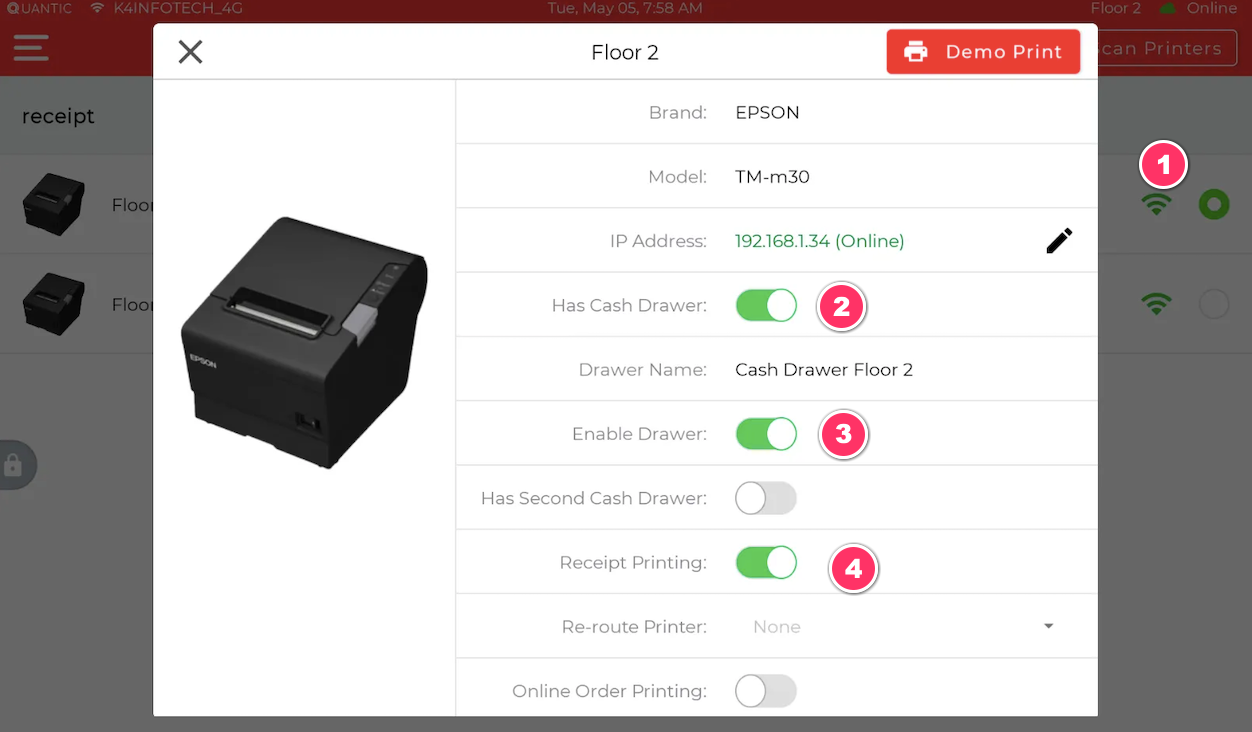
- Once the printer is added, please edit the printer > toggle on the Enable Drawer and Receipt Printing.
- Now repeat the same process with another terminal to add the printer and the cash drawer.
Start Drawer
- Say, Cash Drawer Floor 1 is attached to the Floor 1 Terminal via the printer.
- And, Cash Drawer Floor 2 is attached to the Floor 2 Terminal via the printer.
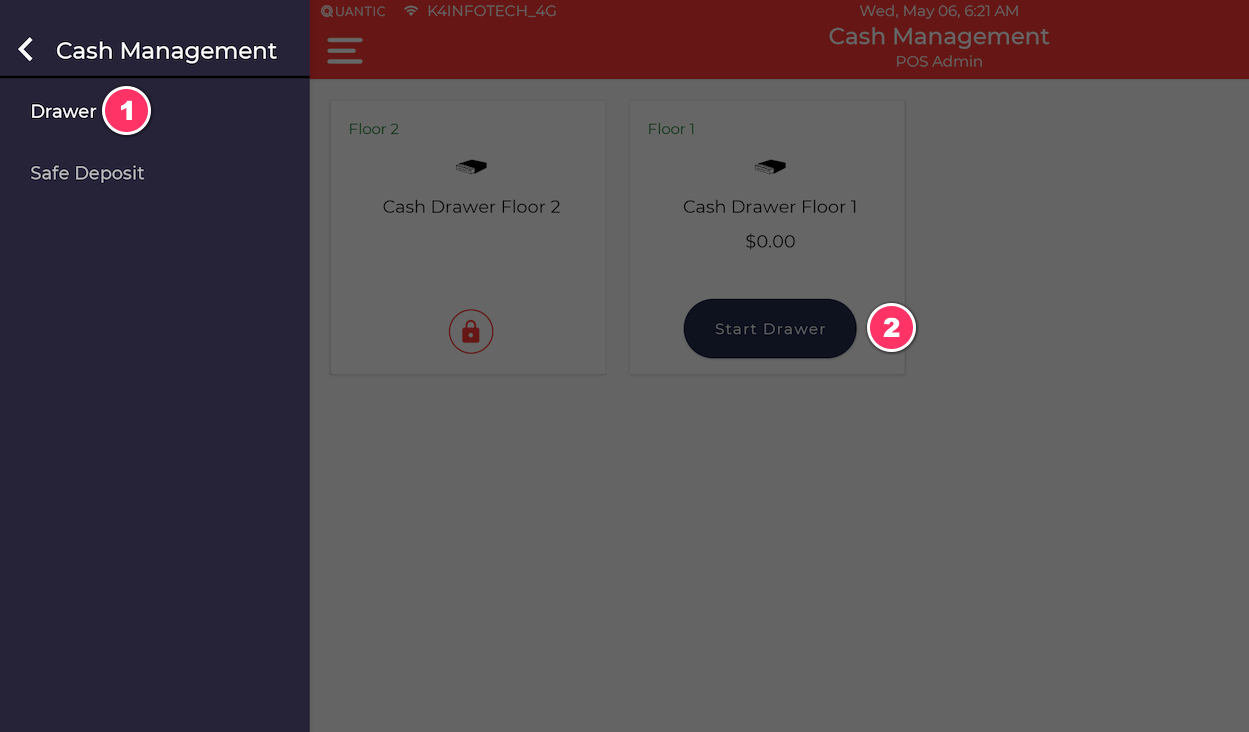
- To start the drawer, select the terminal where you have added the drawer > select the Cash Management > Drawer > Click Start Drawer > Done.
- Now, whatever goes inside the cash drawer, like cash payments, Tills will be displayed in the Drawer under Cash Management.
- And these Drawer details will be displayed under the Safe Deposit with the Open status.
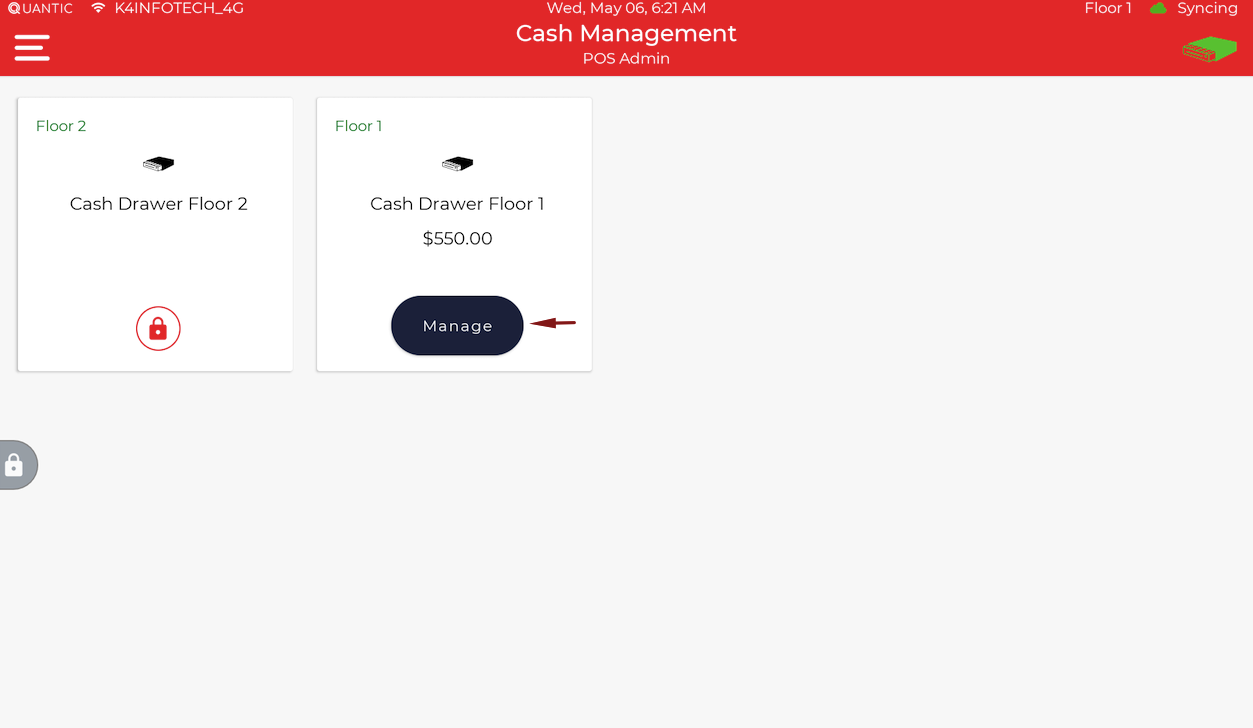
Closed Drawer
- The actual closed drawer total displays with the Closed status.
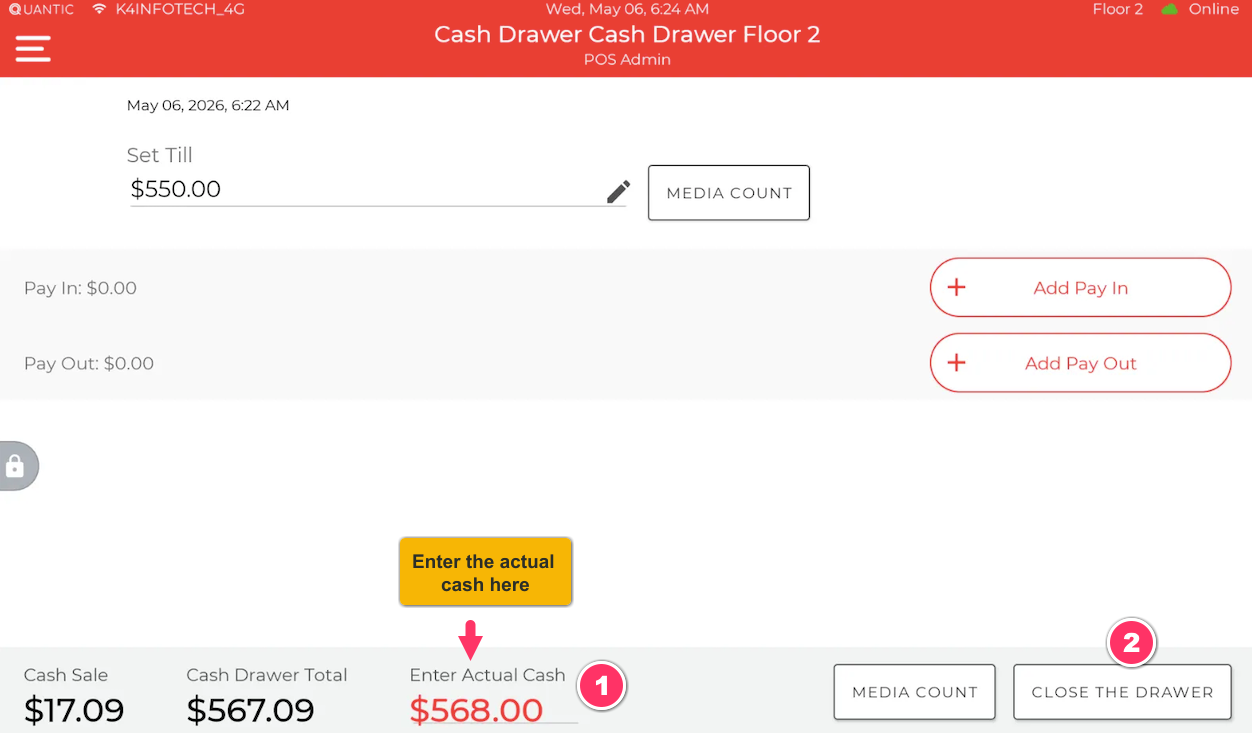
- To do that, Go to the Drawer > Click Manage > Tap on Enter Actual Cash > Enter the Actual amount in the drawer > enter the amount in the actual cash > tap Close the Drawer > and click Yes on the confirmation window.
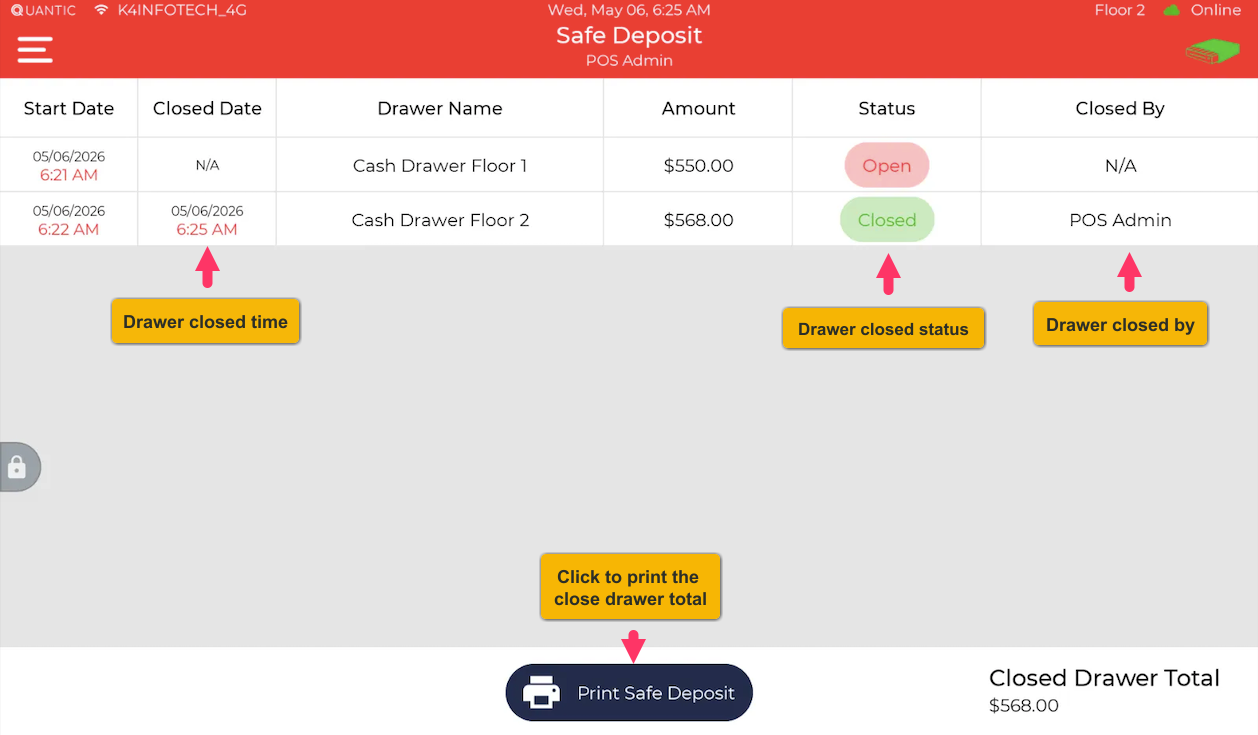
- Now the employee with access to the Safe Deposit can navigate to the Safe Deposit section from Cash Management and can see the closed drawer total.
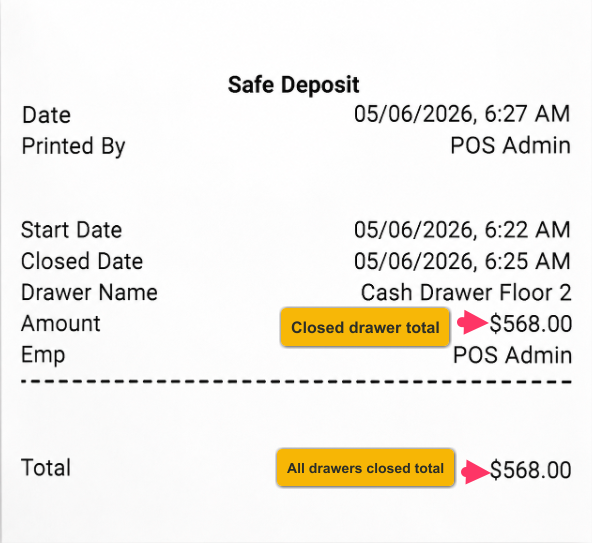
- In addition, the safe deposit closed total can also be printed by clinicking the Print Safe Deposit button.
| ENHANCEMENT |
|---|
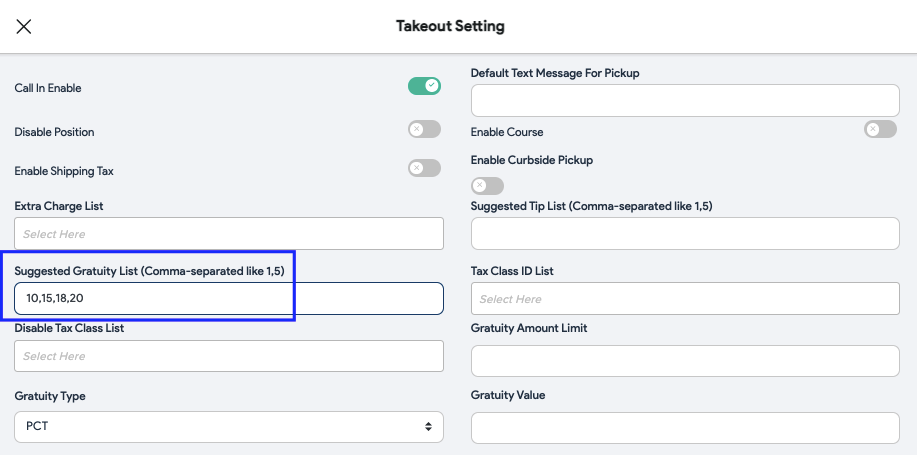
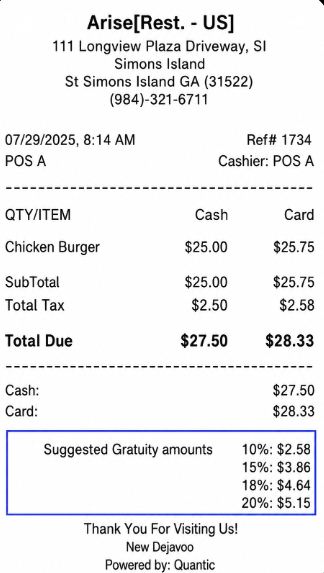
Suggested Gratuity on Initial Receipt
We’ve introduced a new feature that allows you to display suggested gratuity amounts at the bottom of the initial receipt, similar to how gratuity tips are shown on the tip screen.
This feature displays both the gratuity percentage and the corresponding amount, giving customers the option to choose their preferred tip. Once selected, the server can easily apply the gratuity from the POS.
This is a service area–based feature and can be enabled via the configuration:
Show Suggested Gratuity On Initial Receipt
To set up suggested gratuity:
- Go to Portal > Setup > Service Area
- Edit the desired service area
- In the Suggested Gratuity field, enter gratuity percentages separated by commas (e.g., 15,18,20)
- Once configured, the options will automatically appear on the printed receipt.
 |
|---|
| Suggested Gratuity Setup |
 |
|---|
| Suggested Gratuity on Initial Receipt |
| Note: Please note that for consumer choice locations, the gratuity will have the surcharge (consumer choice) adjusted to it |
|---|
| ENHANCEMENT |
|---|
Abilty to open the drawer for card payments
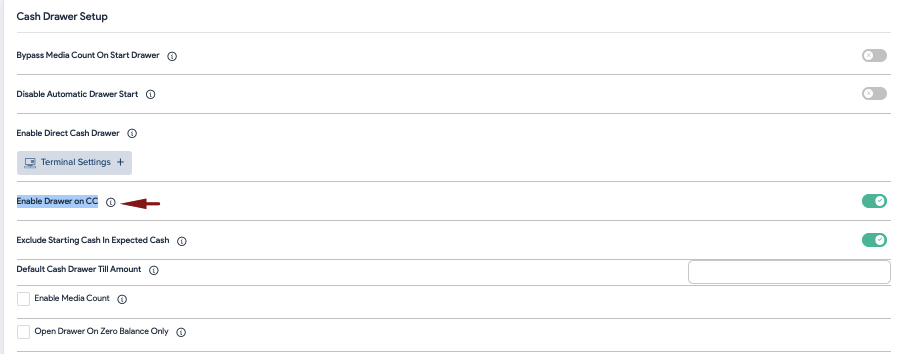
Added a functionality where you can trigger the cash drawers for the card payments.
- Setting based: Enable Drawer on CC
- Default: Disabled. Drawers will open on cash payments.
- When enabled, the drawer will open on initiating the card payments too.
Please note, there is no impact of this setting on drawer opening on cash transactions.
| ENHANCEMENT |
|---|
Ability to sort receipts alphabetically
You can now configure receipts to display items in alphabetical order for better readability.
Setting:
- Sort Items Alphabetically for POS Receipt
How it works:
- Enable this setting to automatically sort all items alphabetically on the receipt
- When disabled, items will appear in the default order (as added to the cart)
| ENHANCEMENT |
|---|
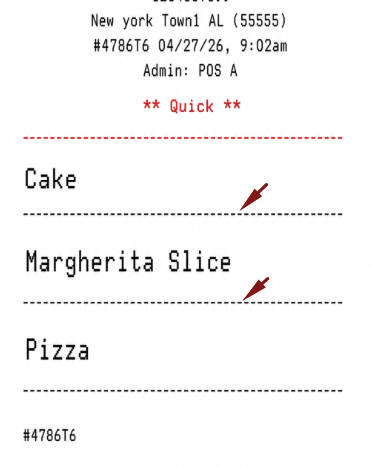
Line separator between items
A line separator has been added between items on the kitchen ticket to improve readability and prevent confusion.
Setting: Add Line After Ticket Item
- Default: Disabled
- When enabled, a line separator will appear between each item on the kitchen ticket.
Note:
Kitchen tickets are printed when an order is paid for from the Kiosk. Ensure that a kitchen printer is properly associated with the items.
 |
|---|
| Line separator between items in the kitchen ticket |
| ENHANCEMENT |
|---|
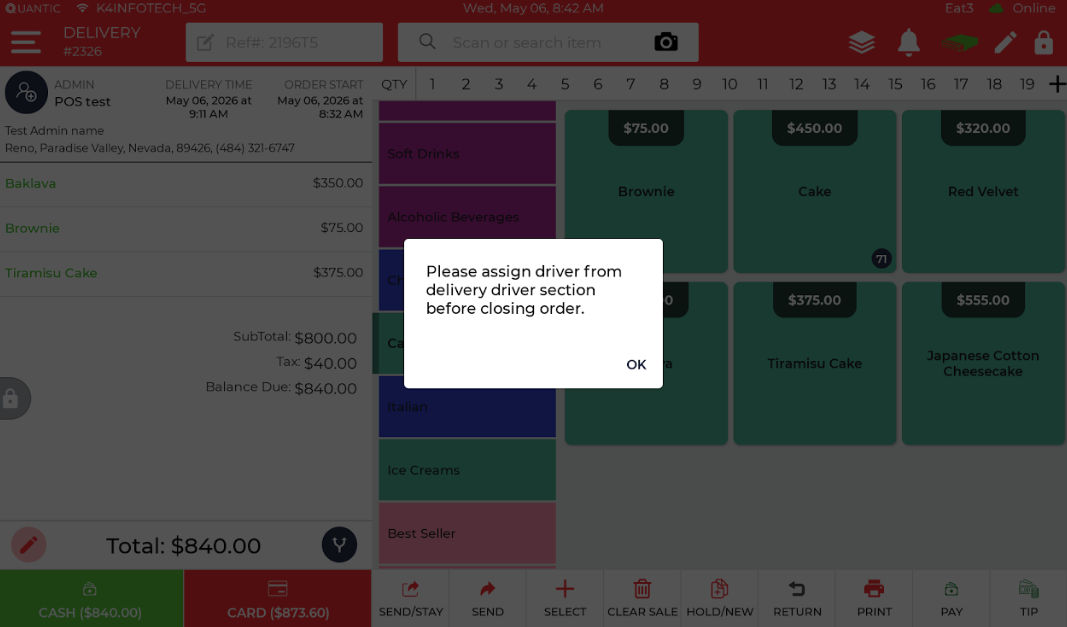
Mandatory Driver Assignment Before Closing Delivery Orders
A new feature has been implemented to prevent servers from closing delivery orders without assigning a driver.
When the Force Delivery Driver Before Payment setting is enabled, servers must first assign a driver to the delivery order from the Delivery Order section. The order can only be closed after a driver has been assigned.
This ensures all delivery orders are properly tracked and assigned before payment and closure.
 |
|---|
| Order not allowed to close without assigning a driver |
| ENHANCEMENT |
|---|
Ability to remove tax from item level extra charge
Now you have the ability to remove the tax from the item level extra charge. A new checkbox has been added at the item level extra charge called Enable Tax to Extra Charge.
- Setting at item level extra charge: Enable Tax to Extra Charge
- Default: Enabled
- When disabled, the tax would not apply to the item level extra charge.
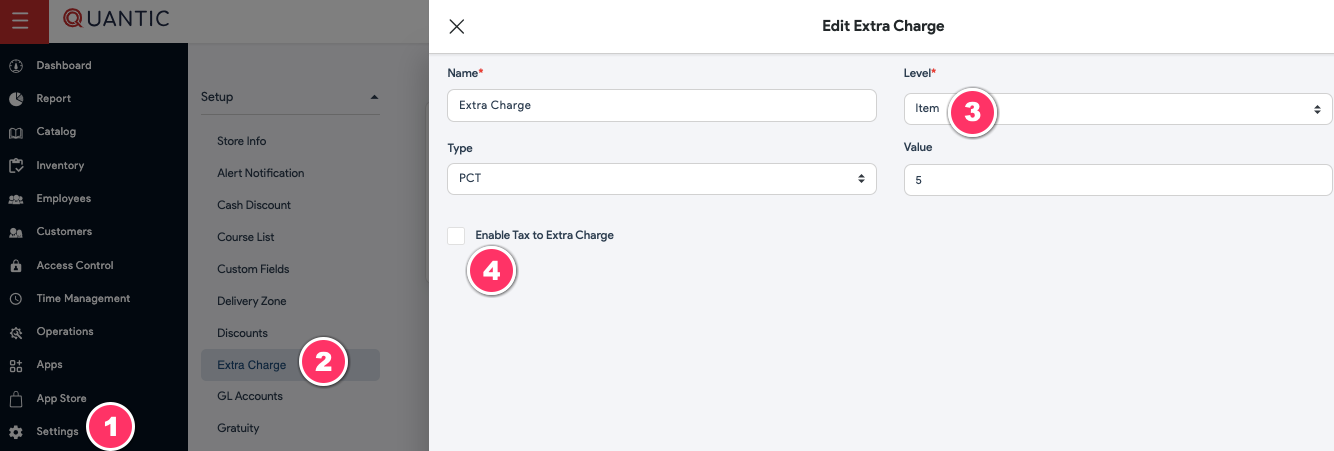

In this example, the Enable Tax to Extra Charge was off for the item level extra charge, the tax did not apply on the extra charge.
| ENHANCEMENT |
|---|
Promotion Rule Enhancements
The promotion rules flow has now been enhanced by adding the promotion name on the promotion rules page. So you need not to visit the promotions page separately to add the event. Additionally, now you can select the items, to be applied with the promotions, during the promotion rule setup itself.
Associating the Promotion/Event with Promotion Rule
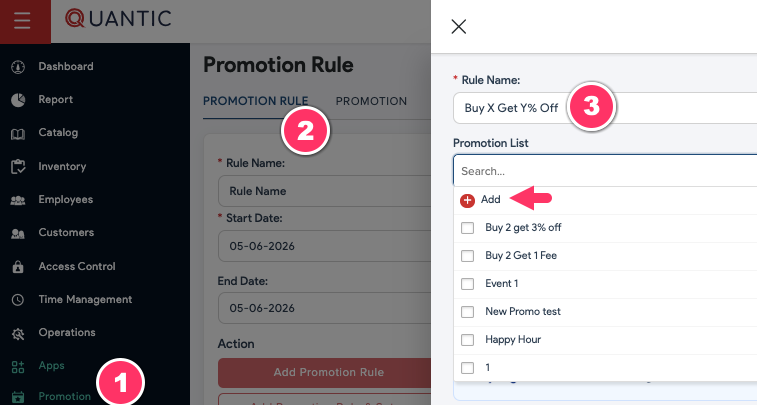
- Go to the Promotion rule add the rule name.
- Select the date.
- And add the Promotion by clicking the + Add button.
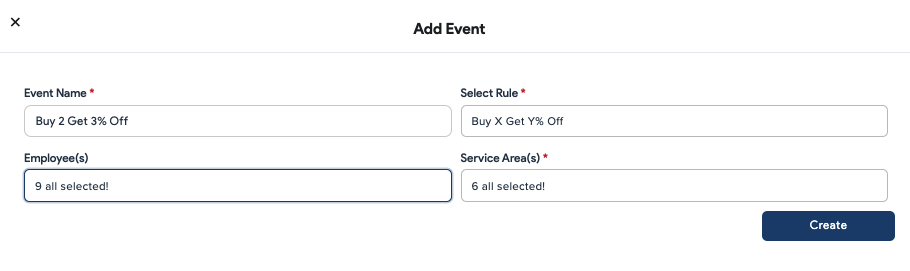
- Fill in the Event details, rule will appear preselected.
- Click Create.
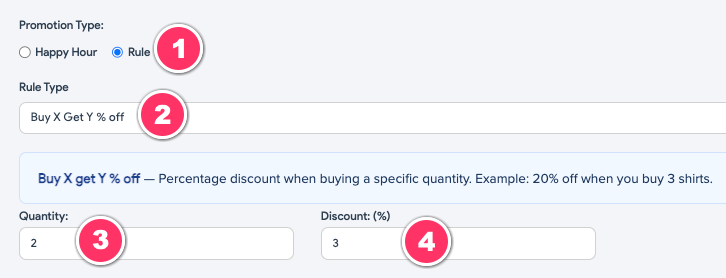
- Select the rule type.
- Add the Quantity and set Discount.
Associating items to the Promotion
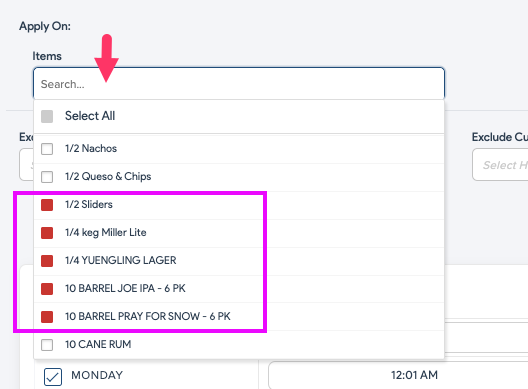
- Select the items from the listing where you want to apply the promotion.
- The promotion along with this rule will be associated automatically to the item.
- At the end, please select the promotion timings and click Save.
Excluding Customer/Customer Groups from Promotions
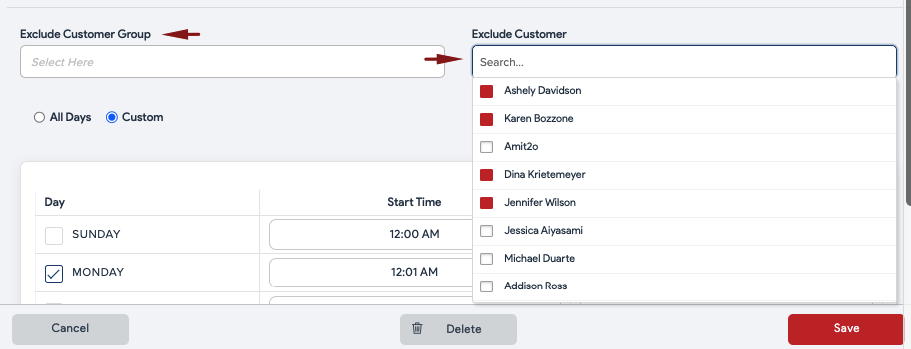
- You may also exclude the customer or the customer group from promotions.
- Select the customers or customers groups which you want to exclude from promotions and click Save.
Note:
- The above flow is not applicable to this rule – “Discount item price if X quantity rule”. This rule will need to be selected at the item level from Catalog.
- If a promotion/rule is set at the item level, it will not be displayed at the category level.
- Please make sure to associate one rule with one event and to one item.
- Items should not have the multiple rules associated.
| ENHANCEMENT |
|---|
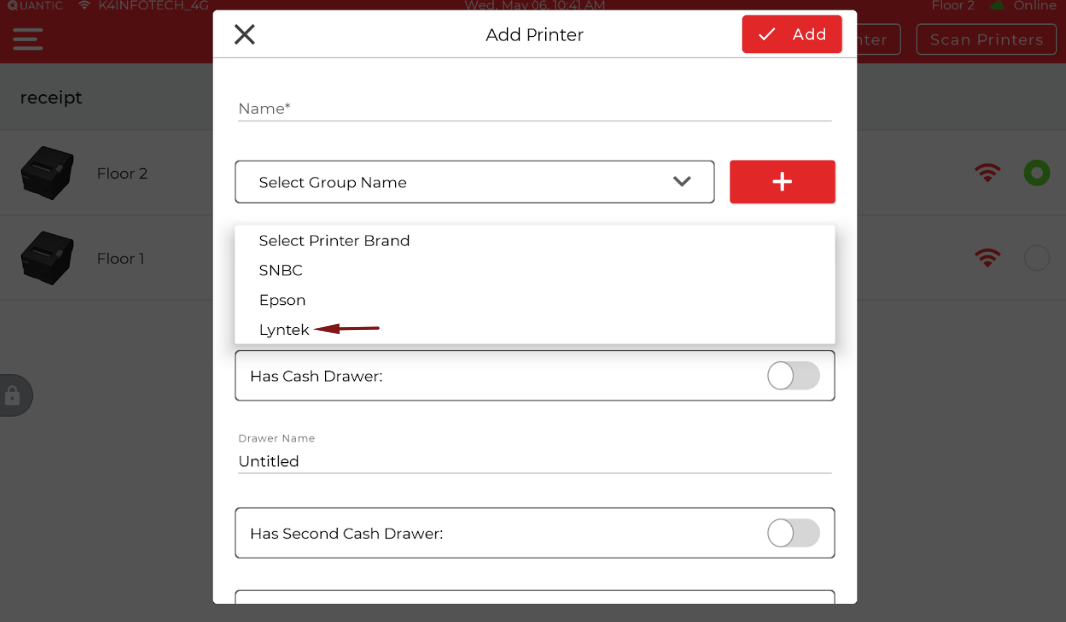
Lyntek Printer Support
Your Android POS has now been supported with the USB Lyntek printer. You can add it from Hardware > Printer > Add USB Printer and select Lyntek as the printer brand.
| ENHANCEMENT |
|---|
Enterprise – Service Area-Based Item Pricing
A new functionality has been introduced to override item pricing based on the selected service area, providing greater flexibility in pricing strategies.
- Setting-Based Control: Managed via Override Item Price With Service Area Price
- Default Behavior: Disabled — standard item pricing applies
- When Enabled: The service area–specific price will override the default item price
Example:
- An item (e.g., Pizza) is priced at $13 by default. If a Quick Serve service area has a price set to $10, the item will be sold at $10 when ordered from that service area.
Configuration Path:
- Go to Portal > Item > Settings > Service Area Based Price, select the service area, and set the desired price
This enhancement allows businesses to customize pricing based on service context, improving operational flexibility.

| ENHANCEMENT |
|---|
Label Templates Supported
Now you can select the Label printing templates from the backend portal > Setting > Setup > Select the template and click Save.

- Enable Tax Exempt by Default for POS Items
- Promotion rule improvements
- Receipt UI improvements
- Refund reason selection
- Table Reservations – Send Reminder
- POS Printer Support Update
- Ability to set up the Negative open item
- Sell Items as Cases with Units per Case
- More control on loyalty earn and redemption
- Epson USB T88Vi Supported
- Order Ready notification via Text
- The single item shows 0 when split and sent to the kitchen
| ENHANCEMENT |
|---|
Enable Tax Exempt by Default for POS Items
To simplify the use of the tax-exempt feature, the Enable Tax Exempt setting is now turned on by default for items added from the POS. This allows you to easily mark items as tax-exempt directly from the cart when needed.
The Enable Tax Exempt setting can be found under Item > Settings.
How it works:
- When enabled: Add an item to the cart, select the item, and choose Tax Exempt to remove the tax.
- When disabled: The item cannot be marked as tax-exempt at the POS.
| ENHANCEMENT |
|---|
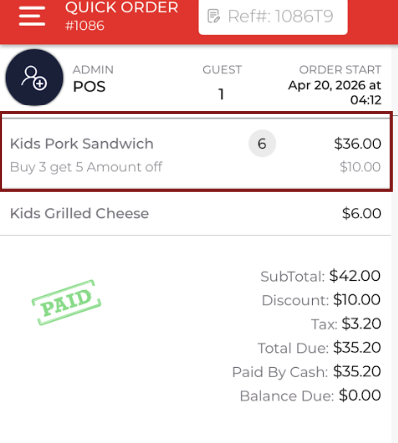
Promotion rule improvements
Items sold under a promotion will now be grouped into a single line item for improved clarity on the POS and receipts.
Example:
For a promotion like Buy 3, Get 5 Off, if 6 sandwiches are sold, they will appear as one line item with quantity 6 on cart and receipt.
Previously, the same order would be split into two line items of 3 each.
| ENHANCEMENT |
|---|
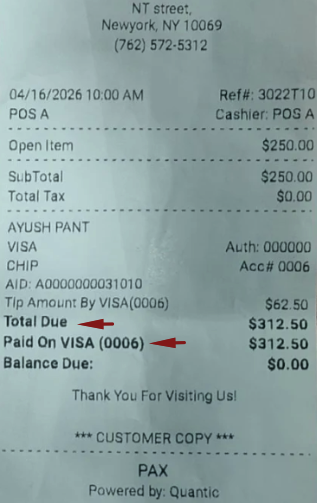
Receipt UI improvements
The Total Due and Paid By line items are now displayed in bold on the receipt, improving clarity and making receipts cleaner and more user-friendly.
| ENHANCEMENT |
|---|
Refund reason selection
You can now select a refund reason while initiating a refund directly from the POS, helping improve tracking and reporting.
Portal Setup:
- Go to Settings > Setup > Predefined Reasons
- Enter the reason
- Select Refund as the reason type
- Click Save
POS view (Optional Refund reason)
- Initiate a refund on a paid order
- Select a refund reason (optional)
- The selected reason will be recorded in the refund report
- You can skip this step if you do not wish to select a reason
 |
|---|
| Optional refund reason |
POS view (Mandatory Refund reason)
- Enable the Refund Reason Required setting from the backend
- Initiate a refund on a paid order
- Selecting a refund reason is required to proceed
- The selected reason will be recorded in the refund report
 |
|---|
| Mandatory refund reason |
| ENHANCEMENT |
|---|
Table Reservations – Send Reminder
The message icon will now change to a bell icon once the reservation notification has been sent to the customer.
For multiple reminders, a count is displayed to indicate how many times the notification has been sent.
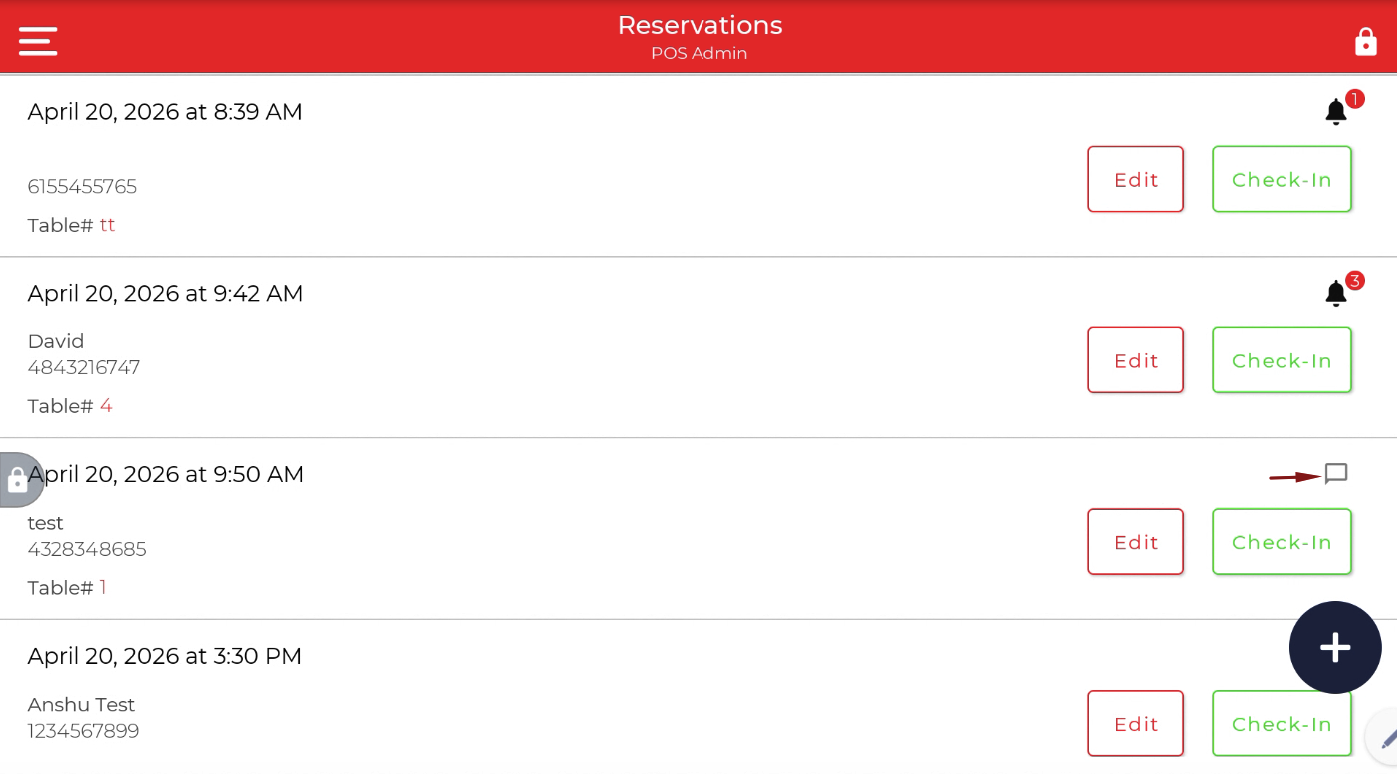
Text to customer when clicking the message button:
Hello David, your reservation is confirmed in Cafe / Coffee Shop at 9:42 AM on 04/20/2026, we are waiting to serve you at table 4.

Text to customer when clicking the Bell (reminder) button:
Hello David, you have table reserved for Cafe / Coffee Shop at 9:42 AM on 04/20/2026.
| ENHANCEMENT |
|---|
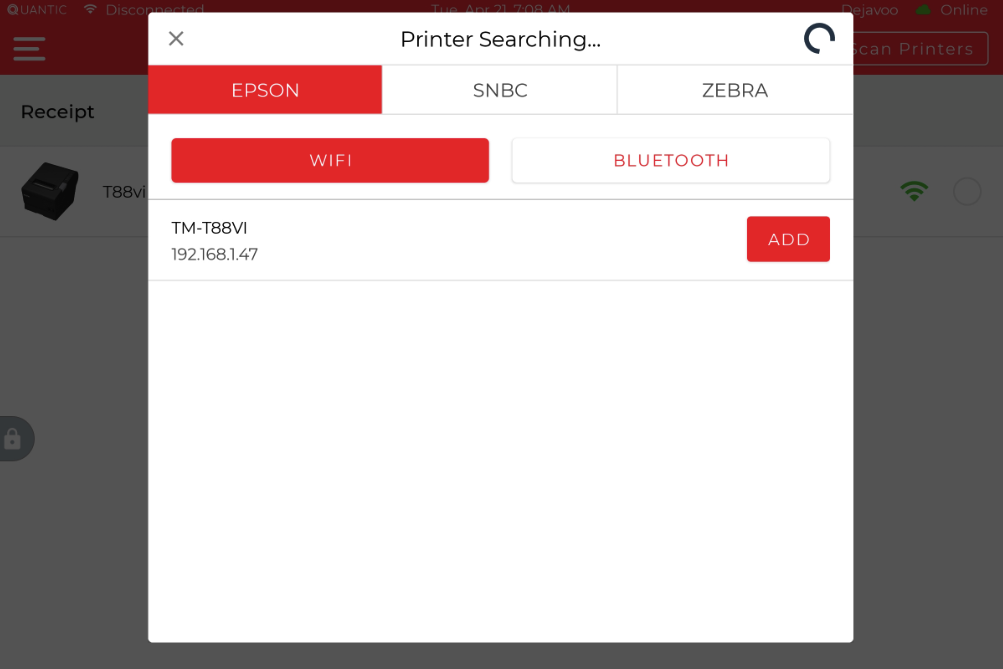
POS Printer Support Update
Unwanted printer models have been removed from the POS printer list. Only the following printer brands are now supported:
- SNBC
- Epson
- Zebra
Note: Merchants using Star printers can continue to use them without any impact.
| ENHANCEMENT |
|---|
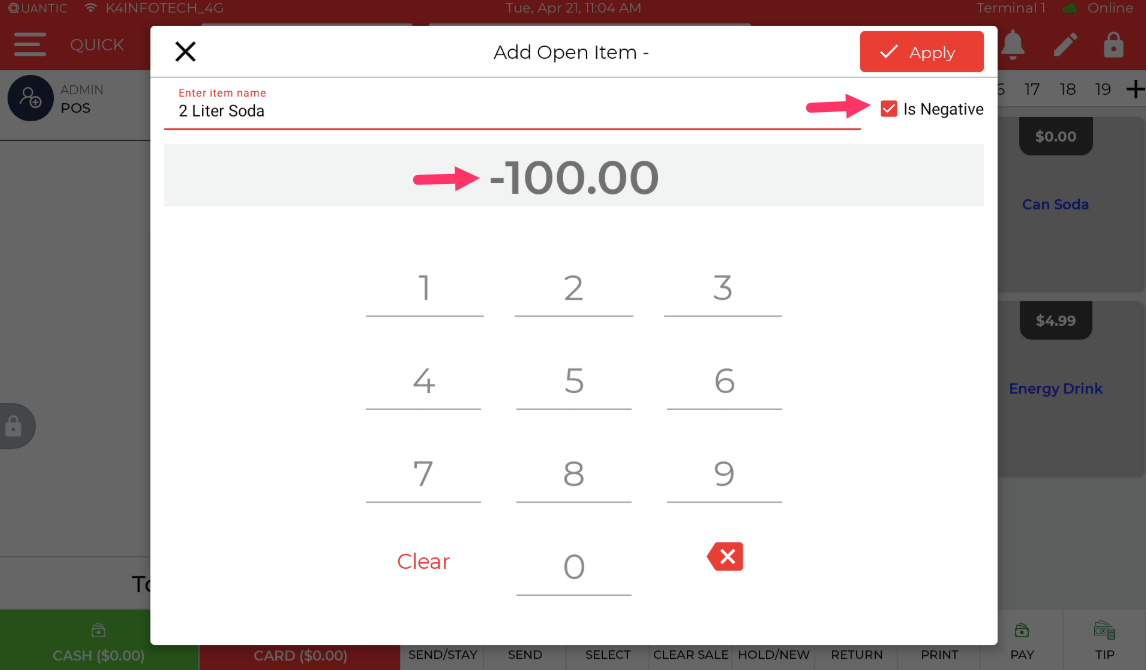
Ability to set up the Negative open item
You can now configure and add negative open items directly from the POS.
Setting:
- Enable Negative Open Item (Default: Off)
How it works:
- When enabled, an “Is Negative” checkbox appears in the Add Open Item pop-up
- Select the checkbox to apply a negative price to the open item
- Leave it unchecked to add a regular priced open item
- Click Apply to add the item to the cart
| ENHANCEMENT |
|---|
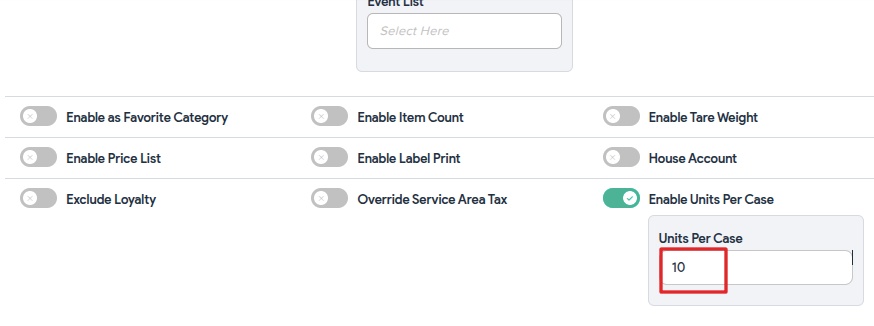
Sell Items as Cases with Units per Case
You can now configure items to be sold as cases by defining the number of units per case at the item level.
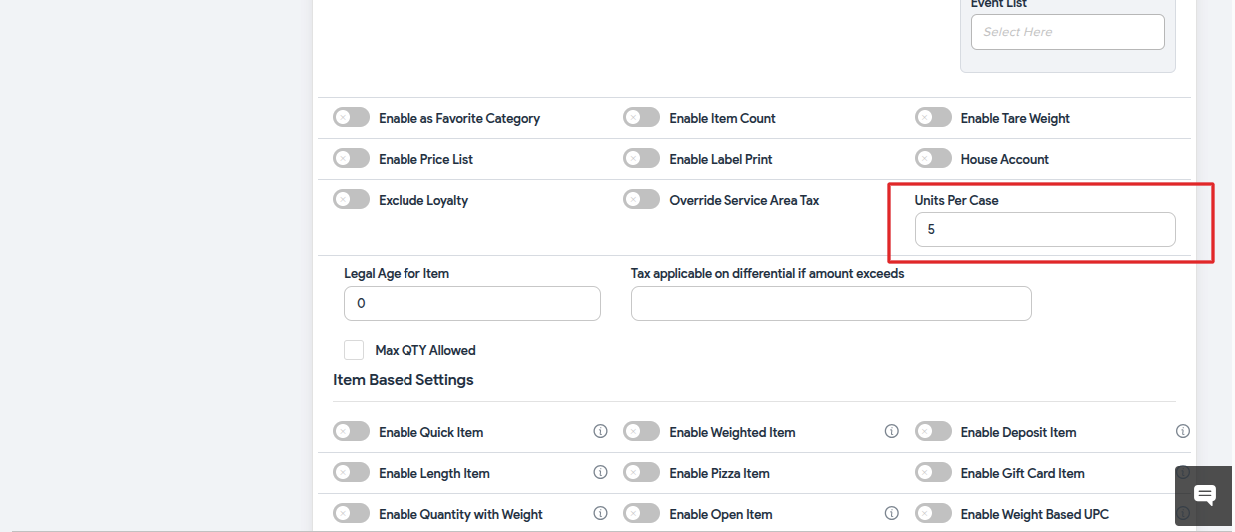
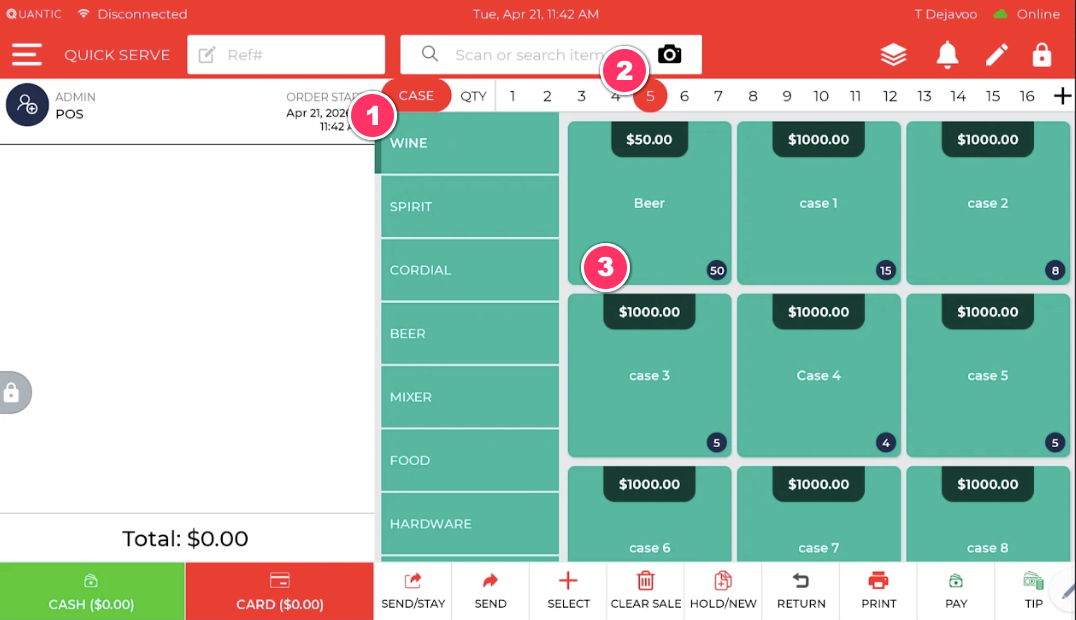
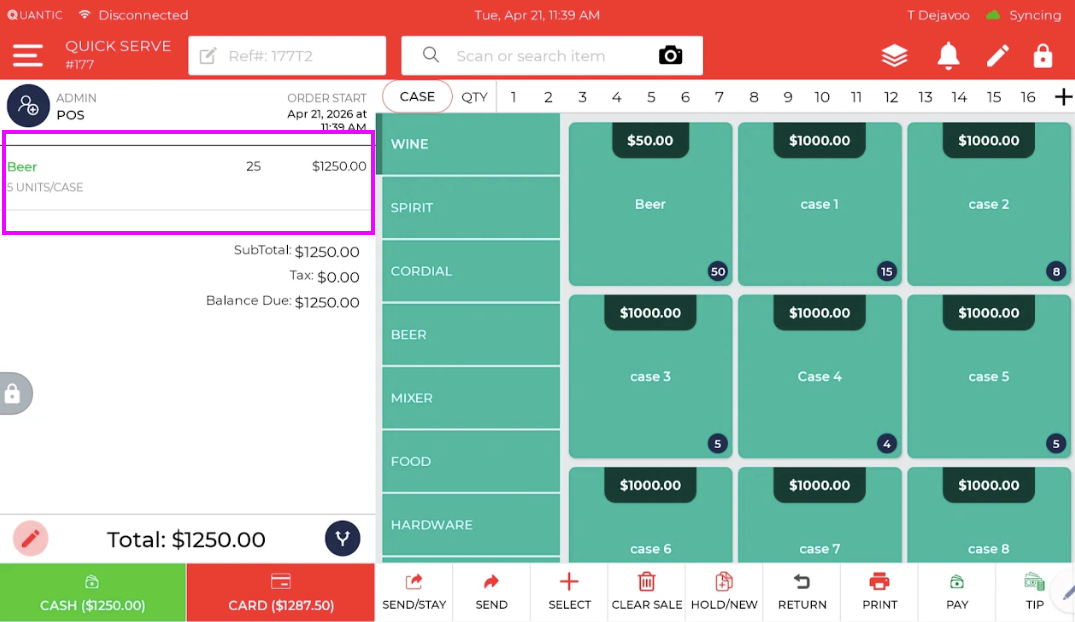
Setting:
- Enable Unit Per Case (Default: Disabled)
How it works:
- When enabled, a Units per Case field appears in the item settings
- The Case option is added to the quantity bar on the POS
Example:
To sell a Beer case with 5 units per case:
- Go to the portal > select Item > Settings
- Enter 5 in the Units per Case field and click Save
- On the POS, select Case and choose quantity 5
- Add the item to the cart
- This will add 25 units (5 cases × 5 units per case) to the cart.
- You can still sell the item as a single unit if needed.
Note: Units per case can only be configured at the item level, not at the category level.
| ENHANCEMENT |
|---|
More control on loyalty earn and redemption
You now have more control over what items to earn loyalty from and what items you can buy using loyalty.
-
Exclude items from Loyalty program: Items or the entire category can now be excluded from the loyalty program. Loyalty will not be earned or redeemed on these items.
- Setting based – Added a setting at the item and category level called “Exclude Loyalty”.
- When enabled, the loyalty rule will not apply to such items. So you will not be able to buy these items using loyalty, nor can you earn the points when these items are sold.
-
Exclude Gift Card payments from Loyalty: Now you can prevent customers from earning loyalty points from the orders sold via Gift Card.
- Setting based – A new setting has been introduced, “Exclude loyalty from gift card redeem”.
- When enabled, the customers cannot earn points when paying via Gift Card.
| ENHANCEMENT |
|---|
Epson USB T88Vi Supported
Added support for the Epson T88VI USB receipt printer. You can now connect it to your Android POS via USB and start printing receipts seamlessly.
 |
|---|
| Epson USB T88Vi |
| ENHANCEMENT |
|---|
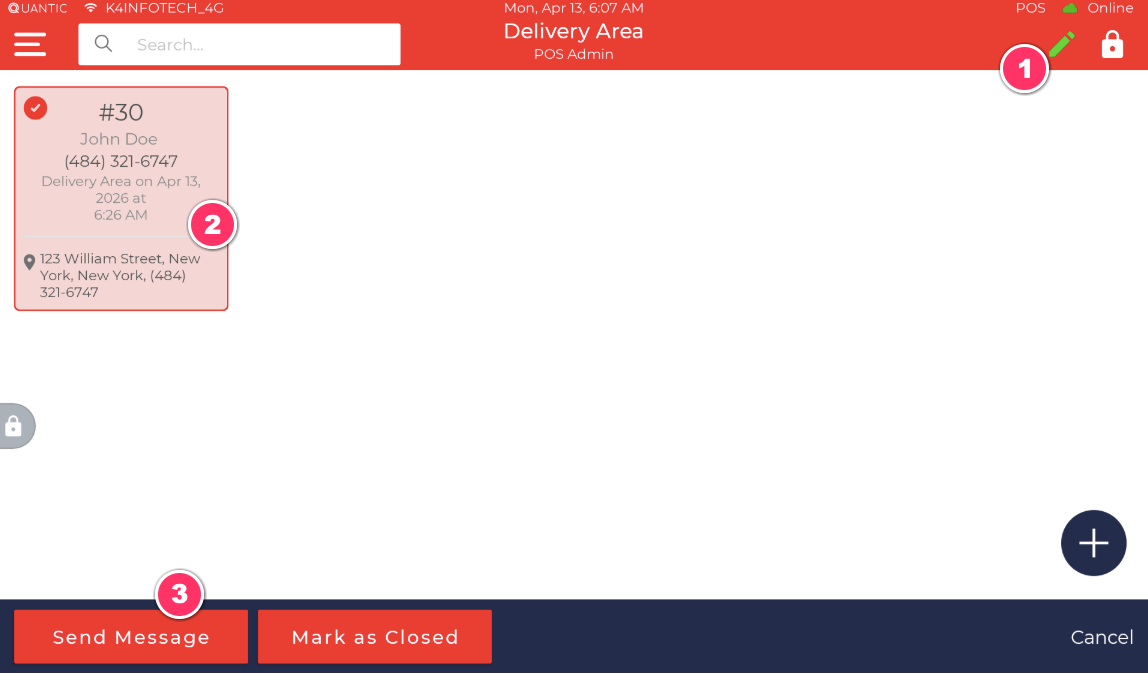
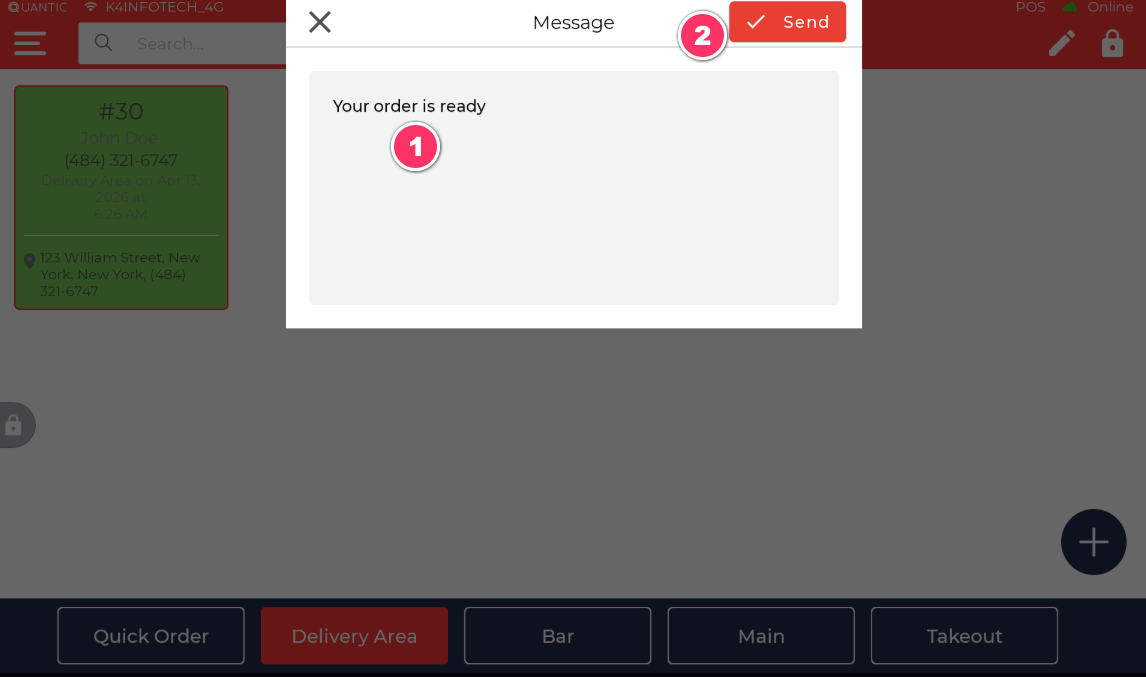
Order Ready notification via Text
Introduced the Send Message feature in the Delivery service area, allowing you to notify customers via text when their order is ready for delivery.
How to send an order-ready message:
- Go to the Delivery service area.
- Click the Pencil icon at the top.
- Select the delivery order.
- Click the Send Message button.
- Enter your message (e.g., “Your order is ready”) and click Send.
 |
|---|
| Order Ready notification via Text |
 |
|---|
| Order Ready notification via Text |
| ENHANCEMENT |
|---|
The single item shows 0 when split and sent to the kitchen
Previously, when a single item was split into multiple checks and sent to the kitchen, the item quantity was displayed as 0. This issue has now been addressed with a new setting:
Setting:
- Combine Split Items On Ticket
How it works:
- When enabled, split items are merged into a single line item on the kitchen ticket
- This ensures the correct quantity is displayed instead of 0
Limitations: The quantity may still display as 0 for single split items in the following scenarios:
- Hold/Send actions
- Course-wise fire
- When selecting a single item and sending it to the kitchen
| ENHANCEMENT |
|---|
More control on loyalty earn and redemption
You now have more control over what items to earn loyalty from and what items you can buy using loyalty.
-
Exclude items from Loyalty program: Items or the entire category can now be excluded from the loyalty program. Loyalty will not be earned or redeemed on these items.
- Setting based – Added a setting at the item and category level called “Exclude Loyalty”.
- When enabled, the loyalty rule will not apply to such items. So you will not be able to buy these items using loyalty, nor can you earn the points when these items are sold.
-
Exclude Gift Card payments from Loyalty: Now you can prevent customers from earning loyalty points from the orders sold via Gift Card.
- Setting based – A new setting has been introduced, “Exclude loyalty from gift card redeem”.
- When enabled, the customers cannot earn points when paying via Gift Card.
| ENHANCEMENT |
|---|
Order Ready notification via Text
Introduced the Send Message feature in the Delivery service area, allowing you to notify customers via text when their order is ready for delivery.
How to send an order-ready message:
- Go to the Delivery service area.
- Click the Pencil icon at the top.
- Select the delivery order.
- Click the Send Message button.
- Enter your message (e.g., “Your order is ready”) and click Send.
 |
|---|
 |
|---|
- Sell Items as Cases with Units per Case
- Bulk Quantity Update via Quantity Bar
- Calculate Gratuity Post Tax
- Penny Elimination (Nickel Rounding) for Cash Transactions
- Printer Section Enhancements
- Bar Tab Improvements
ENHANCEMENT
Sell Items as Cases with Units per Case
You can now configure items to be sold as cases by defining the number of units per case at the item level. When enabled, selecting the item on the POS prompts for the number of cases, and the total quantity is automatically calculated (e.g., 2 cases × 10 units = 20 units). Items can still be sold as single units if required. For example, if you want to sell a Beer case with 10 units per case, follow these steps:
- Go to the portal and create a Beer item.
- Open the Settings section for the Beer item.
- Enable the Units Per Case option.
- Enter 10 in the units field and click Save.
Once enabled:
- Every time you select the Beer item on the POS, a popup will prompt you to enter the number of cases.
- For example, if you enter 2 cases, a total of 20 units (2 × 10) will be added to the cart.
Additionally, the Beer item can still be sold as a single unit if needed.
 |
|---|
| Units per case setup from backend |
 |
|---|
| Numbe of case selection |
 |
|---|
| Item sold as a Case |
Note: Unit per cases can only be setup at the item level and not the category level.
ENHANCEMENT
Bulk Quantity Update via Quantity Bar
Introducing the ability to update item quantities in bulk using the Quantity Bar. Users can select a desired quantity and apply it to an existing item in the cart by clicking on the item name, enabling faster and more efficient quantity adjustments. Quick steps.
- Ensure the item is already added to the cart (e.g., quantity = 10).
- Select the desired quantity from the Quantity Bar (e.g., 20).
- Click on the item name in the cart to update its quantity to the selected value.
 |
|---|
| Updating Qty via Qty Bar |
| ENHANCEMENT |
|---|
Calculate Gratuity Post Tax
You can now configure gratuity to be calculated on the post-tax order total.
- Setting: Enable Post Tax Gratuity
- Default: Off
When disabled, gratuity is calculated on:
- Subtotal + Item-Level Extra Charges − Discounts
When enabled, gratuity is calculated on:
- Subtotal + Item-Level Extra Charges − Discounts + Tax
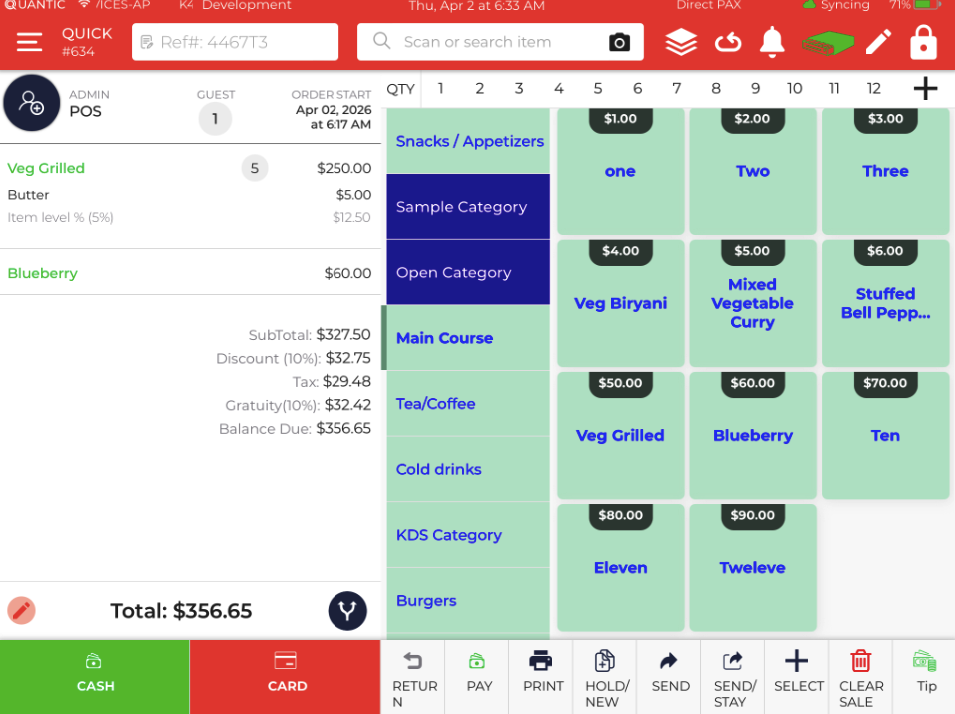
Example,
- Subtotal after discount = $294.75
- Tax @ 10% = $29.48
- Subtotal + Tax = $324.23
- Gratuity @ 10% = $32.42
- Final tota = $356.65
| ENHANCEMENT |
|---|
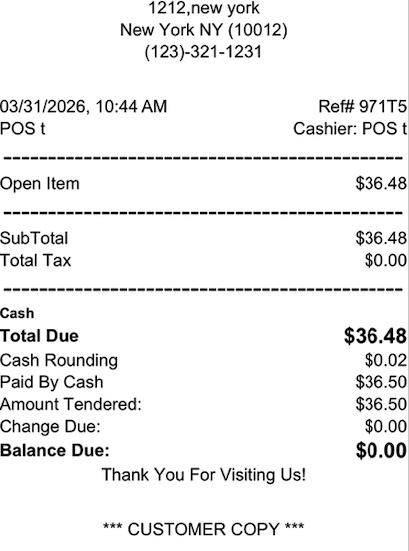
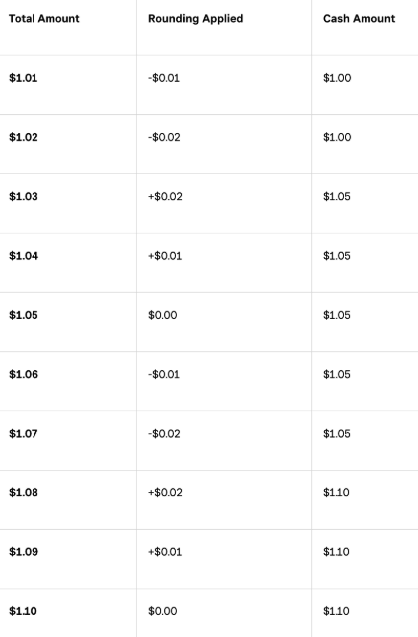
Penny Elimination (Nickel Rounding) for Cash Transactions
To comply with new regulations eliminating pennies from cash transactions, a nickel rounding feature has been introduced.
-
Setting: Enable Nickel Rounding
- Default: Disabled
- When enabled, cash transactions are rounded to the nearest $0.05.
-
Rounding logic:
- $1.01–$1.02 → $1.00
- $1.03–$1.07 → $1.05
- $1.08–$1.10 → $1.10
-
Setting: Show Nickel Rounding Line Item
- Default: Disabled
- When enabled, a separate “Cash Rounding” line item is displayed for adjustments made during rounding.
- Example: If the order total is $36.48, the payable amount becomes $36.50, and a $0.02 Cash Rounding line item is shown.
-
Available On
- POS Cash button
- Cash confirmation popups
- Cash change due
- Post-payment cart screen (with rounding line item)
- CDS Cash button
- Initial and final receipts
Note: Penny elimination is not yet supported on the Portal. While the rounded cash amount (e.g., $36.50) will be reflected, the Cash Rounding line item (e.g., $0.02) will not be displayed.
 |
|---|
| Penny elimination on cash transaction |
 |
 |
|---|---|
| Penny elimination on cash transaction | Penny rounding reference sheet |
| ENHANCEMENT |
|---|
Printer Section Enhancements
The following improvements have been made to the Printer section in the POS:
- UI Enhancements: Improved UI with better visual indicators. The WiFi icon now turns green when the printer is connected to the network.
- Duplicate IP Handling (SNBC): Fixed an issue where SNBC printers with the same IP address appeared multiple times in the list.
- Receipt Printing Indicator: Added a new indicator in the printer listing that turns green when a printer is enabled for receipt printing.
| ENHANCEMENT |
|---|
Bar Tab Improvements
The following enhancements have been made to the Bar tab service area;
- Tab name has now been repositioned to the top of the service area screen.
- Tab name has been made more prominent.
- Ref number has been added underneath the tab name
 |
|---|
| Bar Tab Improvements |
- Bulk Quantity Update via Quantity Bar
- Penny Elimination (Nickel Rounding) for Cash Transactions
- Printer Section Enhancements
Product Enhancements
ENHANCEMENT
Bulk Quantity Update via Quantity Bar
Introducing the ability to update item quantities in bulk using the Quantity Bar. Users can select a desired quantity and apply it to an existing item in the cart by clicking on the item name, enabling faster and more efficient quantity adjustments. Quick steps.
- Ensure the item is already added to the cart (e.g., quantity = 10).
- Select the desired quantity from the Quantity Bar (e.g., 20).
- Click on the item name in the cart to update its quantity to the selected value.
 |
|---|
| Updating Qty via Qty Bar |
| ENHANCEMENT |
|---|
Penny Elimination (Nickel Rounding) for Cash Transactions
To comply with new regulations eliminating pennies from cash transactions, a nickel rounding feature has been introduced.
- Setting: Enable Nickel Rounding
- Default: Disabled
- When enabled, cash transactions are rounded to the nearest $0.05.
- Rounding logic:
- $1.01–$1.02 → $1.00
- $1.03–$1.07 → $1.05
- $1.08–$1.10 → $1.10
- Setting: Show Nickel Rounding Line Item
- Default: Disabled
- When enabled, a separate “Cash Rounding” line item is displayed for adjustments made during rounding.
- Example: If the order total is $36.48, the payable amount becomes $36.50, and a $0.02 Cash Rounding line item is shown.
- Available On
- POS Cash button
- Cash confirmation popups
- Cash change due
- Post-payment cart screen (with rounding line item)
- CDS Cash button
- Initial and final receipts
Note: Penny elimination is not yet supported on the Portal. While the rounded cash amount (e.g., $36.50) will be reflected, the Cash Rounding line item (e.g., $0.02) will not be displayed.
 |
|---|
| Penny elimination on cash transaction |
 |
 |
|---|---|
| Penny elimination on cash transaction | Penny rounding reference sheet |
| ENHANCEMENT |
|---|
Printer Section Enhancements
The following improvements have been made to the Printer section in the POS:
- UI Enhancements: Improved UI with better visual indicators. The WiFi icon now turns green when the printer is connected to the network.
- Duplicate IP Handling (SNBC): Fixed an issue where SNBC printers with the same IP address appeared multiple times in the list.
- Receipt Printing Indicator: Added a new indicator in the printer listing that turns green when a printer is enabled for receipt printing.
- USB MSR Reader Support for Gift Card Transactions 0
- Split Check Enhancements
- Print all tendered payments on one receipt during Reprint
- Multiple discounts on Item/order
- Reference Number Enhancement
- UK – CID Easy Caller ID Device Supported
- Gratuity Permission Control
- Employee-Based Discounting
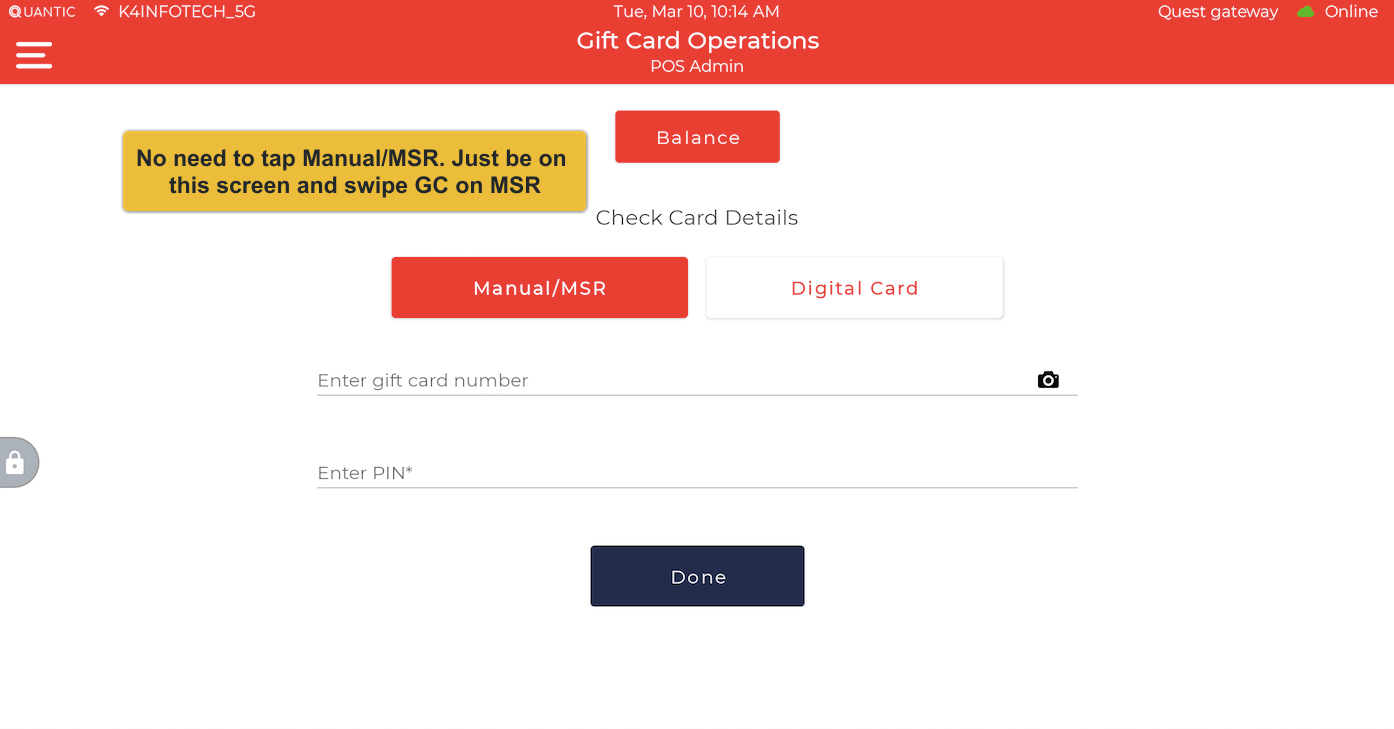
USB MSR Reader Support for Gift Card Transactions
The USB MSR Reader is now supported on the Android POS for swiping Gift Cards. You can perform the following Gift Card actions using the MSR reader:
- Gift Card Redeem
- Gift Card Balance Check
- Gift Card Issue
- Gift Card Reload
Workflow
- Plug the MSR reader into the POS using the Type-C port.
- The green light on the MSR reader will glow once it is successfully connected.
- Subscribe to the Gift Card module.
- Enable the setting – Enable MSR Swiped Gift Card. This will activate the Manual/MSR button on the Gift Card in the POS.
- Log in to the POS.
- Ensure that the Gift Card has already been uploaded to the location via CSV.
- Navigate to the Gift Card swipe screen.
- Simply swipe the Gift Card using the MSR reader.
- The POS will automatically read the card.
- There is no need to tap the Manual/MSR button on the POS.
Please note that the MSR reader is not applicable for Dejavoo and Pax gateways.
|
|
|---|
|
USB MSR Reader |
|
ENHANCEMENT |
|---|
Split Check Enhancements
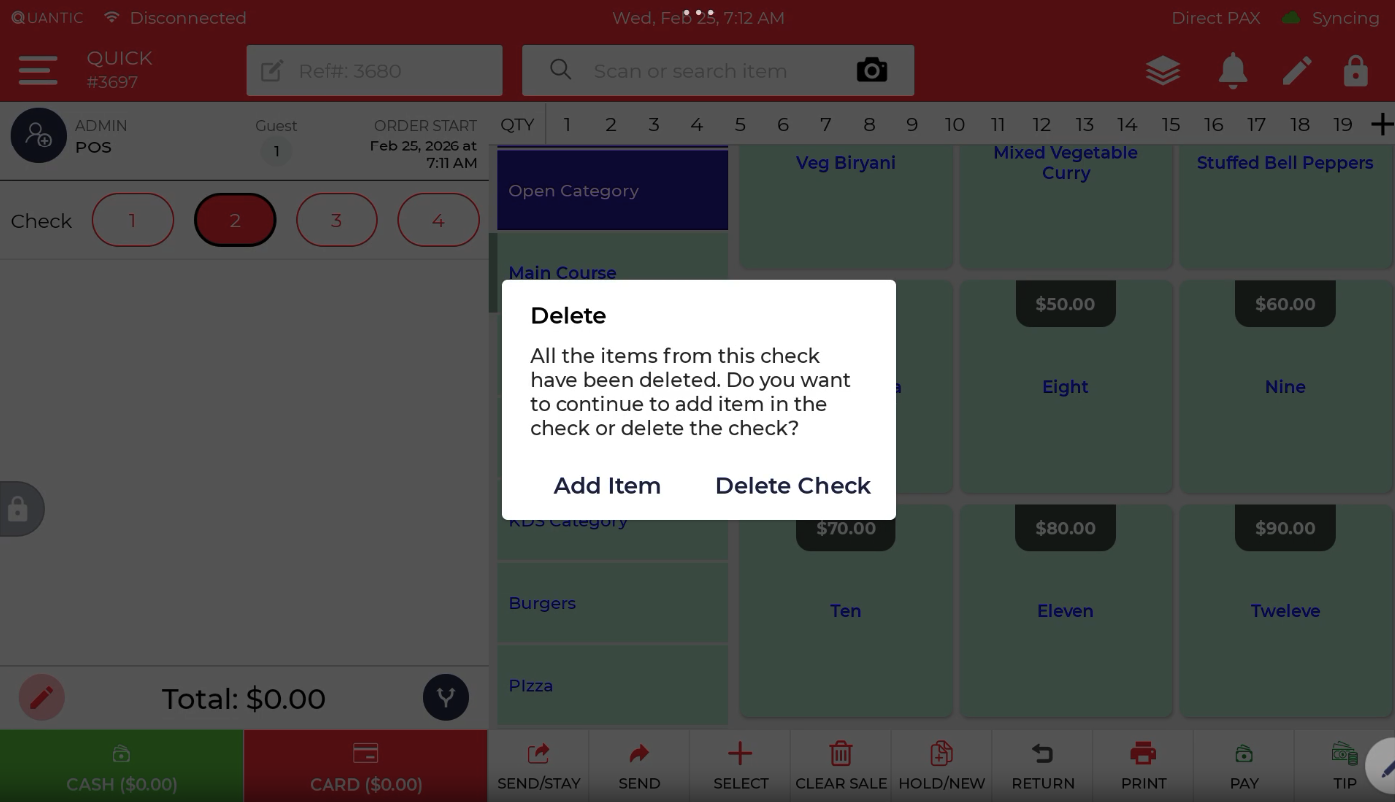
- Delete Check Pop-Up on Order Screen: After splitting a check, if all items are deleted from that check, a confirmation pop-up will appear asking whether you want to keep or delete the check.
- Add Item – Keeps the check open so you can add more items.
- Delete Check – Deletes the check if no further items need to be added.
- Delete Check Pop-Up on Split Screen: If all items are moved from a check to other checks, a pop-up will appear when closing the Split Screen stating: “Do you want to delete the empty checks?”
- Yes – Deletes the empty checks.
- No – Keeps the empty checks so you can add items to them later.
- Express Check Portal with Empty Checks: Previously, the Express Check portal could not be opened for empty checks. This restriction has now been removed. The Express Check portal can now be opened for an empty check, and a customer can be assigned to that check.
|
ENHANCEMENT |
|---|
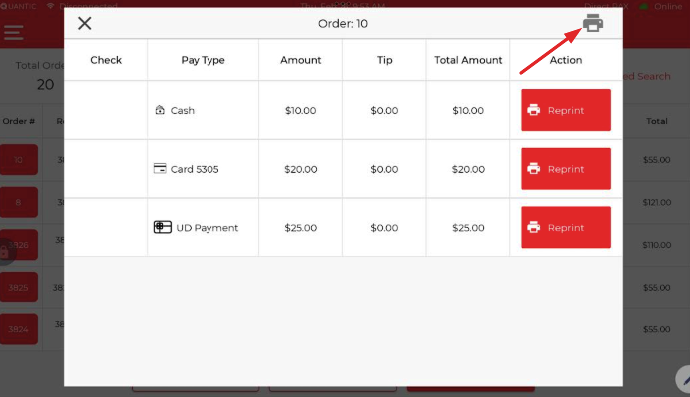
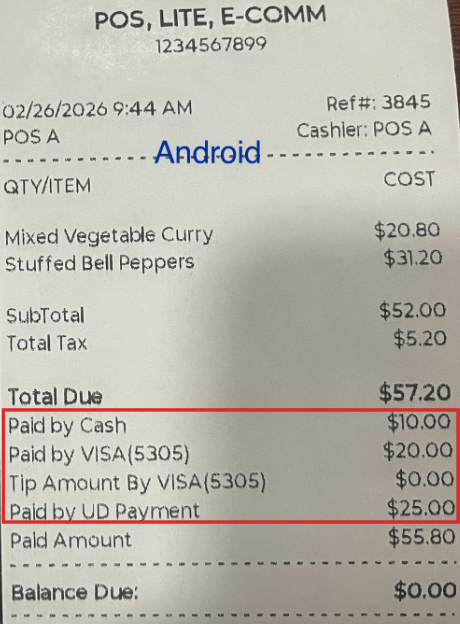
Print all tendered payments on one receipt during Reprint
Previously, when reprinting an order with multiple tendered transactions, separate receipts were printed for each tender type.
Now, we have enhanced this functionality by introducing a consolidated receipt. When clicking “Print All Transactions“, a single common receipt will be printed that includes all tender types.
|
ENHANCEMENT |
|---|
Multiple discounts on Item/order
Multiple discounts (Happy Hour + Standard Discounts) are now supported at both the item level and order level.
This enhancement allows merchants to apply multiple promotional offers to the same order, enabling greater flexibility in discounting and helping drive increased customer satisfaction and sales.

|
ENHANCEMENT |
|---|
Reference Number Enhancement
The reference number format in the POS app has been updated to include the terminal sequence as a suffix. The terminal sequence is determined by the terminal’s creation order in the CRM. The first created terminal will be labeled T1, the second T2, and so on.
Based on the terminal from which the order is placed, the corresponding terminal sequence will be appended to the reference number. This change will apply to all orders, improving order identification across multiple terminals.
Example: 343T1, 400T2.
|
ENHANCEMENT |
|---|
UK – CID Easy Caller ID Device Supported
Support for the CID Easy Caller ID device has been added for UK merchants. This device captures incoming caller information and automatically identifies the customer in the system when a call is received. By recognizing the caller’s number, the POS can quickly pull up the associated customer profile or order details, helping staff serve customers faster and streamline phone-based ordering.
|
ENHANCEMENT |
|---|
Gratuity Permission Control
A new control has been introduced to restrict which employees can apply or remove gratuity from an order.
By default, all employees can add or remove gratuity. To restrict this action for specific employees, enable the privilege “Disable Apply/Remove Gratuity.” Employees with this privilege enabled will not be able to apply or remove gratuity from orders.
|
ENHANCEMENT |
|---|
Employee-Based Discounting
Employee-based discounting allows only the eligible employees to apply a discount on the POS. Employee-level discount can be set up from the Portal. Here are the steps to set up:
- Setting based: Toggle on the Enable Employee-Based Discount.
- Default: Disabled. All of the employees will be eligible to apply for discounts.
- To apply the employee-based discounts – Go to the Employee > Access Management > Enable the “Allow Employee to Manage Employee Based Discounts”.
- Log out and log back in to the portal.
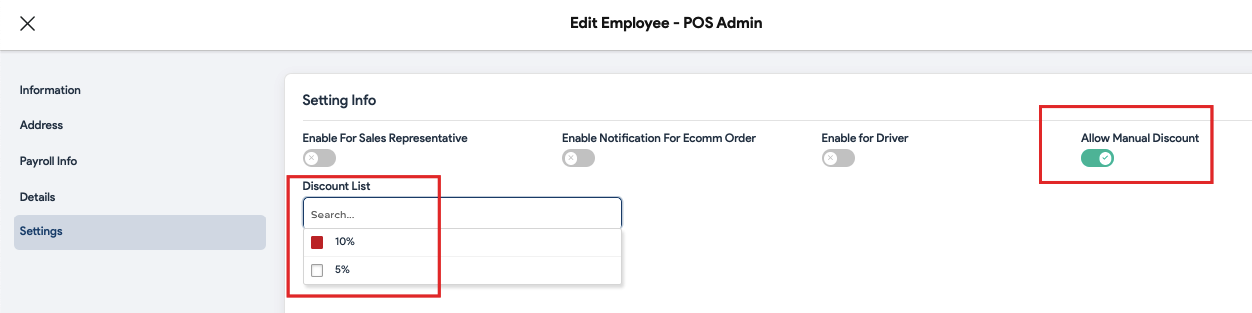
- Go to the Employee > Settings > Discount list. Here you can set up the discounts that the employee is eligible to offer.
- Check the screenshot, the employee is only ELIGIBLE to apply 10% discount and NOT the 5% discount.
- You can also allow the employee to offer the customer a discount manually.
- Introducing the Valor payment gateway
- Butterfly Label Format
- CDS Login Button Enhancements 3
- Quantity on Order on Item
- Bulk Transfer Closed/Open Order
- Dejavoo – Valutec Gift Card Tip Adjust
- Modifier Inventory Tracking
- Order and Payment Lock
- New Integration – COMO (POS + CDS)
Product Enhancements
|
ENHANCEMENT |
|---|
Introducing the Valor payment gateway
The Valor payment gateway has now been supported on your Android POS. Valor payment gateway can be set up from the Partner Portal.
Applicable Payment Mode
- Card Present
- Card Not Present
Features Supported for CP
- Transaction/Sale
- Refunds
- Partial Refund
- Full Refund
- Void (say day, before settlement)
- Tip Refund
- Tip Prompts
- Tip Adjustments
- Payment programs (Consumer Choice, Cash Discount, Surcharging)
- Batch Close (Auto or Manual from POS)
- EBT Payment
- Card on File
- Bar Tab
Features Supported for CNP
- Transaction/Sale
- Ecommerce
- Manual payments
- Invoicing
|
ENHANCEMENT |
|---|
Butterfly Label Format
Butterfly label formats are now supported on Zebra printers. This functionality is controlled by the Enable Butterfly Label Format setting. When enabled, butterfly labels can be printed directly via a Zebra printer.
|
|
|---|
|
Butterfly labels |
|
ENHANCEMENT |
|---|
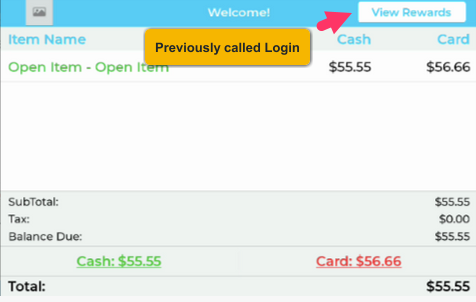
CDS Login Button Enhancements
- The Log In button is now replaced with View Rewards.
- The View Reward Points is now replaced with View Rewards.

|
ENHANCEMENT |
|---|
Quantity on Order on Item
Quantity On Order has been added at the item level. This can be managed either manually or based on Purchase Orders.
- Manual (default): Quantity On Order is an editable field and can be updated from Portal > Item > Inventory > Track Inventory > Qty on Order.
- PO-based: Quantity On Order is calculated from units on purchase orders that have not yet been received (fully or partially). This field is non-editable, as values are derived automatically from PO activity. To enable this behavior, turn on the Enable PO Based Quantity On Order setting.
|
ENHANCEMENT |
|---|
Bulk Transfer Closed/Open Order
You can now transfer closed or open orders in bulk from the respective Closed Orders and Open Orders sections on the POS. Orders can be transferred to the clocked-in employees only. Additionally, the online orders can also be transferred to another employee.
This is a privilege-based feature and can be disabled using the setting: “Disable Bulk Transfer Sale.”
|
|
|---|
|
Bulk Order Transfer |
|
ENHANCEMENT |
|---|
Dejavoo – Valutec Gift Card Tip Adjust
Tip adjustment is now supported for the orders paid via Valutec Gift Card. Below are the conditions for tip adjustments:
- Tip applied via Tip Prompts cannot be adjusted again.
- If the tip adjusted once already, the tip cannot be readjusted.
|
ENHANCEMENT |
|---|
Modifier Inventory Tracking
We’ve added Remaining Modifier Quantity to modifiers to help you easily track modifier inventory and restock as needed.
How to enable modifier inventory tracking
- Enable the Enable Modifier/Variant Inventory setting.
- The Track Inventory option will appear at the modifier level.
- Enable Track Inventory for the modifier.
- The Qty in Hand field will appear next to the modifier in the item–modifier association.
- Enter the modifier quantity in the Qty in Hand field.
- Modifier inventory will automatically be deducted when the modifier is sold with an item.
Note: Modifier inventory tracking is not supported for sub-modifiers.
|
|
|---|
|
Modifier inventory tracking |
|
ENHANCEMENT |
|---|
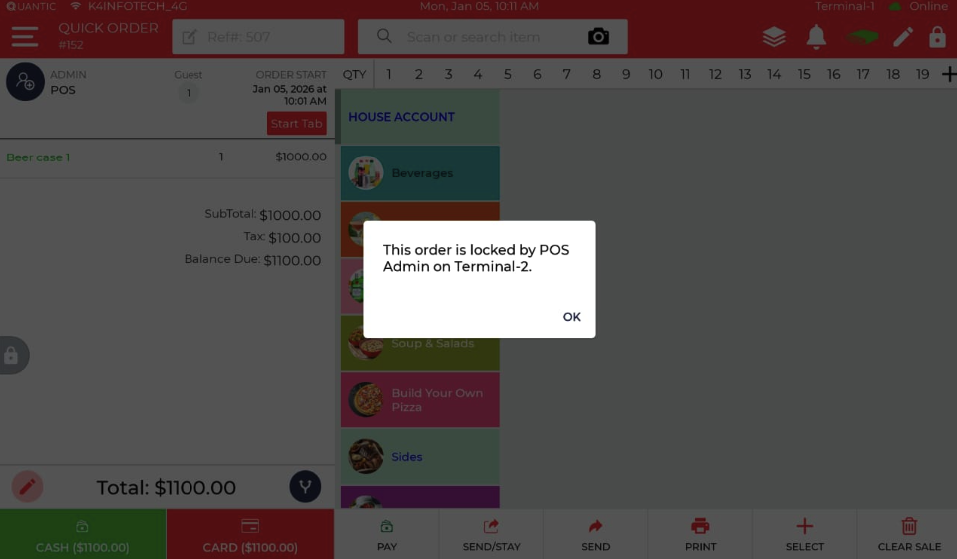
Order and Payment Lock
- Order lock:
- Controlled by the Enable Order Transaction Lock setting.
- When enabled, an order cannot be opened on another terminal if it is already open on one terminal by another employee.
- Payment screen lock:
- Controlled by the Enable Payment Screen Lock setting.
- When enabled, the payment screen (displayed when clicking Pay on the bottom bar) will be locked on other terminals if the order is already open on one terminal by another employee.
|
ENHANCEMENT |
|---|
New Integration – COMO (POS + CDS)
Introducing the COMO integration. A third-party loyalty module that allows you to pay with loyalty points. Customers already signed in to COMO can redeem their points to pay for the order on the POS or via CDS. Here are the quick steps to set up COMO.
- Subscribe to the COMO module from the backend portal.
- Now, log in to the POS.
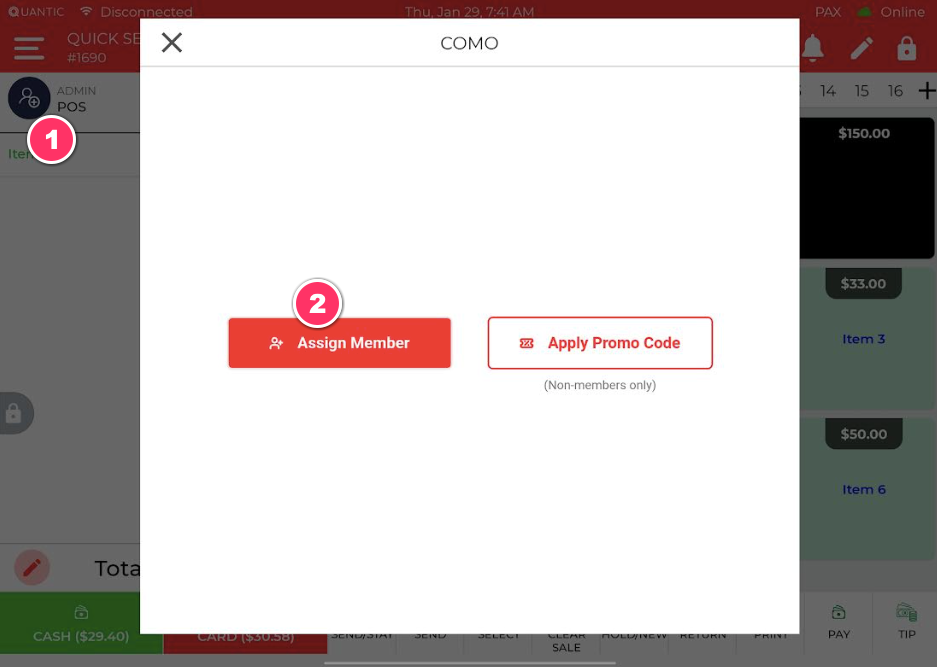
- Start an order and click the Customer icon.
- Click the Assign Member icon. You can then search for the member registered on COMO.
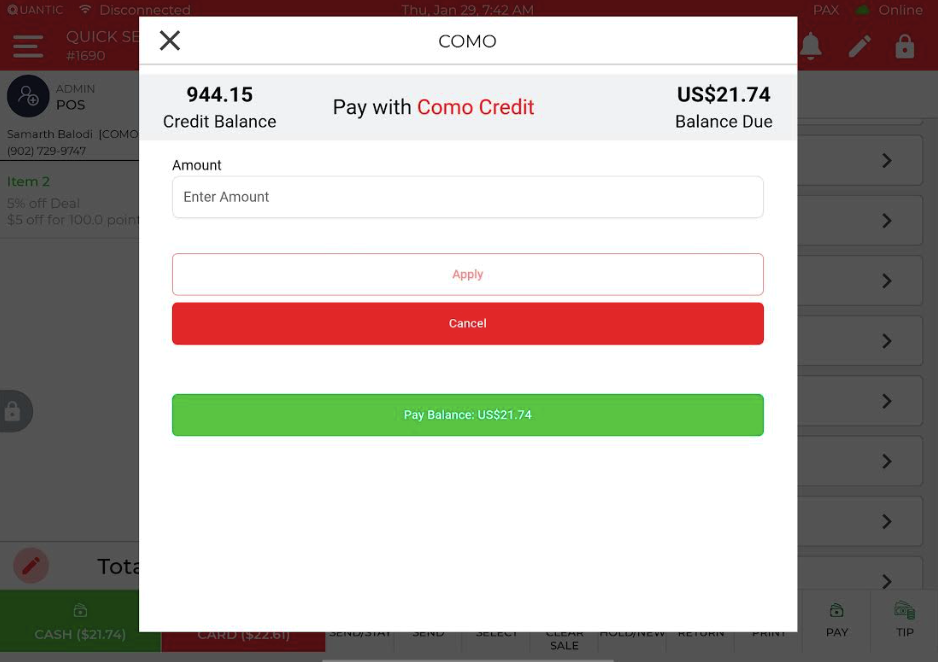
- The customer will then be attached to the order.
- Tap Pay (at the bottom bar), and click the COMO (user-defined payment gets added automatically once the COMO module is subscribed).
- Out of the balance loyalty points, you can redeem partial points and click Apply or you can pay entirely using COMO.
- The balance remaining (if any) can be paid via other payment methods.
Supported platforms:
- POS
- CDS
- Lock on Split
- Advanced Split Check Enhancements
- Restricted Item movement to another order
- Butterfly Labels for Zebra Label Printer
Product Enhancements
|
ENHANCEMENT |
|---|
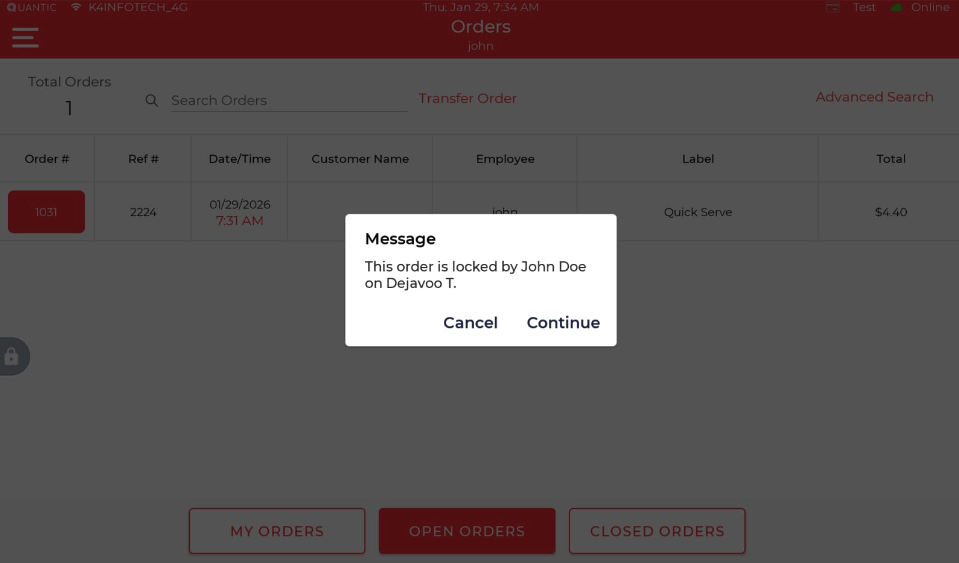
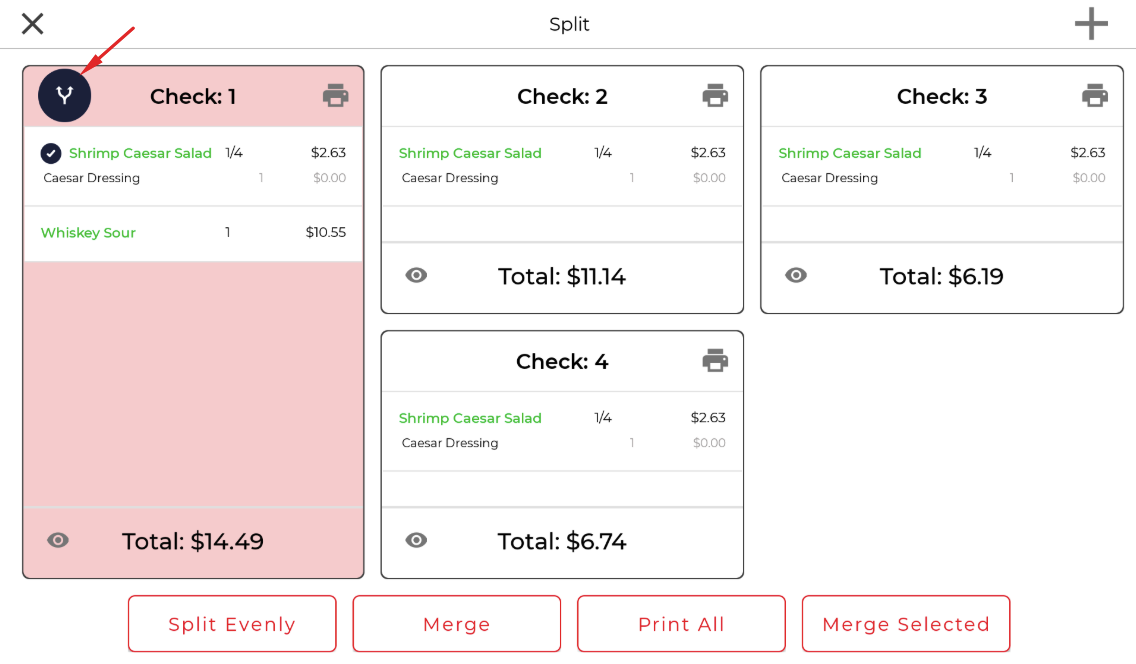
Lock on Split
Introducing the Split Lock on the POS. A check if split on one terminal, now cannot be triggered to split on another terminal. The Split lock will apply automatically with a pop-up displaying the name of the employee who locked it and on which terminal. An important point to note for Split Lock to work is that all the terminals should be online and in an active working state.
How the Spit Lock triggers:
- Say you have two terminals, Station 1 and Station 2, both are working on the same order.
- Now Station 1 opens an order on the screen and clicks on the split icon, a lock will get triggered from Station 1 to all stations.
- Now, since the split screen is open on Station 1 so Station 2 cannot split the order until the lock is released from Station 1.
- In this condition, Station 2 will see a message that the order is locked by an employee in some terminal.
How the Split Lock Releases:
- Station 1 closes the Split screen.
- Station 1 puts the application in the background or closes the app.
- Station 1 moves to a different order.
- Station 2 puts an application in the background.
|
ENHANCEMENT |
|---|
Advanced Split Check Enhancements
The “split item between checks button” has now been implemented for Advanced Split Check and Merge. Pressing the button will allow you to:
- Split the item between the checks.
- Or, transfer the items from one check to another.
|
ENHANCEMENT |
|---|
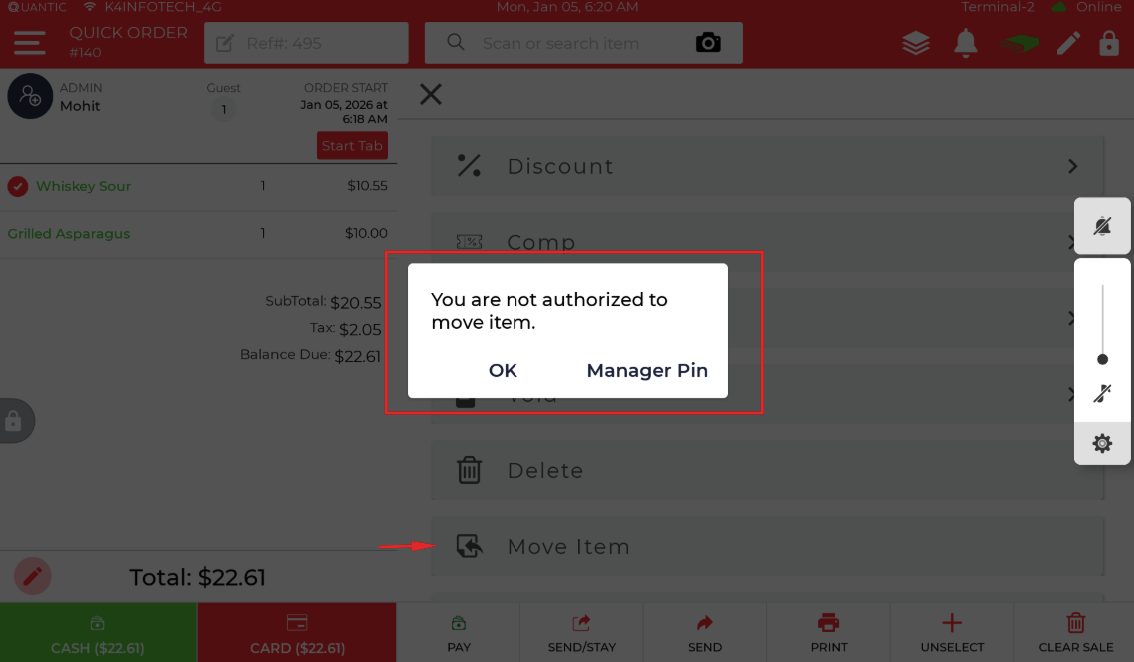
Restricted Item movement to another order
The “Disable move item to another order” privilege is now supported on the Android POS as well.
- Default: Disabled. Any user can move the item to another order from Select > select the item > Tap on Move Item > select the order to transfer the item to.
- When enabled, that employee will not be able to move the item to another order. Instead, the manager PIN will need to be input to move the item.
|
ENHANCEMENT |
|---|
Butterfly Labels for Zebra Label Printer
The Enable Butterfly Label Format setting is now implemented to print the butterfly labels from the Zebra printer.
- Setting name: Enable Butterfly Label Format
- Default: Disabled
- Differential Tax Applied When Item Exceeds a Specified Amount
- Ability to Add Additional UPCs from POS
- Ability to Add Additional Items Information from the POS
- Improvements in the Markup/Margin
- Dejavoo – Blind Return and Refund (without a check)
- Ability to remove the surcharge
- Disable Keyboard on Open Item Popup
- Mark Modifier Out of Stock
- Dejavoo CRM – Custom Fee for NCA from Partner Portal
- Dejavoo – Mark decline for fraud response
- Introducing a new Terminal Module for Magensa > Dynaflex
- Ability to Hide Location Address from Receipt
Product Enhancements
| ENHANCEMENT |
|---|
Differential Tax Applied When Item Exceeds a Specified Amount
We’ve introduced a new tax configuration that allows tax to be applied only to the amount exceeding a specified limit, rather than to the entire item total.
- A new text field – “Tax applicable on differential if amount exceeds” – has been added at both the category and item levels.
- When an item’s price exceeds the configured threshold, tax is applied only to the differential amount, not the full price.
This enhancement provides more accurate and flexible tax handling for items subject to conditional taxation.
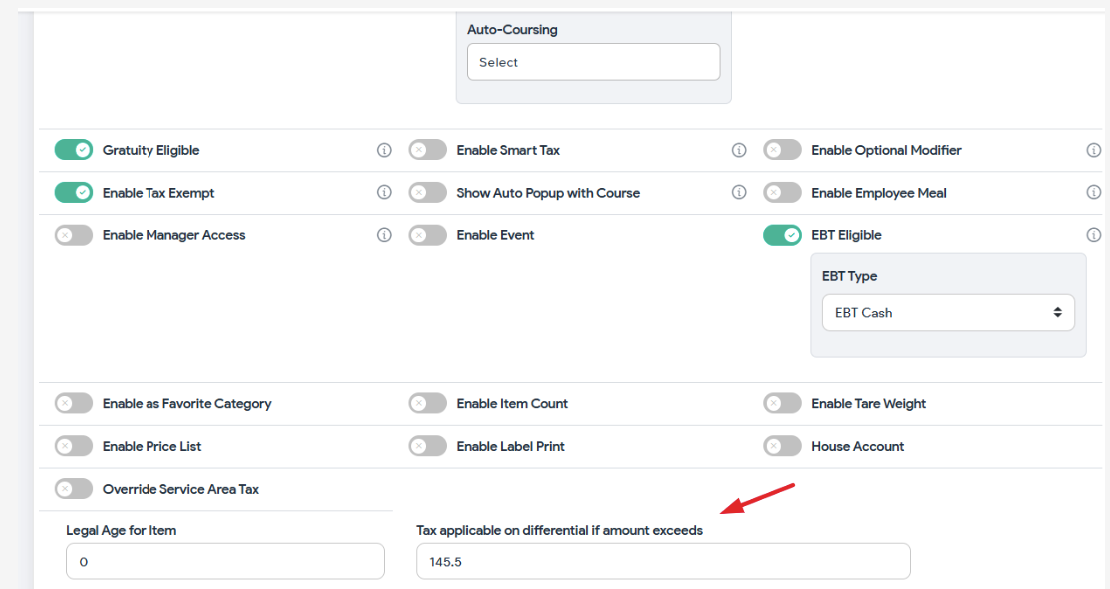
Example:
- If $175 is set in “Tax applicable on differential if amount exceeds” at a 6.25% tax rate:
- Item price: $300
- Threshold: $175
- Differential amount: $300 − $175 = $125
- Tax applied on differential: 6.25% of $125 = $7.81
- So, the tax on the $300 item will be $7.81, not on the full item amount.
Important points:
- Calculation is per item.
- This feature can be configured at both the category level and item level.
- The differential tax calculation occurs after modifiers, discounts, and item-level extra charges are applied.
- Any tax-exempt amount will appear in the Tax Exempt report.
| ENHANCEMENT |
|---|
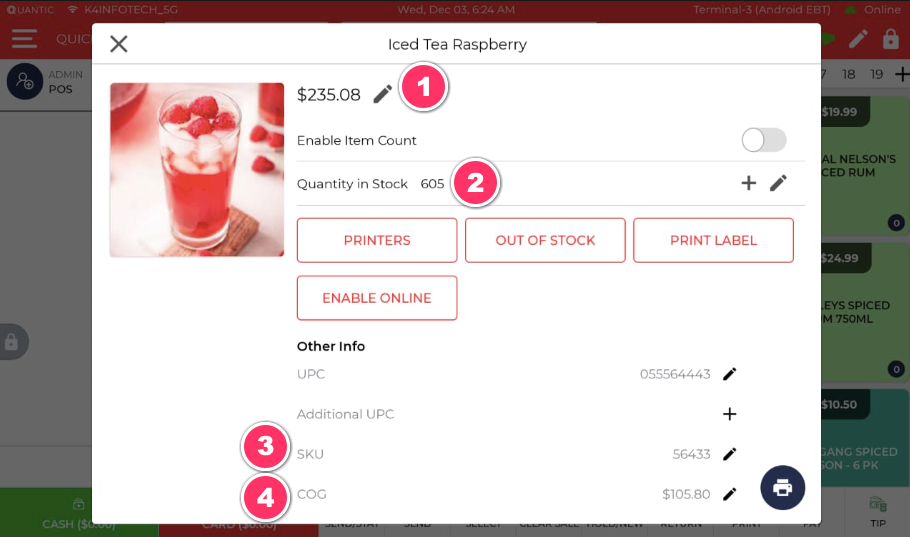
Ability to Add Additional UPCs from POS
You can now add the additional UPCs from the POS itself. But to see the Add button, you should have the item with at least the main UPC already added (which can be done in the Portal > Item > Inventory). From POS, you can:
- Edit the existing UPC.
- Add a new additional UPC.

| ENHANCEMENT |
|---|
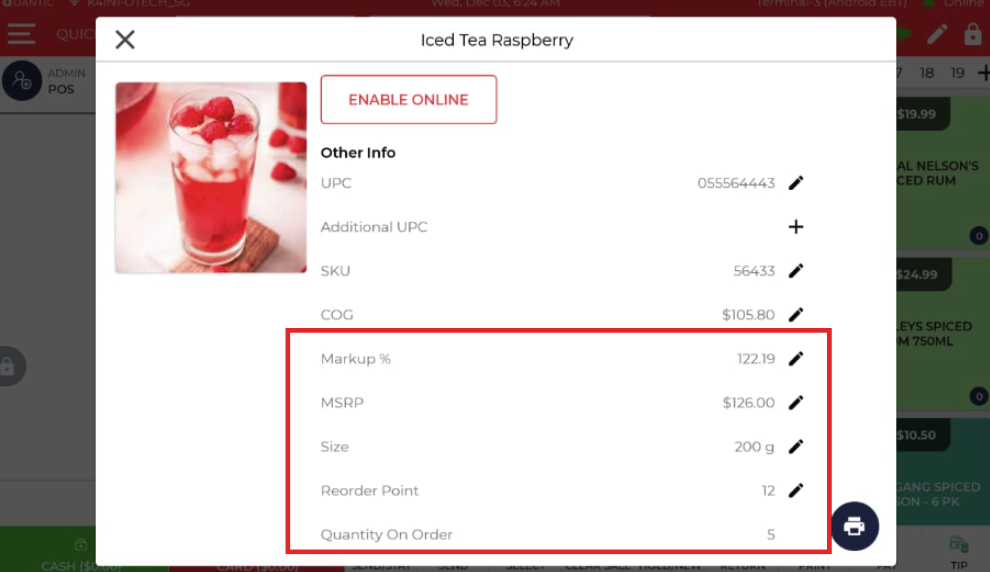
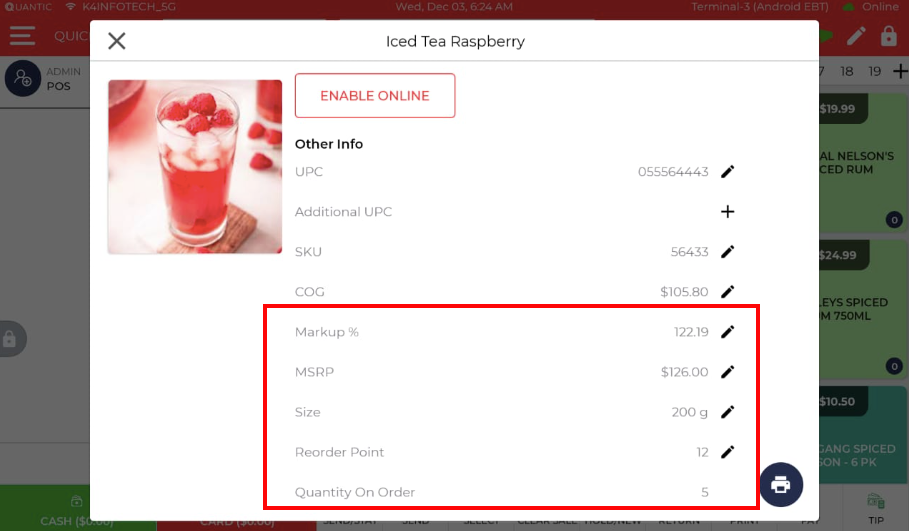
Ability to Add Additional Items Information from the POS
You can now add the additional item information from the POS. The additional information could be SKU, COG, Item size, reorder point, etc.
- Item Price – This is the item’s sale price, which can be added from the POS or the Portal.
- Qty In Stock – This is the in-stock item quantity. You can either add (using the + icon) the new quantity or edit (using the pencil icon) the existing quantity.
- SKU (Item’s unique identifier) – Can be edited from the POS. But initially, the new SKU needs to be added from the Portal > Item > Inventory > SKU.
- COGS (Cost of Goods) – It can be added from the Portal > Item > Details > COG. Can be edited from the POS.
- Markup/Markup – Profit margin % based on cost and sale price. The following rules have been defined to calculate the markup, COG, and sale price.
- When COG changes, the markup/margin will change.
- When the Item price changes, the markup/margin will change.
- When the markup/margin charges, the item price will change.
- MSRP – Manufacturer Suggested Retail Price. It needs to be added initially from the Portal > Item > Details > MSRP. Can be edited from the POS.
- Size (Item size) – Item size can be added from the Portal > Item > Setting > Add item size and select the unit (e.g., 750ml, 300ml, etc.). Can be edited from the POS.
- Reorder Point – Threshold quantity at which reordering is triggered. Can be added from the Portal > Item > Inventory > Reorder Point. Can be edited from the POS.
- Quantity On Order – Units on purchase orders but not yet received. This is a non-editable field as the Qty on order is calculated based on the item received via PO (full or partial).
| ENHANCEMENT |
|---|
Improvements in the Markup/Margin
We’ve found that the Markup was being wrongly called the Margin in the Portal and the POS. So now we have replaced Margin with Markup, however the calculation remains the same. Below is a way to calculate the Markup and Markup%:
Markup = Selling Price – COG
Markup % = (Markup / COG) × 100
In addition, we have added a new feature called Margin which will be calculated based on the Selling Price. Below is a way to calculate the Margin and Margin%:
Margin = Selling Price – COG
Margin % = (Margin / Selling Price) x 100
Default setup is Markup. You can set the Markup/Margin calculations using a setting – Show Profit Report Based On. The calculations will reflect on the Item section (POS and Portal) and the Profit Margin report.
| ENHANCEMENT |
|---|
Dejavoo – Blind Return and Refund (without a check)
We have added support for blind refunds on Dejavoo payment terminals. With this enhancement, you can now process a refund directly to a card on the POS without requiring a check or an associated order. This provides greater flexibility for situations where a refund needs to be issued without referencing a specific transaction.
How to trigger a return and a blind refund?
- Add an item to the cart that needs to be returned for a refund.
- Click the Return button on the bottom bar.
- Click the Refund button on the bottom bar.
- Select the Card from the list (the card option will only be available when your terminal is selected as Dejavoo)
- A blind refund request will be sent to the Dejavoo terminal.
- You can tap the different or the same card to get the refunded amount back.
| ENHANCEMENT |
|---|
Ability to remove the surcharge
Added new functionality that allows you to remove the consumer choice or NCA from an order. The Remove Surcharge button has been added to the Pay Screen, clicking on which will remove the consumer choice or NCA.
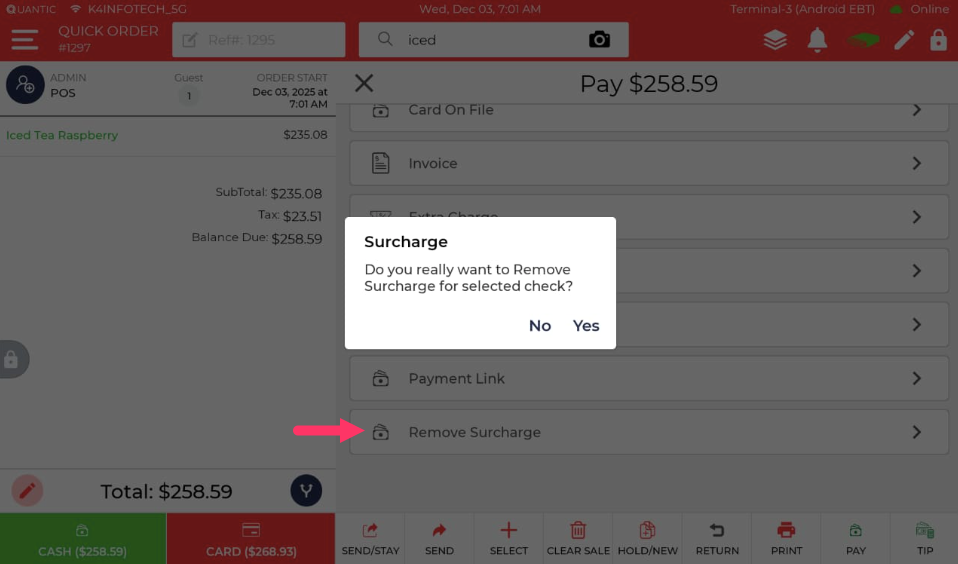
Setting-based: Enable Remove Surcharge on Pay
Default: Disabled.
By default, this setting will remain disabled; merchants can enable it to see on the Pay screen.
| ENHANCEMENT |
|---|
Disable Keyboard on Open Item Popup
The keyboard can now be disabled on the Open Item pop-up. This will help the merchant add an Open Item to the cart without seeing the keyboard.
Setting-based: Keyboard On Open Item Popup
Default: Enabled.
By default, this setting will remain enabled, so merchants will see the keyboard always on the Open Item. However, you can disable the keyboard by turning off this setting.
| ENHANCEMENT |
|---|
Mark Modifier Out of Stock
We have a new functionality where you can mark any modifier out of stock at the item level from the POS. You can long-press the modifier to mark it out of stock for an item. Below are the details:

- Privilege-based feature: The employee should have the Allow Item86 privilege enabled to be allowed to mark the modifier out of stock.
- Modifier will only be out of stock for a specific item where you have marked it 86.
| ENHANCEMENT |
|---|
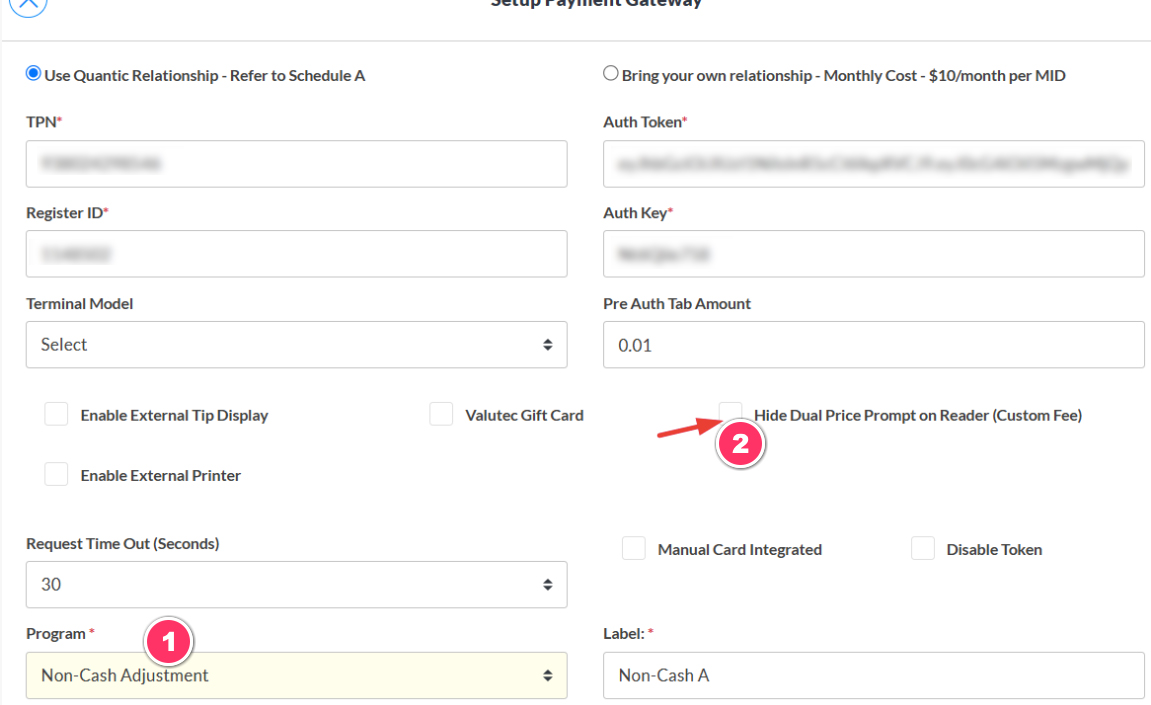
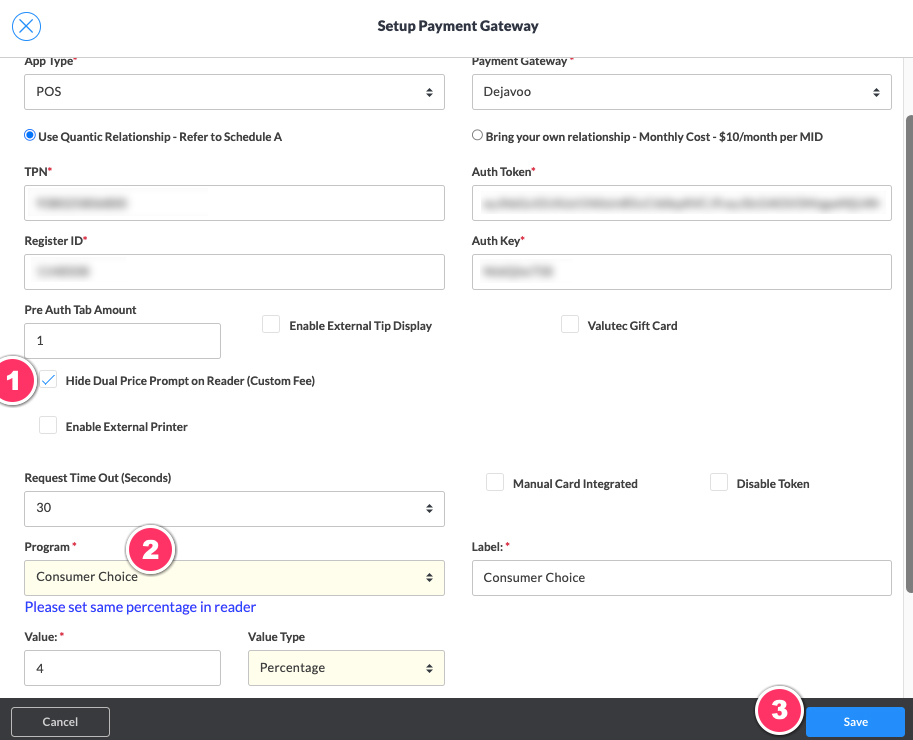
Dejavoo CRM – Custom Fee for NCA from Partner Portal
Custom Fee (Dejavoo) can now be set up with Non-Cash Adjustment from the CRM. To set up the Custom Fee on Dejavoo, merchants will need to enable the following two settings from the CRM:
- Set up the Consumer Choice/Non Cash Adjustment (in Program)
- Enable Hide Dual Price Prompt on Reader (Custom Fee)
Also, please make sure that the Custom Fee is set up in the Dejavoo backend portal.
| ENHANCEMENT |
|---|
Dejavoo – Mark decline for fraud response
In the event of a fraudulent card use on the Dejavoo terminal, we used to get a Hold response from the gateway, and this response keeps hanging in a loop if we try to hit the card button on the POS to pay for the order.
To fix this, we have introduced a new setting called – Mark transaction declined due to fraud alert. When this setting is enabled, we will decline the fraud transaction attempt, and clicking the card button will initiate a new transaction.
| ENHANCEMENT |
|---|
Introducing a new Terminal Module for Magensa > Dynaflex
The Dynaflex terminal model has now been supported for the Magensa payment gateway. Dynaflex will only appear for the Magensa payment gateway and can be set up from the Partner Portal – Station > for Magensa Payment Gateway > Terminal Model (Dynaflex).
Applicable Payment Mode
- Card Present
Features Supported
- Transaction/Sale
- Refunds (Partial/Full)
- Tip Prompt
- Tip Adjusts
- Payment programs (Surcharging, Consumer Choice, No Program)
- Bar tab (pre-auth)
- Card on File
- Manual Batch Close
- Supported on Dynaflex Go.
- Dynaflex PED – Under development
| ENHANCEMENT |
|---|
Ability to Hide Location Address from Receipt
Merchants can now hide the location address from the initial or final receipts. We have added a few new settings to support this feature:
- Hide Location Address On Receipt: This hides the location address from top of the initial receipt.
- Hide Location Detail For Customer Copy: This hides the location’s address from the final customer receipt copy.
- Hide Location Detail For Merchant Copy: This hides the location’s address from the final merchant receipt copy.
- Void Alert Notification
- EBT Split Check – Food and Cash
- Kitchen Ticket Enhancements
- Membership ID Added in Customer Management
- Minimum Signature Amount Supported for CDS
- Ability to add multiple items at once to a position
- Initial Receipt Improvements for Dual Pricing
Product Enhancements
| ENHANCEMENT |
|---|
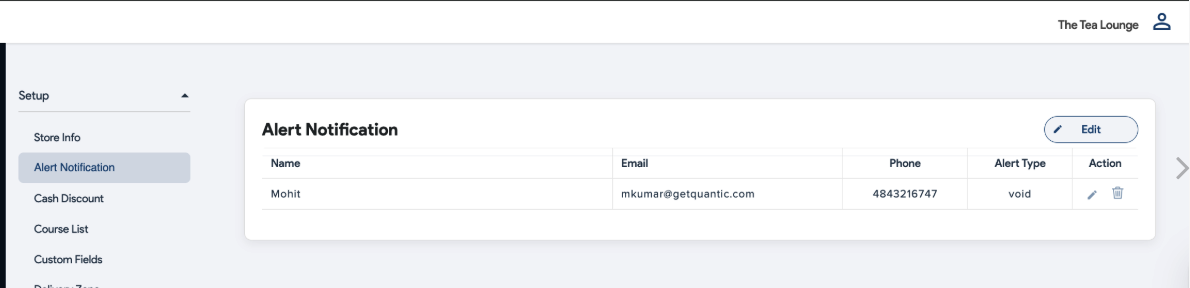
Void Alert Notification
The Void Alert Notification feature has been implemented on the Android POS. Whenever an item or order is voided, a notification email will be sent to the configured email address.
You can set up the recipient email address in the backend by navigating to:
Settings > Setup > Alert Notification > Add Email, then set the Alert Type to Void.
| ENHANCEMENT |
|---|
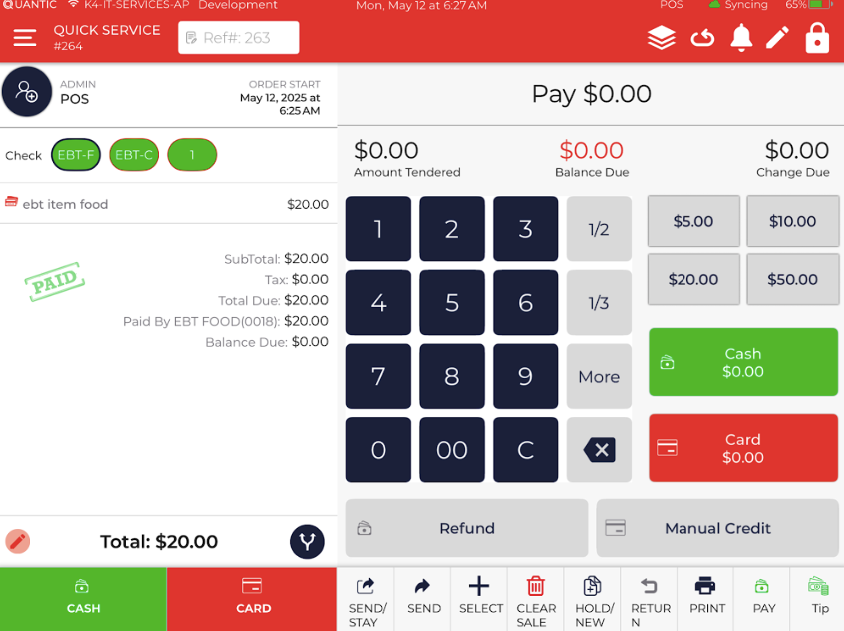
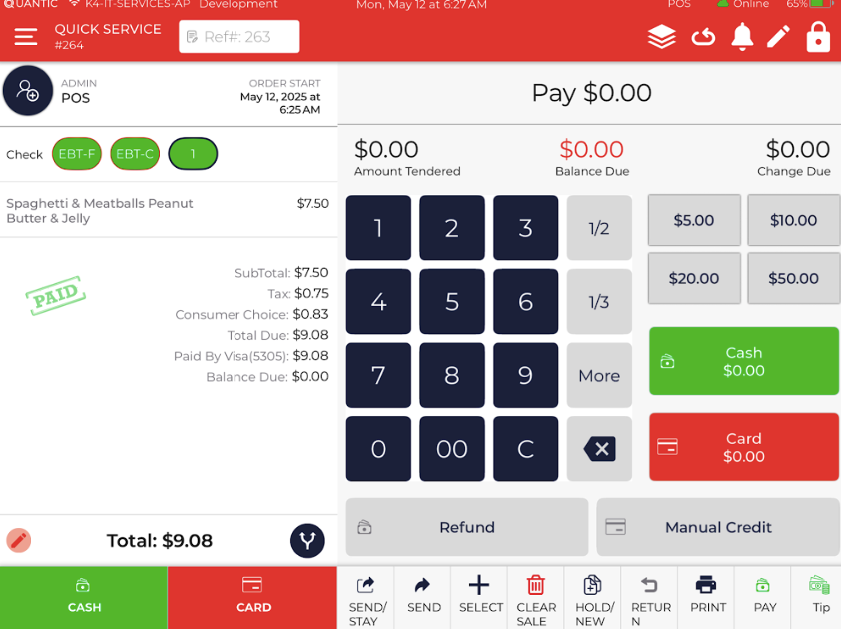
EBT Split Check – Food and Cash
EBT Split Check functionality has now been enhanced by adding the food and cash EBT options. Merchants can split the check based on item type, as EBT Food, EBT Cash, or a regular one.
- So if we have three items – Normal, EBT food, and EBT cash.
- Add all three items to the cart.
- Split the check.
- We will have three checks now > regular check, EBT-F, and EBT-C.
- Regular checks when paid will have the tax and surcharge applied to them (if applicable).
- EBT-F and EBT-C, when paid via EBT, will not have a surcharge or taxes applied to them.
 |
 |
|---|---|
| EBT food or cash check without tip and surcharge | Regular check with tip and surcharge |
| ENHANCEMENT |
|---|
Kitchen Ticket Enhancements
We have introduced a few enhancements to the Kitchen Ticket. Details are as follows:
- Resolved Overlap Issue: The overlap between the Table Number and Guest Count has been fixed.
- Adjustable Service Area Font Size: The font size for the Service Area can now be adjusted using the setting Ticket Service Area Font Size.
- Adjustable Item Name Font Size: The font size for Item Names can now be adjusted using the setting Ticket Item Name Font Height.
| ENHANCEMENT |
|---|
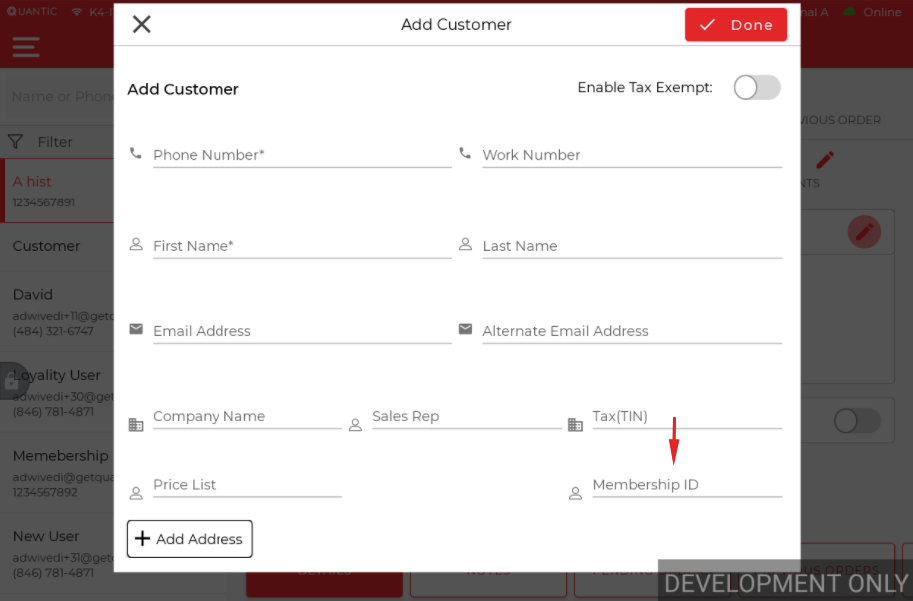
Membership ID Added in Customer Management
Customers can now be assigned a unique Membership ID, which can be used to search for and identify them in both the POS and the Portal.
| ENHANCEMENT |
|---|
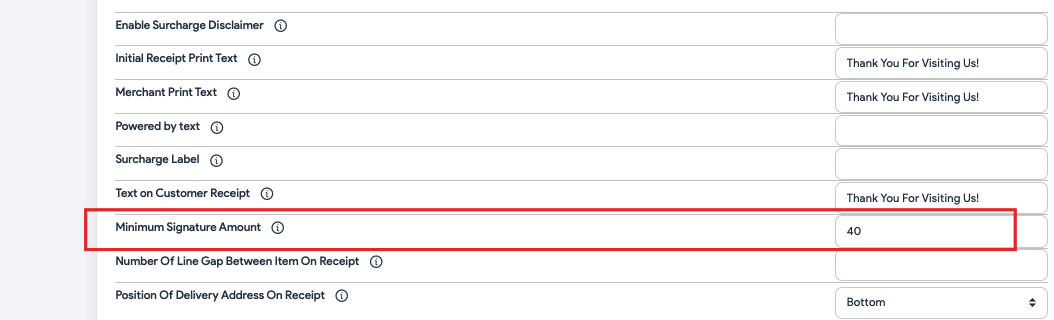
Minimum Signature Amount Supported for CDS
The Minimum Signature Amount setting is now supported on the CDS as well. The signature box on the CDS will appear only when the order amount exceeds the value specified in the Minimum Signature Amount field.
| ENHANCEMENT |
|---|
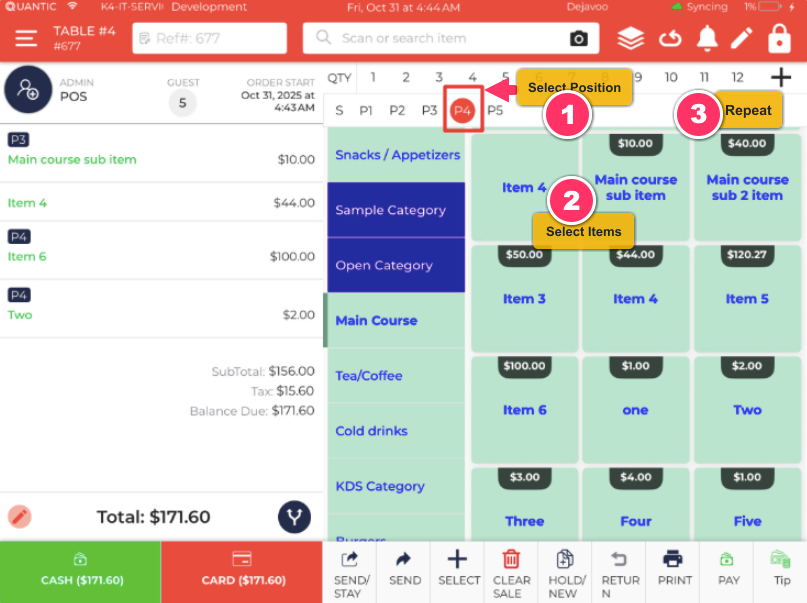
Ability to add multiple items at once to a position
You now have the ability to add multiple items to a position at the same time. This will eliminate the hassle of selecting the position every time while adding an item to the cart. You can select the position on the product screen and select the items from the catalog that need to be added to the cart. Items will be added to the chosen position. To add items to another position, just select the position and repeat the same steps. This is a configuration-based feature and has to be enabled using the setting – “Enable Position On Product Screen”.
 |
|---|
| Positioning on Product Screen |
| ENHANCEMENT |
|---|
Initial Receipt Improvements for Dual Pricing
We’ve introduced new options for the Initial Receipt under Dual Pricing to provide more flexibility in display preferences.
- Hide Card Price Column: You can now hide the Card Price column on initial receipts when using dual pricing. This ensures that only the Cash Price appears on the receipt.
Enable this feature using the setting Hide Card Price on Initial Receipt for Dual Pricing.
- Hide Cash/Card Total at the Bottom: You can also choose to hide the Cash or Card total (or both) at the bottom of the initial receipt.
Configure this using the Hide Cash/Card Total in Dual Pricing setting, which includes the following options:
-
- Show Cash Card: Displays both cash and card totals.
- Hide Cash Price: Hides only the cash total.
- Hide Card Price: Hides only the card total.
- Hide Cash/Card Price: Hides both cash and card totals.
 |
|---|
| Positioning on Product Screen |
- Added Group Discount Functionality
- Enterprise – Enhanced Menu Sorting for Child Locations
- Enterprise – Out of Stock & Item Count Management for Child Locations
- Promotional Price Display on Cart and Receipt
We are pleased to announce the release of the Android POS with new features, enhancements, and bug fixes. These features and fixes are live for all our customers and will revolutionize the way guests place an order on the POS app. Below are the takeaways from this release.
Product Enhancements
| ENHANCEMENT |
|---|
Added Group Discount Functionality
We have introduced a Group Discount feature that allows users to apply flat discounts to item groups. This enhancement provides greater flexibility in managing promotions and pricing by enabling bulk discounting across a defined group of items.
Example:
- Your cart has 15 units of the XYZ item.
- Item price – $100 per item.
- Total cost – $1500.
- Discount applied $5 (group discount)
- So the group discount would be 15 x $5 = $75.
- Final item price would be $1425.
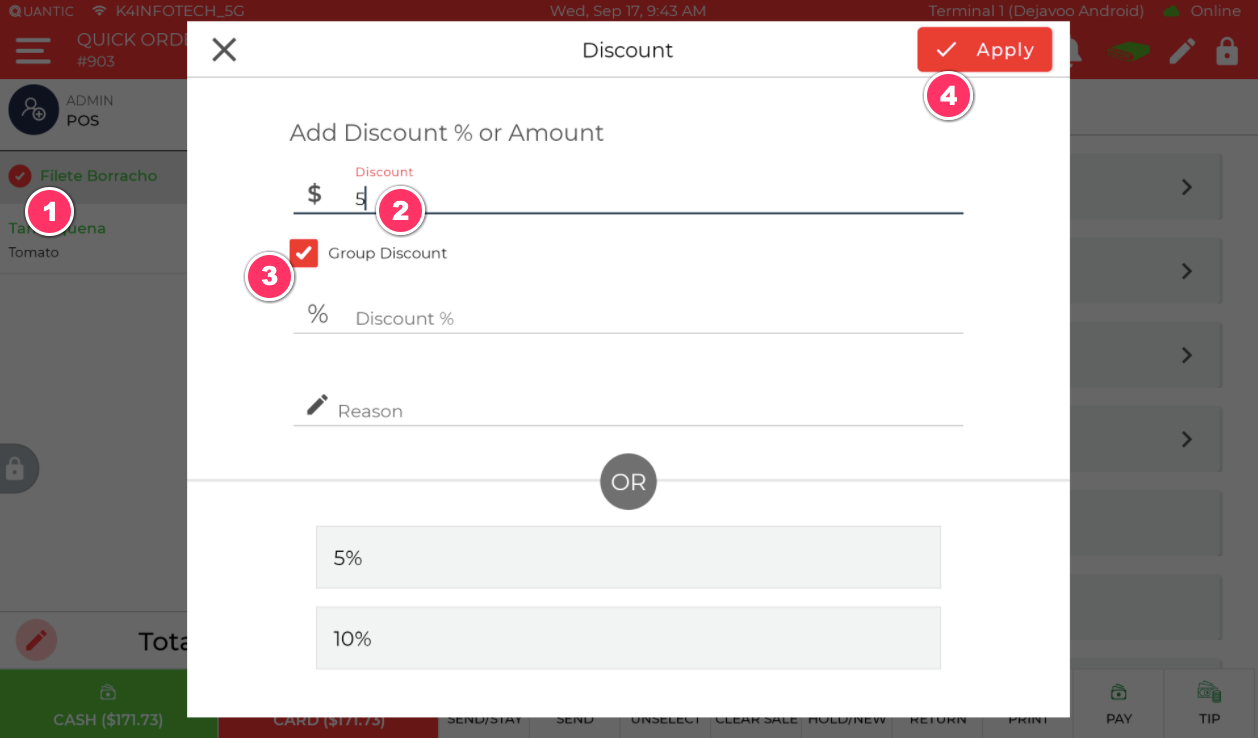
How to apply the group discount?
- Add items to the cart in multiple quantities.
- Select the item group to which the group discount needs to apply.
- Add a Flat discount and select the Group Discount checkbox.
- Now the flat discount would apply to the entire item group.
Note:
- Group discount can not be applied to multiple item groups at once. It has to be applied separately to individual item groups.
- Group discount can not be applied at the order level.
- Predefined discount can be set as a Group Discount from Portal > Discounts > Group Discount.
- The discount only applies to the item subtotal.
| ENHANCEMENT |
|---|
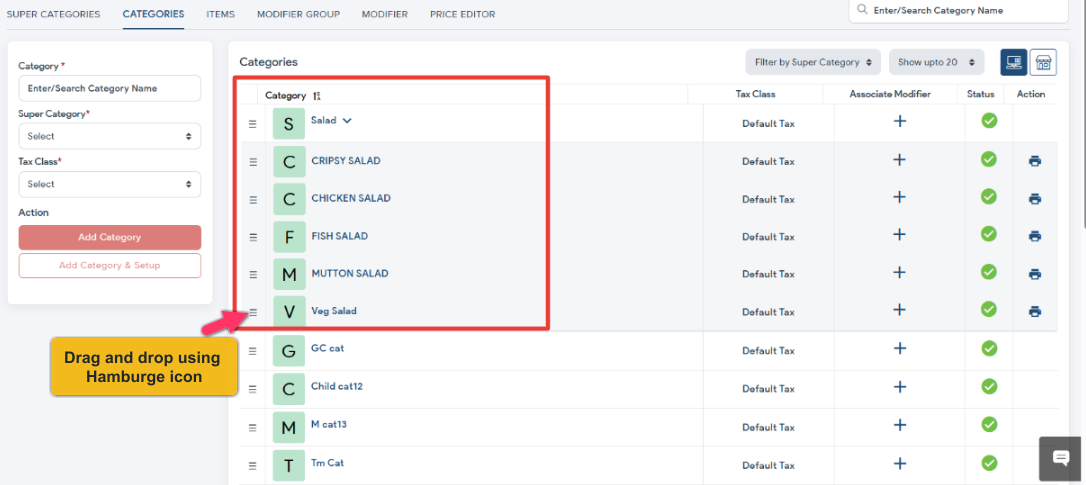
Enterprise – Enhanced Menu Sorting for Child Locations
Your enterprise child locations now have the ability to sort Categories, Items, and Subcategories directly from the back office.
Using the hamburger icon, users can easily drag and drop to reorder menu elements. The updated sorting will automatically sync with the POS system, ensuring a consistent menu layout across both platforms.
This enhancement allows for greater flexibility and customization at the child location level, improving both user experience and operational efficiency.
 |
|---|
| Enterprise – Menu Sorting From Child |
| ENHANCEMENT |
|---|
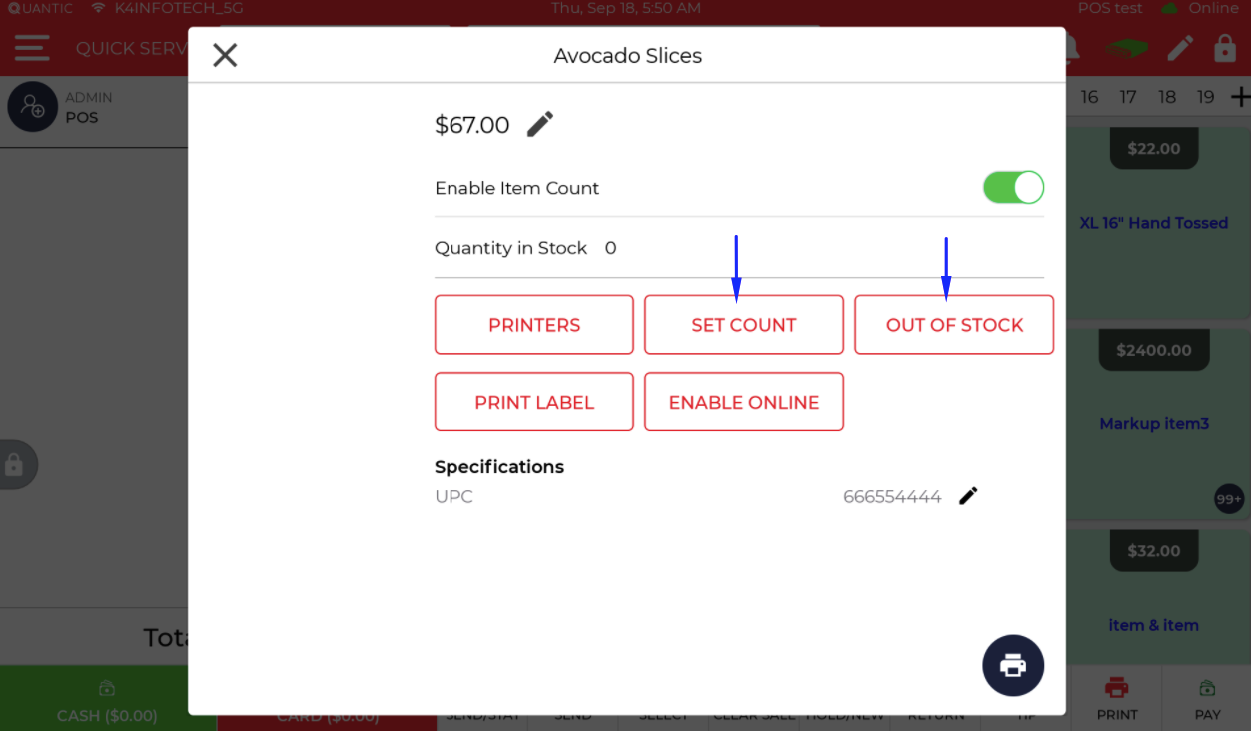
Enterprise – Out of Stock & Item Count Management for Child Locations
Enterprise child locations now have the ability to mark items as Out of Stock and set item counts independently.
To use these features:
- Log in to the POS at the child location
- Long-press on the desired item
- Select either “Out of Stock” or “Set Count” as needed
Please note: These inventory adjustments can only be performed from the child location’s POS or its associated back office. They are not accessible from the enterprise or parent-level dashboard.
This update empowers child locations with greater control over real-time inventory management.
 |
|---|
| Out of Stock & Item Count Management for Child Locations |
| ENHANCEMENT |
|---|
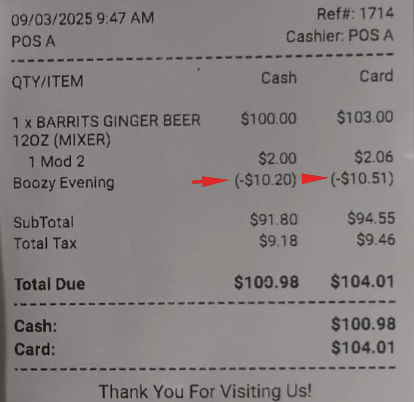
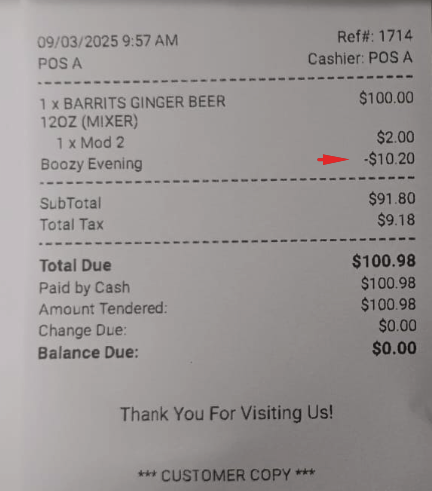
Promotional Price Display on Cart and Receipt
We’ve enhanced the cart and receipt to display promotional pricing for better transparency. During promotional periods, any discounts – such as a $5 Happy Hour discount on a $50 item – will be shown in red along with the promotion name.
 |
|---|
| Service Area and Terminal Assignment from KDS Module |
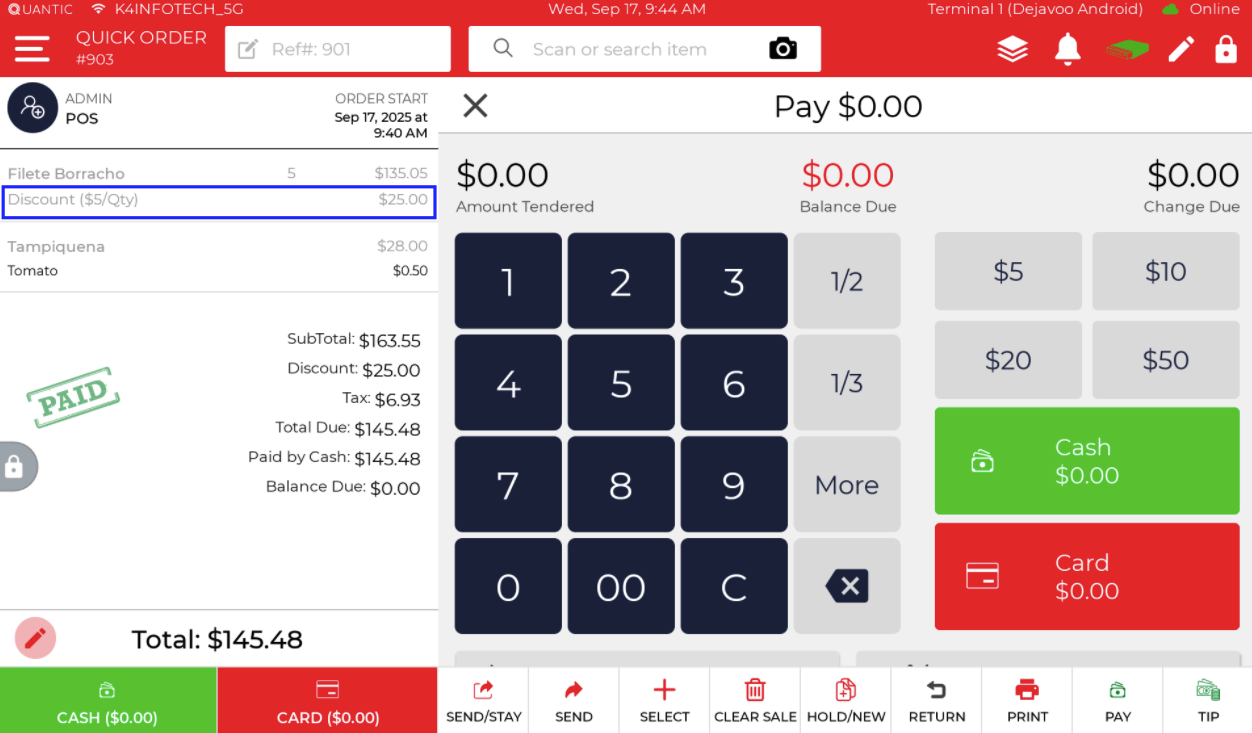
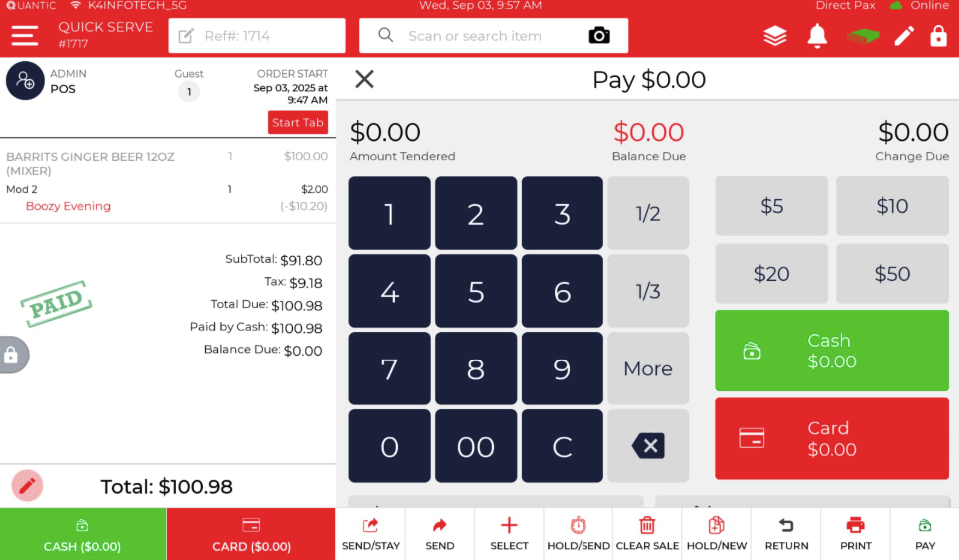
In this example,
- The original item price is $100
- The mod price is $2.
- The Boozy Evening promotion was 10%, which translates to $10.20 (10% of $102)
- The new Subtotal becomes $102 – $10.20 = $91.80.
- Tax @10% = 9.18
- Balance $91.8 + $9.18 = $100.98
 |
 |
|---|---|
| Happy Hours on Initial Receipt with Dual pricing | Happy Hours on Final Receipt |
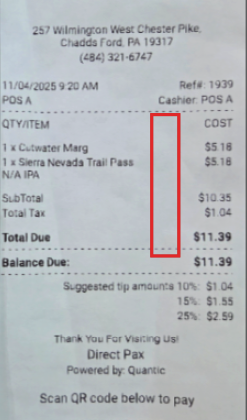
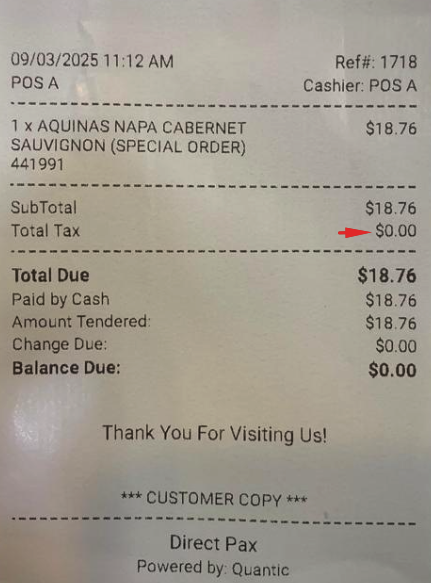
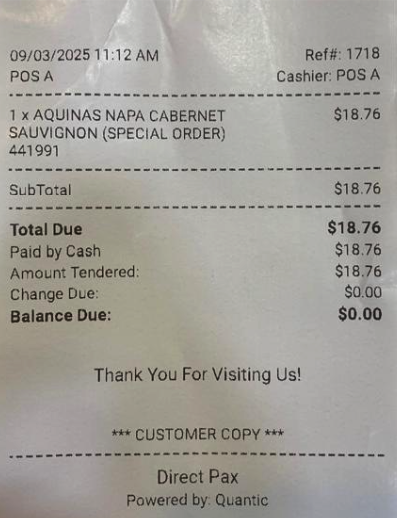
Hide Zero Tax Line on Receipt
A new configuration, “Hide Zero Tax Line on Receipt”, has been added. When enabled, any tax with a zero value will be hidden from both the initial and final receipt.
 |
 |
|---|---|
| Setting disabled | Setting enabled |
| ENHANCEMENT |
|---|
Card Tender Prompt
We’ve added functionality to display an “Amount Tendered” prompt when making a partial payment via card. This prompt shows a confirmation message to ensure the user is aware of the exact amount being paid.
Setting-based feature – “Show Card Tender Amount Prompt”.
 |
|---|
| Amount Tendered on Card partial payment |
Android POS Release Notes
Feature Updates
- Promotional Price Display on Cart and Receipt
- Introducing the Smart Tax
- ID Scan to Clock In
- Ability to Hide Modifier Groups on POS
- Unique Phone Number Validation to Issue Digital GC
- Hide Zero Tax Line on Receipt
- Card Tender Prompt
We are pleased to announce the release of the Android POS with new features, enhancements, and bug fixes.
These features and fixes are live for all our customers and will revolutionize the way guests place an order on the POS app.
Below are the takeaways from this release.
Product Enhancements
| ENHANCEMENT |
|---|
Promotional Price Display on Cart and Receipt
We’ve enhanced the cart and receipt to display promotional pricing for better transparency.
During promotional periods, any discounts – such as a $5 Happy Hour discount on a $50 item – will be shown in red along with the promotion name.
 |
|---|
| Service Area and Terminal Assignment from KDS Module |
In this example,
- The original item price is $100
- The mod price is $2.
- The Boozy Evening promotion was 10%, which translates to $10.20 (10% of $102)
- The new Subtotal becomes $102 – $10.20 = $91.80.
- Tax @10% = 9.18
- Balance $91.8 + $9.18 = $100.98
 |
 |
|---|---|
| Happy Hours on Initial Receipt with Dual pricing | Happy Hours on Final Receipt |
Android POS Release Notes
Feature Updates
- Option to Disable OTP for Digital Gift Card Redemption
- Item Level Extra Charge
- Future Order Visibility on POS
- Print Check# on the Order Receipts
- Automatic Kitchen Printing for QR/Invoice Orders 6
We are pleased to announce the release of the Android POS with new features, enhancements, and bug fixes.
These features and fixes are live for all our customers and will revolutionize the way guests place an order on the POS app.
Below are the takeaways from this release.
Product Enhancements
|
ENHANCEMENT |
|---|
Option to Disable OTP for Digital Gift Card Redemption
You can now remove the OTP (send and input box) from the Digital Gift Card redemption screen, allowing Digital Gift Cards to be redeemed without requiring OTP verification.
This is a configuration-based feature that can be enabled by turning on the setting Disable OTP on Digital Gift Cards.
|
|
|
|---|---|
|
Digital GC redeem with OTP |
Digital GC redeem without OTP |


|
ENHANCEMENT |
|---|
Item Level Extra Charge
Now the extra charge can be implemented at the item level as well.
The extra charge then applies to the item price and becomes part of a calculation.
Below are the steps you can follow to set up the item-level extra charge.

Extra Charge creation:
- Go to Settings > Setup.
- Extra Charge > Select Add Extra Charge.
- Enter the details like the Name of the extra charge, select the item level, and set the $ or % value.
Assign Extra Charge to Item:

- Once the extra charge is created, you can select the item to which you want to apply the extra charge.
- Go to Settings > Extra Charge > Select from the drop-down.
- Now you can add this item to the cart, and the extra charge will apply automatically to it.

Calculation layout:
- Extra charge applies to the Item price only. So, 5% extra charge will apply to $22 item price only. Extra Charge in this case = $1.10
- New Subtotal after item level extra charge = Item price + Extra charge + Modifier.
- Discount if any will apply on (Item price + Extra charge + Modifier) * Discount%
- Tax will apply on the Item price + Extra charge + Modifier – Discount
|
ENHANCEMENT |
|---|
Future Order Visibility on POS
The Future Orders Visibility feature has been implemented on the POS.
This will be a configuration-based feature that works when the Enable Future Order setting is enabled for a location.
When this configuration is enabled, and the deliveryDateTime or pickupDateTime is set later than the time the order was paid, the Takeout or Delivery order will remain visible on its respective service area screen, even after closing the order.
To remove such future orders from the screen, users must click the pencil icon in the service area and mark the order as Closed for delivery or takeout.

|
ENHANCEMENT |
|---|
Print Check# on the Order Receipts
Orders paid using user-defined payment methods will now have the check number printed on receipts.
You can configure the check number under Backend > Settings > Setup > Custom Fields.
|
|
|---|
|
Custom Field (check#) on receipt |

|
ENHANCEMENT |
|---|
Automatic Kitchen Printing for QR/Invoice Orders
QR links and Invoice orders can now be sent automatically to the kitchen printer when they are paid.
Items will print either on the item-assigned or terminal-assigned kitchen printer, depending on your configuration.
To enable kitchen ticket printing for QR/Invoice paid orders, ensure the required combination of settings is turned on in the backend.

Print ticket at the item level kitchen printer
- Kitchen printer/KDS should be assigned to the item.
- Go to the POS Operations > Change Terminal > Terminal Settings > Turn on Enable POS/QR Ticket printing
- Now, the items paid via QR/Invoice will print to the item-level kitchen printer or KDS.
- Please note that both current and future orders will print to the KDS or kitchen printer as soon as the order is paid.
- In case you want the future orders to print just before the order delivery/takeout time – order waiting time, you will need to turn on the Enable Future Order configuration.
Print ticket at the terminal level kitchen printer
- Go to the POS Operations > Change Terminal > Terminal Settings > Turn on Enable POS/QR Ticket printing.
- On the same page, select the Kitchen Printer from the Redirect Online Printing On.
- Now the items, paid via QR/Invoice, will print to the terminal-level kitchen printer.
- Please note that the current order or future orders will both print to the kitchen printer as soon as the order is paid.
- In case you want the future orders to print just before the order delivery/takeout time – order waiting time, you will need to turn on the Enable Future Order configuration.
Please note that the above rules apply the same for e-commerce orders as well.
Example of future orders:
- The Order Waiting Time is set to 20 minutes.
Case 1:
- 11:00 am Order pickup/delivery time was chosen.
- The order was paid at 10:42 am.
- Since the difference between the Order pickup/delivery time and the Order paid time (18 minutes) is less than 20 minutes, the order will be sent to the kitchen immediately after payment.
Case 2:
- 11:00 am Order pickup/delivery time was chosen.
- The order was paid at 10:30 am.
- Since the difference between the Order pickup/delivery time and the Order paid time (30 minutes) is more than 20 minutes, the order will be put on hold.
- The order will be sent to the kitchen at 10:40 am (just before the order waiting time).
Android POS Release Notes
Feature Updates
- Tip and Total Amount Line Brightened
- Introducing the Quest Gateway
- Caller ID – Save the business that the employee is calling from
- Call Notification on Status Bar (Caller ID)
We are pleased to announce the release of the Android POS with new features, enhancements, and bug fixes.
These features and fixes are live for all our customers and will revolutionize the way guests place an order on the POS app.
Below are the takeaways from this release.
Product Enhancements
| ENHANCEMENT |
|---|
Tip and Total Amount Line Brightened
The Tip and Total Amount Line on the receipt has been brightened a bit for better visibility.
 |
|---|
| Tip and Amount Line brightened |
| ENHANCEMENT |
|---|
Introducing the Quest Gateway
The Quest gateway has now been supported on your Android POS.
Quest gateway can be set up from the Partner Portal.
The following are the supported features:
Applicable Payment Mode
- Card Present (PAX and Dejavoo)
- Card not Present (Invoicing, Manual payments)
Features Supported
- Transaction/Sale (CP and CNP)
- Refunds
- Tip Prompts (on the reader, not applicable for CNP)
- Tip Adjusts
- Payment programs (Surcharging, Consumer Choice, Service Fees)
- Bar tab
- Card on File
- Manual Batch Close
| ENHANCEMENT |
|---|
Caller ID – Save the business that the employee is calling from
You can now save an employee’s company name when they place an order by phone.
This allows for quicker order-taking in future calls from that business number.
How It Works:
- When an employee from a business calls to place an order, start the order in the Delivery or Takeout service area.
- Check the box for “Enable Business“.
- Enter the Business Name (e.g., Business ABC).
- Add the Employee Name (e.g., Employee A).
- Start the order.
This links the employee to the business, so the next time a call comes in from that business number:
- The system will recognize the employee from the business.
- You can quickly search and select the right employee name from a drop-down — just start typing the initials.
Example:
- A call comes in from Business ABC.
- You select Enable Business in the service area and input:
- Business Name: Business ABC
- Employee Name: Employee A
- You start the order.
- Next time Business ABC calls, just type “Emp…” and Employee A will appear for quick selection.
This feature streamlines repeat orders from organizations where multiple employees may place orders using the same phone line.
 |
 |
|---|---|
| Enable Business for customer | Start order for customer |
| ENHANCEMENT |
|---|
Call Notification on Status Bar (Caller ID)
A glowing Phone icon will now appear on the Status Bar when a customer calls the restaurant to place an order.
Tapping the icon allows you to view and respond to incoming calls directly.
This feature is controlled by a new setting: Enable Caller ID on Status Bar.
Ensure it’s enabled to see the Phone icon on the Status bar.
 |
|---|
| Call Notification icon |
Android POS Release Notes
Feature Updates
We are pleased to announce the release of the Android POS with new features, enhancements, and bug fixes.
These features and fixes are live for all our customers and will revolutionize the way guests place an order on the POS app.
Below are the takeaways from this release.
Product Enhancements
ENHANCEMENT
Return Restriction on Partially Paid Orders
Resolved an issue where returning partially paid orders could lead to a negative balance on the POS.
To prevent this, the return feature is now restricted to fully paid orders only.
If a user attempts to return a partially paid order, an alert pop-up will notify them that such orders cannot be returned until fully paid.

Partially paid orders cannot be returned
Android POS Release Notes
Feature Updates
We are pleased to announce the release of the Android POS with new features, enhancements, and bug fixes.
These features and fixes are live for all our customers and will revolutionize the way guests place an order on the POS app.
Below are the takeaways from this release.
Product Enhancements
ENHANCEMENT
Card on File Enhancements
We have added a functionality to delete the saved cards from the card on file.
Enable Saved Card Delete privilege will need to be enabled for an employee to be able to delete the saved card.

Privilege-based – Option to delete the saved card
ENHANCEMENT
Child Enterprise – Item Cannot be Added to the Parent Category
We have added a pop-up in the POS indicating that the items cannot be added to the categories that have been created by the Parent location.

Restricted Add Item
ENHANCEMENT
Added Price List under Customer
The customer-associated Price List will now be displayed on the customer details page on the POS.

Customer Price List
ENHANCEMENT
Enhancements in Takeout/Delivery Service Area
The following enhancements have been made to the Takeout and Delivery service area.
- The Pickup or Delivery date and time will be displayed on the service area screen. This will help the merchants to check the date and time without opening the order.
- Added the ability to change the delivery and takeout time by tapping an order.
- Added the ability to transfer orders to similar service area types, for example, Takeout to Takeout and Delivery to Delivery.

Date and time added to Takeout and Delivery service area
ENHANCEMENT
Tip adjustment implemented for user-defined payments
Merchants can now adjust the tips on the order paid via User-defined payments.
Tips can be adjusted by clicking the Pay button on the order screen (after the order is paid via UD).
Or, from the Tip screen, select the Add Tip button next to the order.
Please make sure to enable the Tip checkbox next to the User-defined payment from the backend portal –
Settings > Setup > User-defined Payment > Enable Tip checkbox.
Doing this will display the User-defined order in the Tip section. The adjusted tip will be displayed in the EOD report.
ENHANCEMENT
QR Code on Initial receipt
The initial receipt can also have the QR Code printed on it. So the merchants can scan that QR to pull up that order.
This is a setting-based feature and has to be enabled using a configuration – Enable Order Number QR on Receipt.
You can scan the QR while on the order or the service area screen.
Note: QR Pay and QR order number cannot both be displayed.
Android POS Release Notes
Feature Updates
We are pleased to announce the release of the Android POS with new features, enhancements, and bug fixes.
These features and fixes are live for all our customers and will revolutionize the way guests place an order on the POS app.
Below are the takeaways from this release.
Product Enhancement
| ENHANCEMENT |
|---|
Introducing the Tips Report
A new printable Tips report has now been added to the POS.
This will allow the merchants to view the tips earned by all the employees during the selected time period.
The Tips report can be enabled for a specific employee from the Employee > Report Management > Tips report.
|
Tip = Gratuity + Tip House Cash = Cash Sale + Extra Charge – Credit Tips – Credit Gratuity – Cash Gratuity – Payout. Please note that this report will only be applicable for the location created after Dec 4th, 2024. |
|---|
 |
|---|
| Tips Report |
| ENHANCEMENT |
|---|
Upcoming reservations first on the list
The reservation listing has been sorted with older reservations first on the list.
This will help the merchants to see the upcoming reservations first and then the future reservations.
 |
|---|
| Reservation sorting > Older First |
| ENHANCEMENT |
|---|
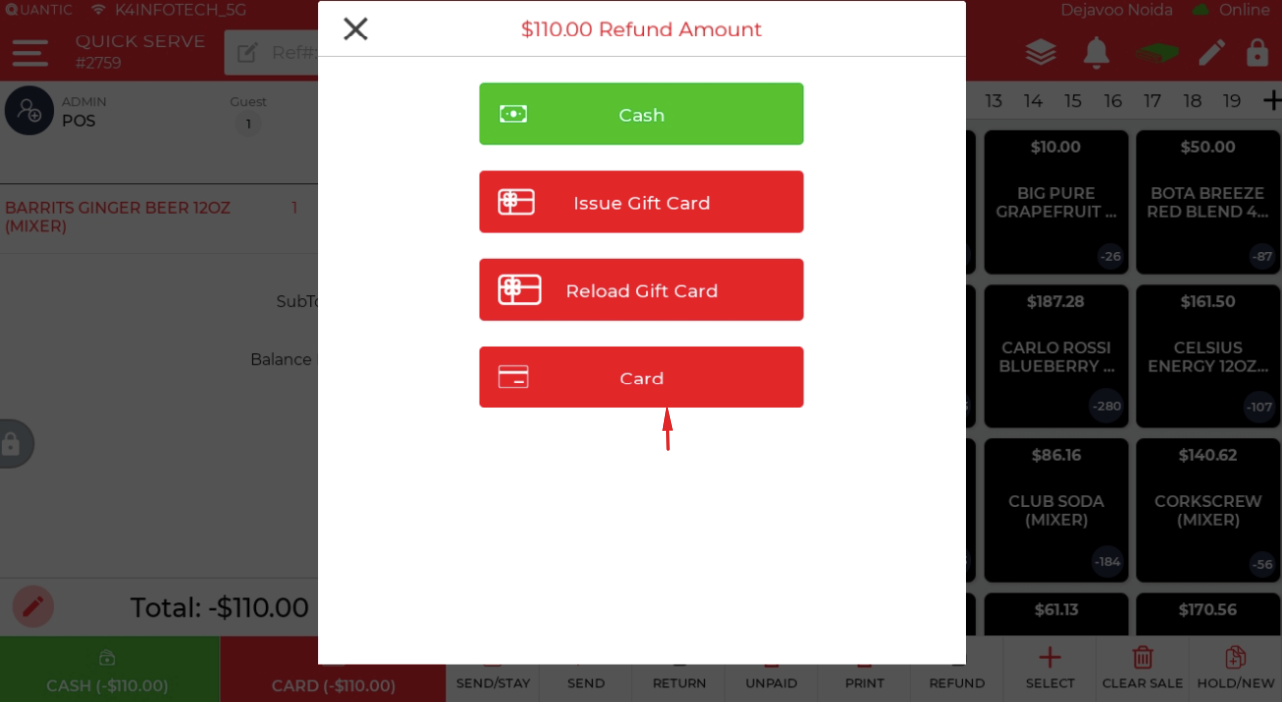
A gift card is now an option for a Refund
The refund from a return will now have a Gift card option in the Android POS.
Customers can choose to get a refund initiated to their existing Gift Card or get a new Gift Card issued.
 |
|---|
| Return refund to a gift card |
| ENHANCEMENT |
|---|
Printable CC Report added in the POS
Introducing the new printable Credit Card report (CC Report) in the POS.
This is an employee-specific report and has to be enabled for the specific employee from the backend portal under Employee > Report Management > CC Report.
This report will display the Ref#, last 4, Amount, and Tip data for the required date range.
 |
|---|
| CC Report |
| ENHANCEMENT |
|---|
Reorder from Old Orders
Customers can now reorder from the old orders from the Customer section.
A Search Before __7 days__ button has been added in the Previous Orders section in the Customer Management.
Enabling it will allow looking up the orders older than 7 days and reordering the items from those orders.
 |
|---|
| Customer’s Previous Orders > Search Before |
| ENHANCEMENT |
|---|
Transaction Under Process Popup
A warning message has been added on the order screen alerting the merchants about the payment approved on the reader but not closed.
So the merchants can click the Card button to close the order.
 |
|---|
| Transaction Under Process popup. |
