Quantic Lite Release Notes
Feature Updates
- New promotion rules added
- Supported Platform
- Uploading promotion via CSV
- Rule 1: Discount item price if X Quantity
- Rule 2: Buy X Get Y Amount Off
- Rule 3: Buy X Get Y % Off
- Rule 4: Buy Above X Get Y % Off
- Rule 5: Buy Above X Get Y Amount Off
- Rule 6: Buy Above X get Y% Off on Each Cart
- Rule 7: Buy Above X get $Y Off on Each Cart
- Rule 8: Buy X, Get Y Free
- Signature line in bold
- Penny Elimination (Nickel Rounding) for Cash Transactions
Product Enhancements
| ENHANCEMENT |
|---|
New promotion rules added
To give more flexibility to the merchants, we have added a few more promotion rules.
How to set up Promotion?
 |
|---|
| Promotion rule setup |
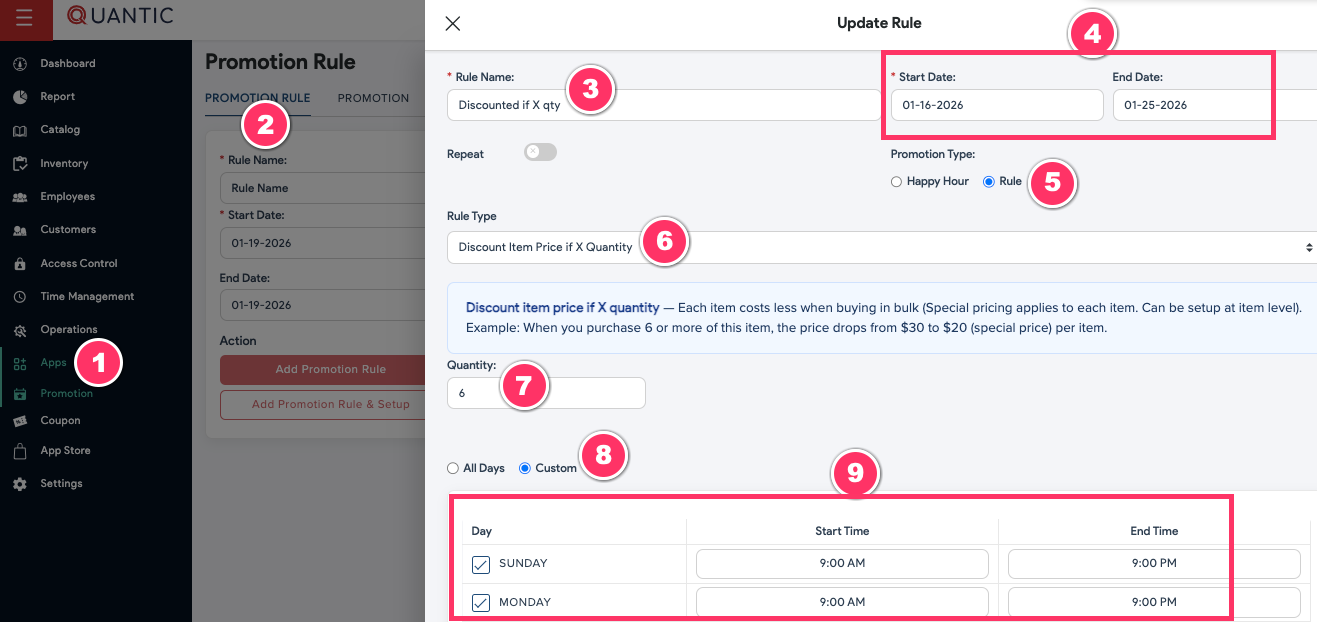
- In Portal left navigation – Go to the Apps > Promotion > Promotion Rule.
- Create a Promotion Rule by filling in all the essential information, such as:
- Rule name.
- Date – Start and End.
- Under Promotion Type – Select Rule.
- Now select the Rule Type – Say, Discount item price if X quantity.
- Quantity – Add the minimum quantity that is required for the promotional discount to be applied. Example: When you purchase 6 or more of this item, the price drops from $30 to $20 (special price) per item.
- Finally, you can set up the time range within which the promotion is applicable.
 |
|---|
| Promotion setup |
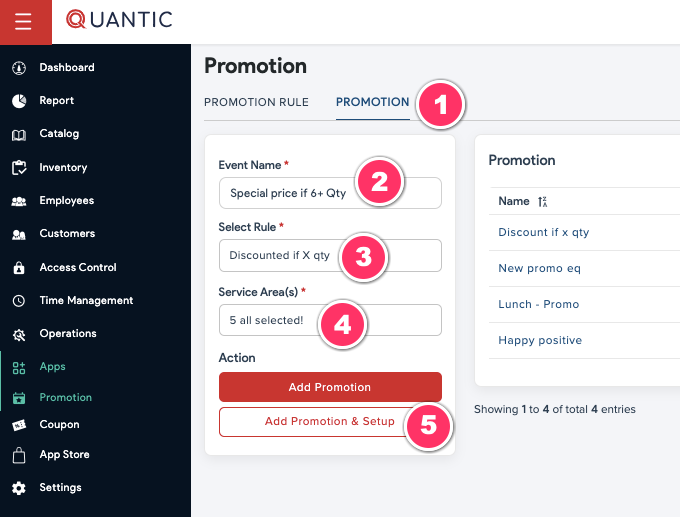
- Once you are done with the rule setup, you can create the Promotion.
- In Portal left navigation – Go to the Apps > Promotion > Promotion.
- Enter the event name, select the rule, and select the service area where you want the promotion to be applicable.
Supported Platform
- iOS POS
- Android POS
- Lite app
Uploading promotion via CSV
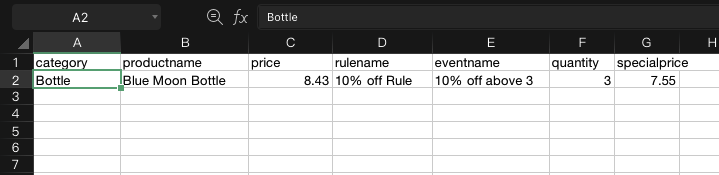
- Promotion rules can also be uploaded via the Promotion Rule CSV template
- The rule and event name should be created in the portal, and the same name should be copied into the CSV as well.
- The category section can take a category or the first-level subcategory only. Please make sure to keep the names exactly the same as they are in the Portal.
- Special price applies to only one rule – Discount Item Price if X Quantity. For other rules, you may leave it empty.
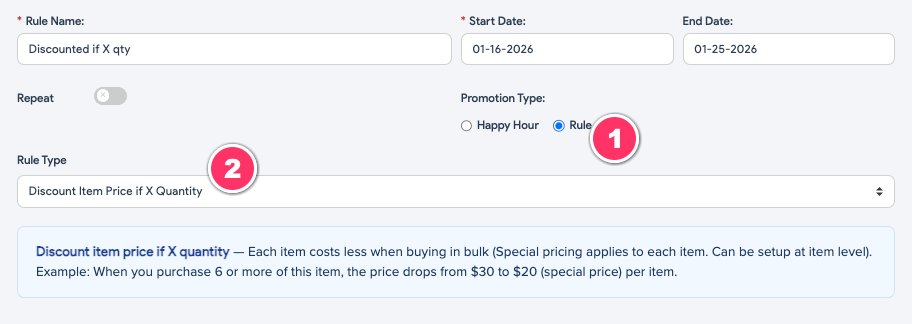
Rule 1: Discount item price if X Quantity
This rule means each item costs less when buying in bulk.
- Can be set up at only the item level.
- The special price applies to the item when the item quantity equals or goes beyond X.
- Discount on the cart: Displays as the difference between original pricing and the special pricing.
- Modifier price, item level extra charge is not considered while applying the discount.
 |
|---|
| Promotion rule set to “Discount item price if X Quantity” |
 |
|---|
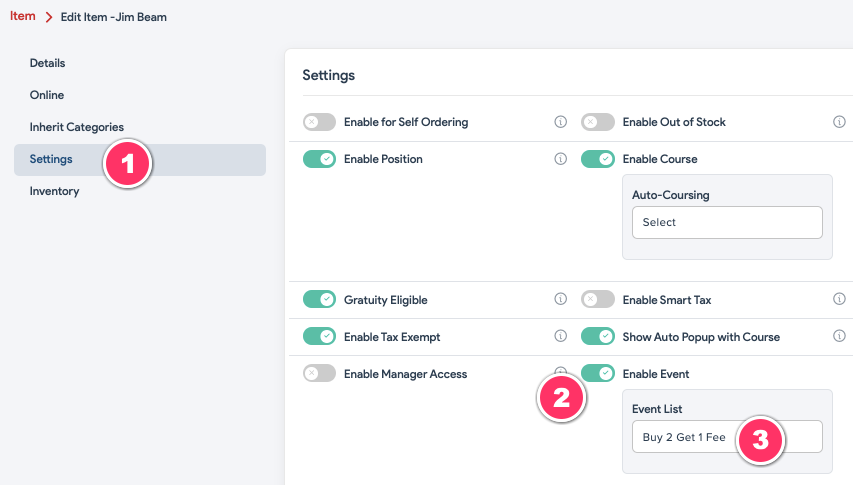
| Event selection at the item level |
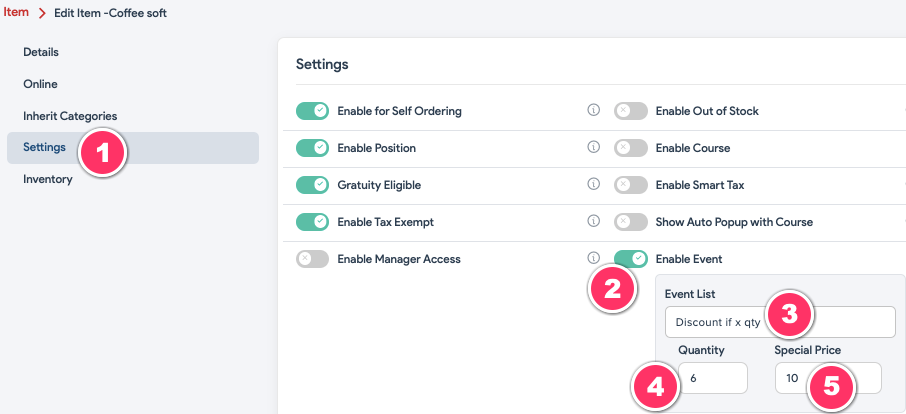
Example: When you purchase 6 or more of this item, the price drops from $30 to $10 (special price) per item.
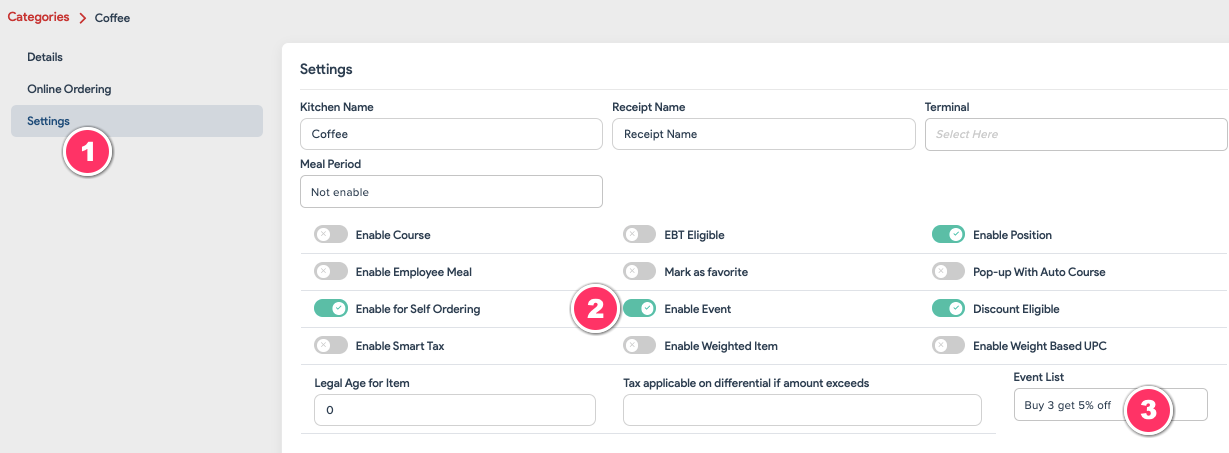
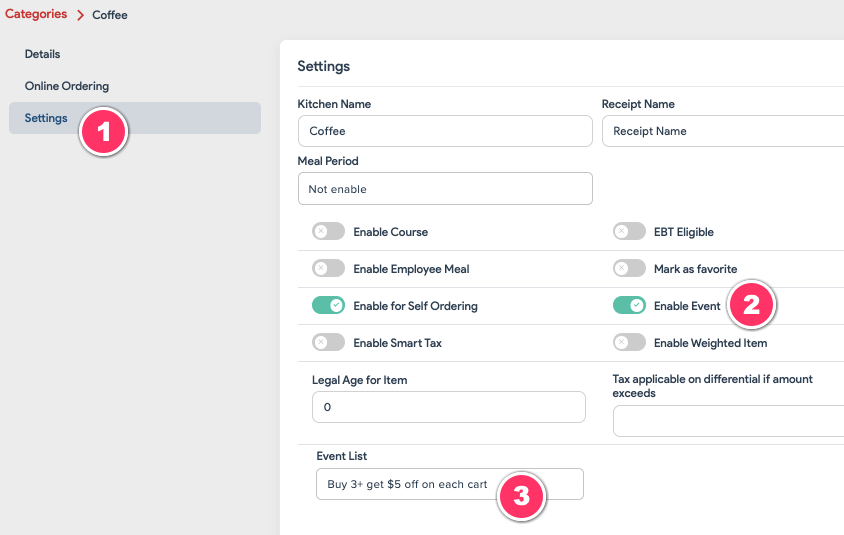
- The special pricing applies item-wise – Item > Settings > Enable Event > Select promotion name.
- Set the Special Price to 10 and Quantity to 6. In this example, the
- Original item price: $30
- Special price: $10 (when bought 6 or more)
- Since, 7 quantities of the item were bought:
- Original price display on the cart @ $30 per Item = $210
- Special price @ $10 per item = $70
- Discount display on the cart = Original Price – Special Price = $140
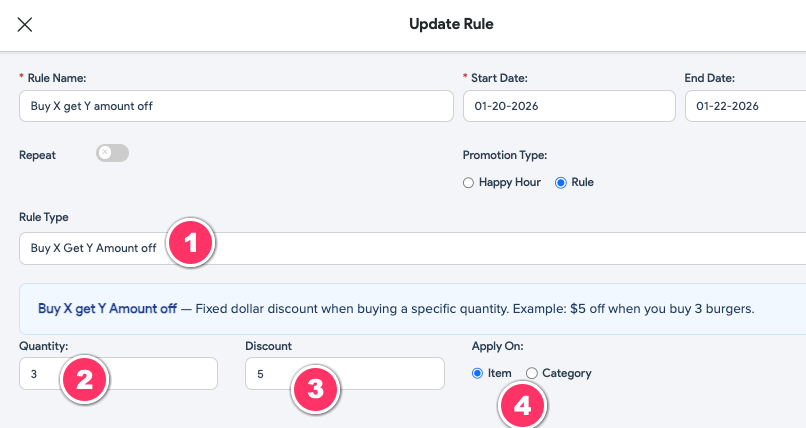
Rule 2: Buy X Get Y Amount Off
This rule means you receive a flat $Y discount when you purchase X quantity. Example: $5 off when you buy 3 burgers.
- Can be set up for an individual item or for the entire category.
- Flat $Y discount applies to the item (or items in the category) as soon as the X qty is met. In case you have added 2X qty to the cart, the discount will apply twice to two different item groups.
- Discount on the cart: Displays the flat discount underneath the item price.
- Modifier price, item level extra charge is also considered while applying the discount.
- Category-wise discount: The flat discount applies to the lowest item prices in a category. Example: Buy 3 get $5 off is the rule. When adding 4 items (of different pricing) from this category, the flat $5 will apply in proportion to the lowest-priced items.
 |
|---|
| Promotion rule set to Buy X Get Y Amount Off |
 |
|---|
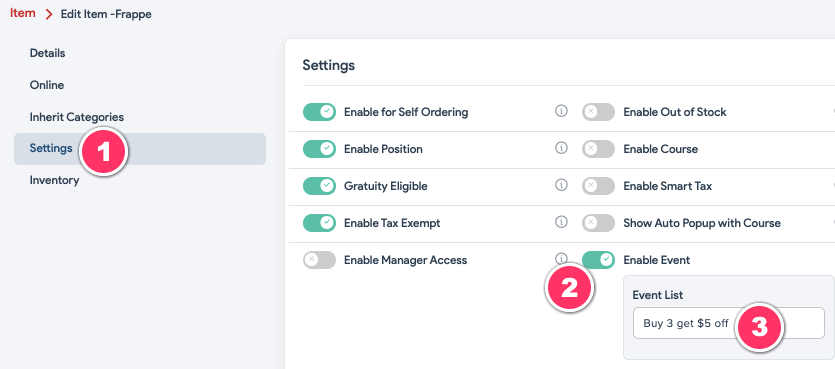
| Event selection at the item/category |
Example: When you purchase 3 items, a $5 discount will be applied to a group of 3 items.
- To set it up, you can add 3 in the Quantity field in the promotion and $5 in the Discount field.
- The event name can be selected at the item or category level.
——————-
- Item-wise flat discount: In this example, the
- Original item price: $45
- $5 discount when buying 3 items
- Since, 3 quantities of the item were bought:
- Original price display on the cart @ $45 per Item = $135
- Flat discount given of $5
- New subtotal = $135 – $5 = $130
——————-
- Category-wise flat discount: In this example, the
- $5 off is to be given to the entire category when buying 3 items in that category.
- Since 3 items were bought in that category.
- The discount applies to the lowest item prices in a category. Since you have added 4 items (of different pricing) from this category, the flat $5 will apply in proportion to the three lowest priced items.
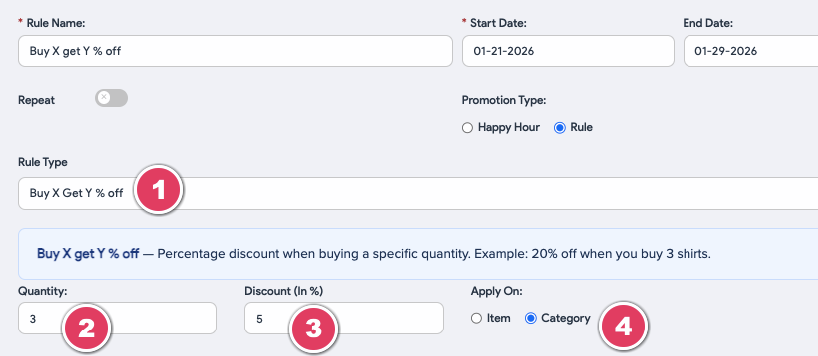
Rule 3: Buy X Get Y % Off
This rule means you receive a Y% discount when you purchase X quantity. Example: 5% off when you buy 3 burgers.
- Can be set up for an individual item or for the entire category.
- Y% discount applies to the item (or items in the category) as soon as the X qty is met. In case you have added 2X qty to the cart, the discount will apply twice to two different item groups.
- Discount on the cart: Displays the % discount underneath the item price.
- Modifier price, item level extra charge is also considered while applying the discount.
- Category-wise discount: The discount applies to the lowest item prices in a category. Example: Buy 3 get 5% off is the rule. When adding 4 items (of different pricing) from this category, the 5% discount will apply to the three lowest-priced items.
 |
|---|
| Promotion rule set to Buy X Get Y % Off |
 |
|---|
| Event selection at the item/category |
Example: When you purchase 3 items, a 5% discount will be applied per item.
- To set it up, you can add 3 in the Quantity field in the promotion and 5% in the Discount field.
- The event name can be selected at the item or category level.
——————-
- Item-wise % discount: In this example, the
- Original item price: $30
- 5% discount when buying 3 items
- Since, 3 quantities of the item were bought:
- Original price display on the cart @ $30 per Item = $90
- Discount given 5% = 5% of $90 = $4.5
——————-
- Category-wise % discount: In this example, the
- 5% off is to be given to the entire category when buying 3 items in that category.
- Since 3 items were bought in that category.
- The discount applies to the lowest item prices in a category. Since you have added 4 items (of different pricing) from this category, the 5% discount applies to the three lowest-priced items.
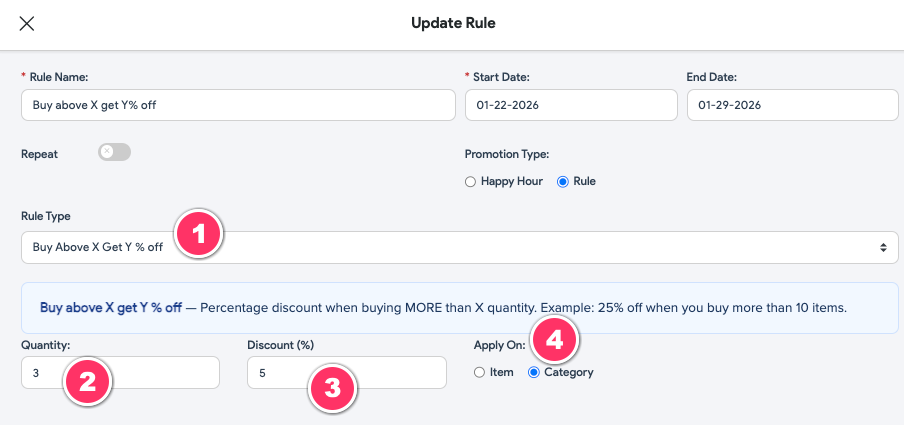
Rule 4: Buy Above X Get Y % Off
This rule means you receive a Y% discount when you purchase more than X quantity. Example: 5% off when you buy more than 3 burgers.
- Can be set up for an individual item or for the entire category.
- Y% discount applies to the item (or items in the category) as soon as you buy more than X qty.
- Discount on the cart: Displays the % discount underneath the item price.
- Modifier price, item level extra charge is also considered while applying the discount.
- Category-wise discount:
- The % discount applies to the lowest item prices in a category.
- But the discount is distributed among all the items in the cart.
- Example: Buy Above 3 get 5% off is the rule. When adding 4 items (of different pricing) from this category, the 5% discount will apply to the lowest-priced items.
 |
|---|
| Promotion rule set to Buy Above X Get Y % Off |
 |
|---|
| Event selection at the item/category |
Example: When you purchase more than 3 items, a 5% discount on those 3 items.
- To set it up, you can add 3 in the Quantity field in the promotion and 5% in the Discount field.
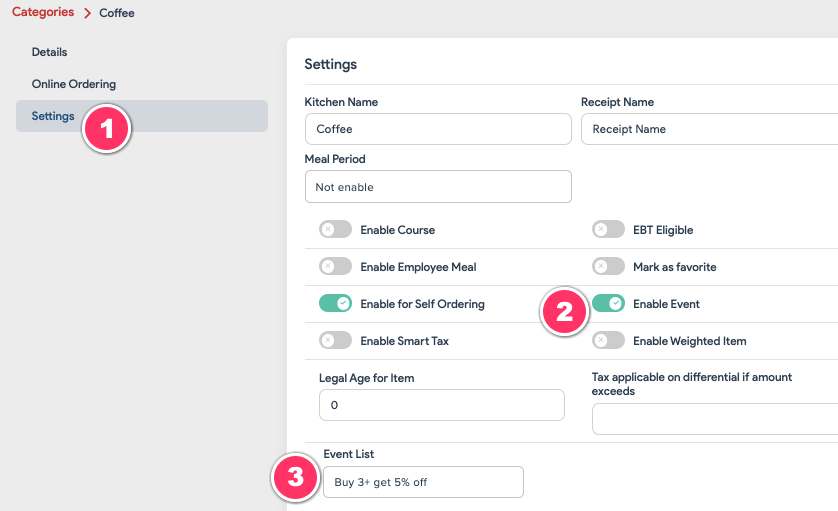
- The event name can be selected at the item or category level.
——————-
- Item-wise % discount: In this example, the
- Original item price: 100
- 5% discount when buying more than 3 items
- Since, 6 quantities of the item were bought:
- Original price display on the cart @ $100 per Item = $600
- Discount given 5% = 5% of $300 = $15
——————-
- Category-wise % discount: In this example, the
- 5% off is to be given to the entire category when buying more than 3 items in that category.
- Since 4 items were bought in that category.
- The discount applies to the lowest item prices in a category. Since you have added 4 items (of different pricing) from this category, the 5% discount applies to the three lowest-priced items, but is distributed across all the items in the cart.
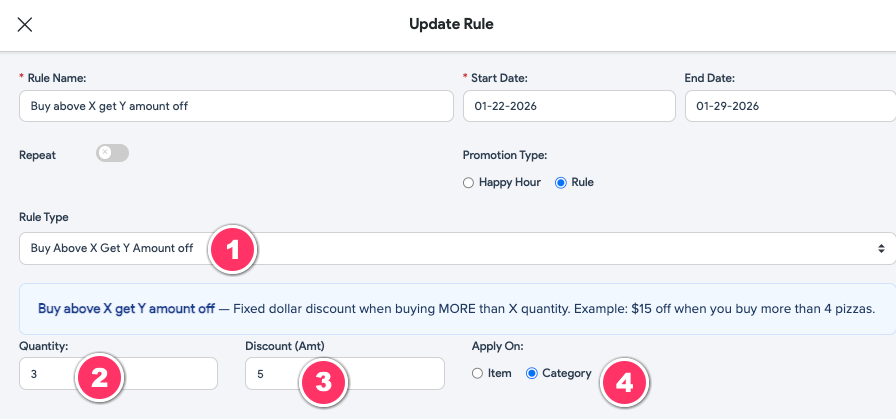
Rule 5: Buy Above X Get Y Amount Off
This rule means you receive a $Y discount when you purchase more than X quantity. Example: $5 off when you buy more than 3 burgers.
- Can be set up for an individual item or for the entire category.
- $Y discount applies to the item (or items in the category) as soon as you buy more than X qty.
- Discount on the cart: Displays the flat $ discount underneath the item price.
- Modifier price, item level extra charge is also considered while applying the discount.
- Category-wise discount:
- The flat $ discount applies to the lowest item prices in a category.
- But discount is distributed among all the items in the cart.
- Example: Buy above 3 get $5 off is the rule. When adding 4 items (of different pricing) from this category, the flat $5 discount will apply on the cart and distributed in proportions to all the cart items.
 |
|---|
| Promotion rule set to Buy Above X Get Y Amount Off |
 |
|---|
| Event selection at the item/category |
Example: When you purchase more than 3 items, a flat $5 discount will be applied per item.
- To set it up, you can add 3 in the Quantity field in the promotion and $5 in the Discount field.
- The event name can be selected at the item or category level.
——————-
- Item-wise flat discount: In this example, the
- Original item price: $30
- $5 discount when buying more than 3 items
- Since, 4 quantities of the item were bought:
- Original price display on the cart @ $30 per Item = $120
- Discount given = $5
——————-
- Category-wise $ discount: In this example, the
- $5 off is to be given to the entire category when buying more than 3 items in that category.
- Since 4 items were bought in that category.
- The flat $ discount applies to the cart and is distributed to all the items in the cart.
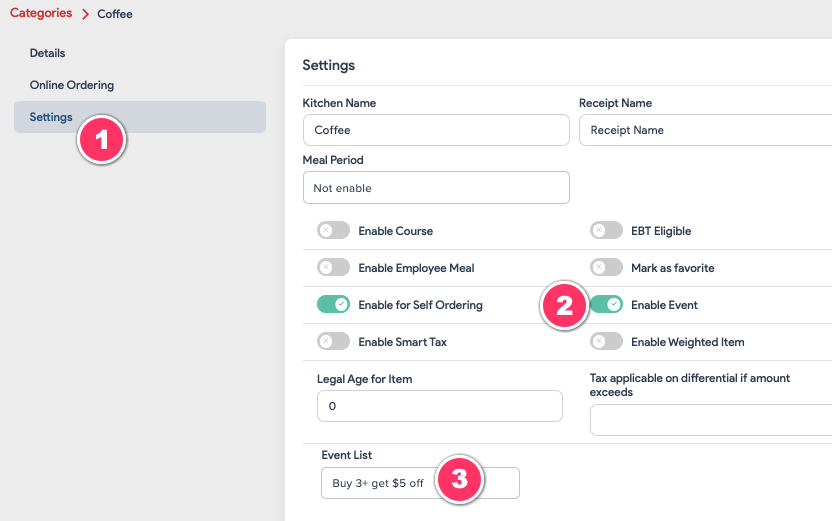
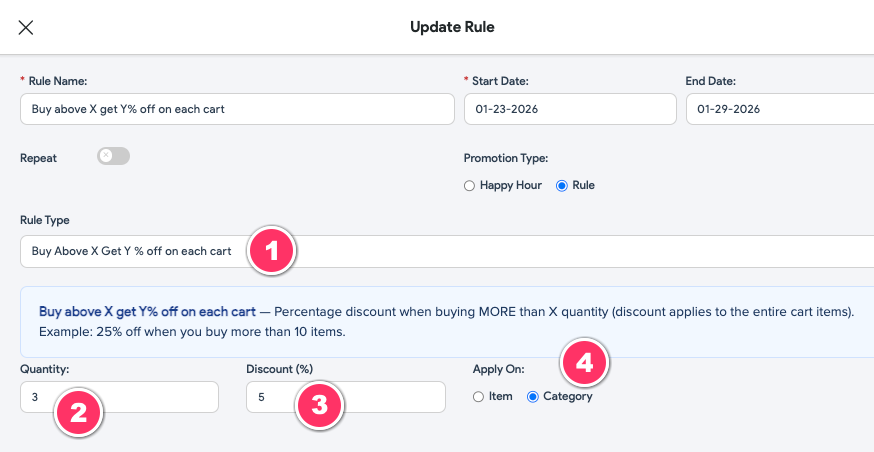
Rule 6: Buy Above X get Y% Off on Each Cart
This rule means you receive a Y% discount when you purchase more than X quantity. But the discount applies to all the cart items. Example: 5% off when you buy more than 3 items (discount applies to all cart items).
- Can be set up for an individual item or for the entire category.
- Y% discount applies to the entire cart as soon as you buy more than X quantity.
- Discount on the cart: Displays the % discount underneath the item price.
- Modifier price, item level extra charge is also considered while applying the discount.
- Category-wise discount:
- The % discount applies to all cart items
- Example: Buy Above 3 get 5% off is the rule. When adding 4 items (of different pricing) from this category, the 5% discount is applied to all the items in the cart.
 |
|---|
| Promotion rule set to Buy Above X Get Y % Off on each cart |
 |
|---|
| Event selection at the item/category |
Example: When you purchase more than 3 items, a 5% discount will be applied to all the items in the cart.
- To set it up, you can add 3 in the Quantity field in the promotion and 5% in the Discount field.
- The event name can be selected at the item or category level.
——————-
- Item-wise % discount: In this example, the
- Original item price: 30
- 5% discount on the cart when buying more than 3 items
- Since, 4 quantities of the item were bought:
- Original price displayed on the cart @ $30 per Item = $120
- Discount given 5% = 5% of $120 = $6
——————-
- Category-wise % discount: In this example, the
- 5% off is to be given to the entire category when buying more than 3 items in that category.
- Since 4 items were bought in that category.
- The 5% discount applies to all the items in the cart.
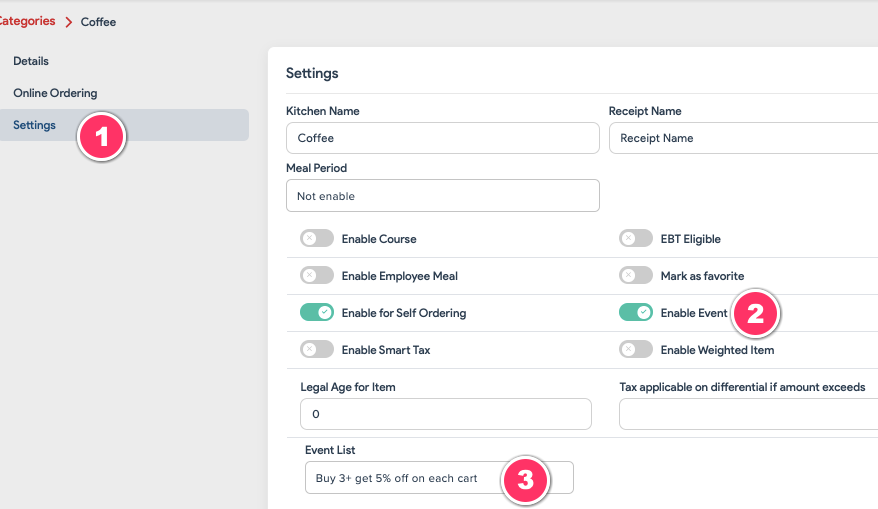
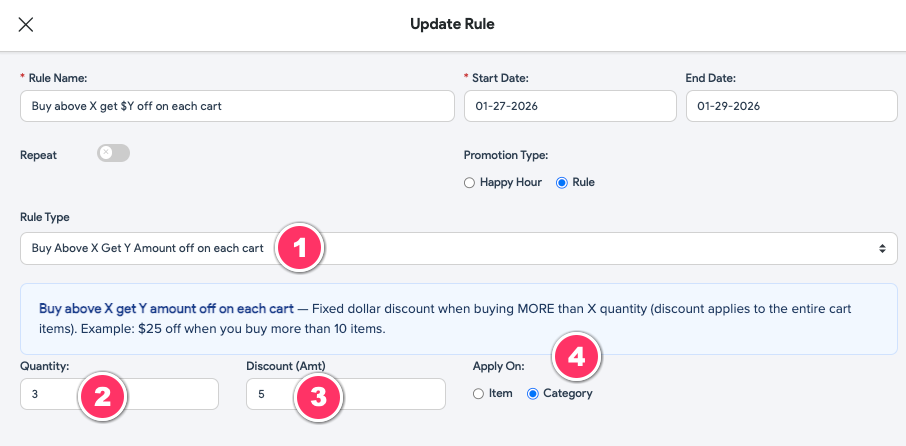
Rule 7: Buy Above X get $Y Off on Each Cart
This rule means you receive a $Y discount when you purchase more than X quantity. But the discount applies to the entire cart items. Example: $5 off when you buy more than 3 items (discount applies to all cart items).
- Can be set up for an individual item or for the entire category.
- $Y discount applies to the entire cart as soon as you buy more than X quantity.
- Discount on the cart: Displays the $ discount underneath the item price.
- Modifier price, item level extra charge is also considered while applying the discount.
- Category-wise discount:
- The flat $ discount applies to all cart items
- Example: Buy Above 3, get $5 off is the rule. When adding 4 items (of different pricing) from this category, the $5 discount is applied to all the items in the cart.
 |
|---|
| Promotion rule set to Buy Above X Get $Y Off on each cart |
 |
|---|
| Event selection at the item/category |
Example: When you purchase more than 3 items, a $5 discount will be applied to all the items in the cart.
- To set it up, you can add 3 in the Quantity field in the promotion and 5 in the Discount field.
- The event name can be selected at the item or category level.
——————-
- Item-wise flat discount: In this example, the
- Original item price: 30
- $5 discount on the cart when buying more than 3 items
- Since, 5 quantities of the item were bought:
- Original price displayed on the cart @ $30 per Item = $150
- Discount given flat $5 on all cart items = $25
——————-
- Category-wise $ discount: In this example, the
- $5 off is to be given to the entire category when buying more than 3 items in that category.
- Since 4 items were bought in that category.
- The $5 discount applies to all the items in the cart.
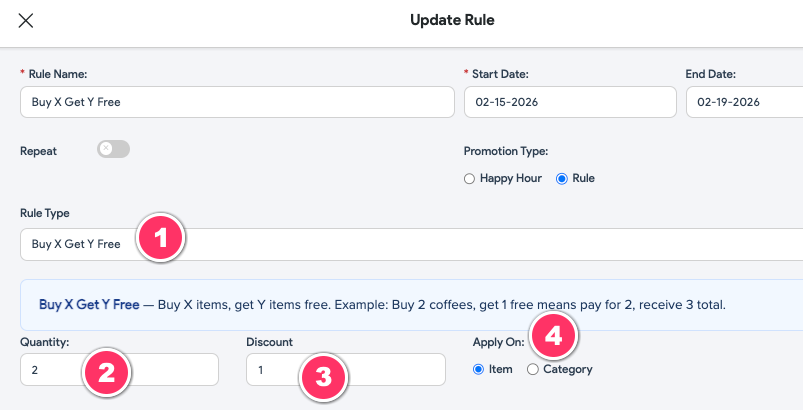
Rule 8: Buy X, Get Y Free
This rule means that you buy X quantity of items and you receive Y free. Example: Buy 2 coffees, get 1 free | Pay for 2 coffees and receive 3 total.
- Can be set up for an individual item or for the entire category.
 |
|---|
| Promotion rule set to Buy X, Get Y Free |
 |
|---|
| Event selection at the item/category |
Example: When you purchase more than 3 items, a $5 discount will be applied to all the items in the cart.
- To set it up, you can add 3 in the Quantity field in the promotion and 5 in the Discount field.
- The event name can be selected at the item or category level.
| ENHANCEMENT |
|---|
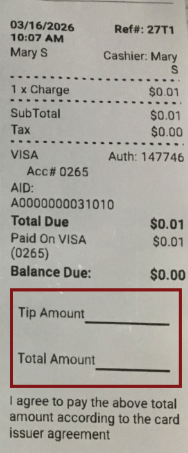
Signature line in bold
Upon the merchant’s request, we have made the tip and signature line bold and highlighted.
| ENHANCEMENT |
|---|
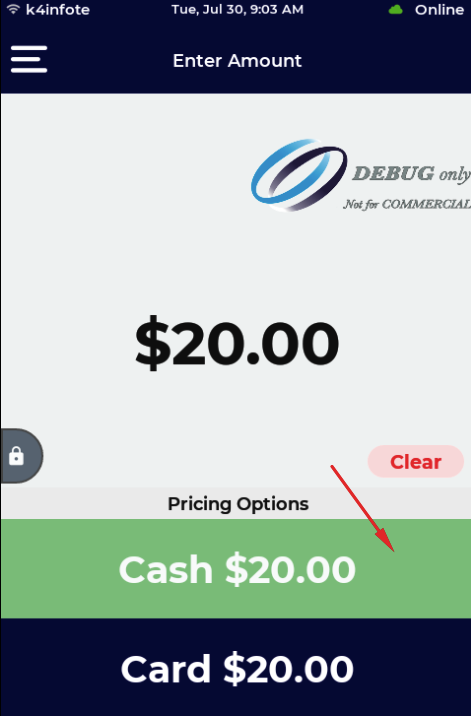
Penny Elimination (Nickel Rounding) for Cash Transactions
To comply with new regulations eliminating pennies from cash transactions, a nickel rounding feature has been introduced.
- Setting: Enable Nickel Rounding
- Default: Disabled
- When enabled, cash transactions are rounded to the nearest $0.05.
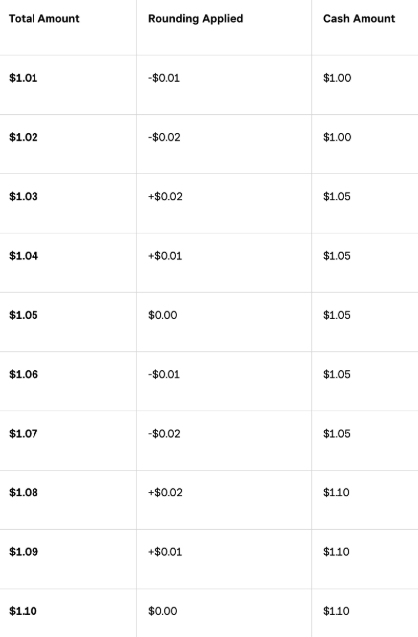
- Rounding logic:
- $1.01–$1.02 → $1.00
- $1.03–$1.07 → $1.05
- $1.08–$1.10 → $1.10
- Setting: Show Nickel Rounding Line Item
- Default: Disabled
- When enabled, a separate “Cash Rounding” line item is displayed for adjustments made during rounding.
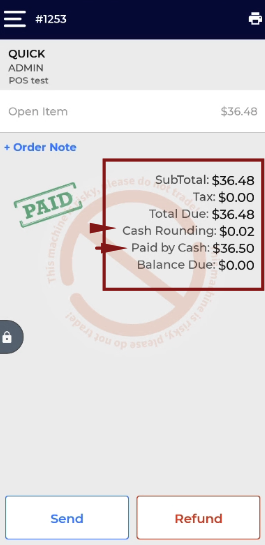
- Example: If the order total is $36.48, the payable amount becomes $36.50, and a $0.02 Cash Rounding line item is shown.
- Available On
- Cash button
- Cash confirmation popups
- Cash change due
- Post-payment cart screen (with rounding line item)
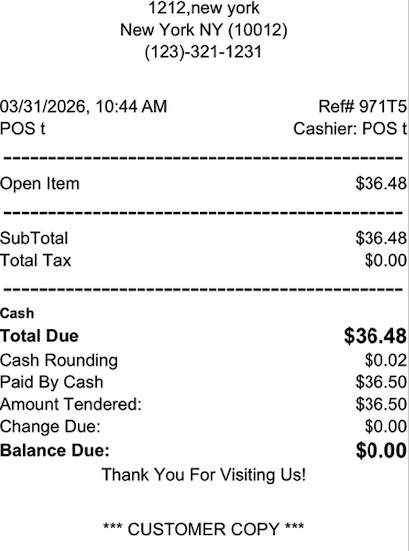
- Initial and final receipts
Note: Penny elimination is not yet supported on the Portal. While the rounded cash amount (e.g., $36.50) will be reflected, the Cash Rounding line item (e.g., $0.02) will not be displayed.
 |
|---|
| Penny elimination on cash transaction |
 |
 |
|---|---|
| Penny elimination on cash transaction | Penny rounding reference sheet |
Quantic Lite Release Notes
Feature Updates
We are pleased to announce the release of the Lite App with new features, enhancements, and bug fixes.
These features and fixes are live for all our customers and will revolutionize the way guests place an order on the Lite app.
Below are the takeaways from this release.
Product Enhancements
ENHANCEMENT
Surcharging has been removed from the discount
We’ve made a minor adjustment to how the payment receipt calculates totals when both a discount and the Consumer Choice Program (surcharge) are involved.
What’s Changed:
Previously, we used to adjust the surcharge on the discount amount as well.
With this update, the surcharge will now adjust on the original subtotal and tax, and not the discounted amount.
This provides a more accurate representation of the final amount paid.
Example:
- Order Subtotal: $100
- Discount: $20
- Consumer Choice Surcharge: 3%
- Tax: $0 (assumed for simplicity)
Calculation Flow on Receipt:
- Subtotal: $102.4
- Discount: $20
- To Pay: $82.4
ENHANCEMENT
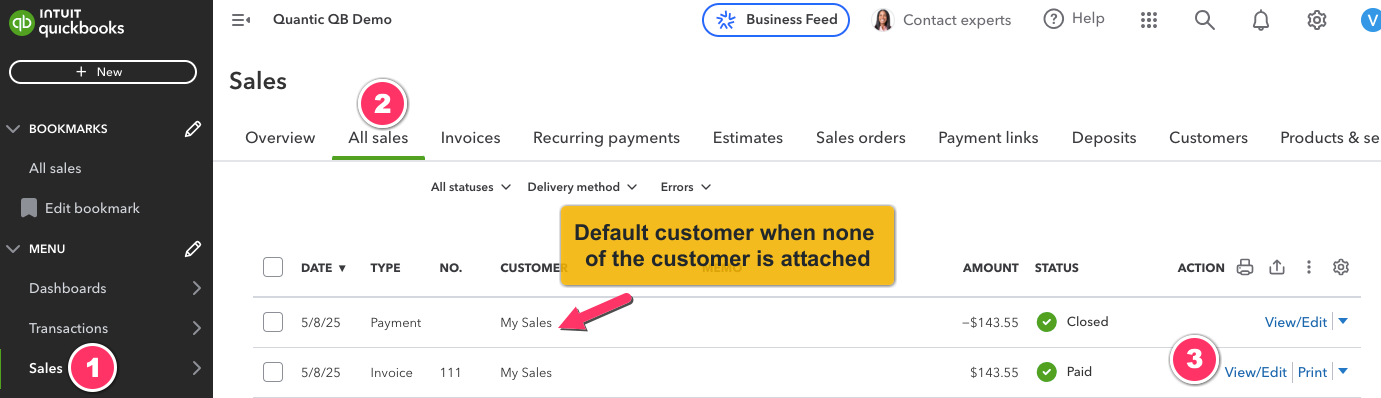
QuickBooks Realtime Order Tracking
Your orders can now be tracked in real-time in QuickBooks.
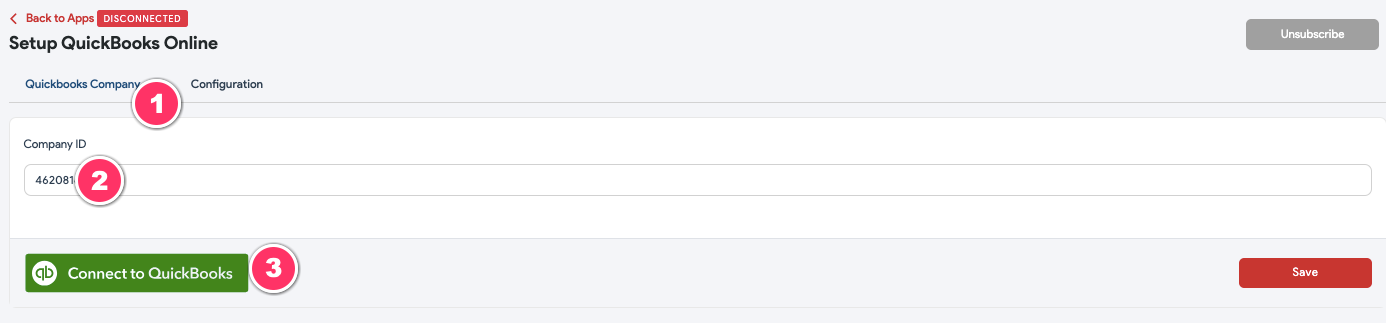
You can subscribe to the QuickBooks module from the backend, add your QuickBooks company ID, connect to QuickBooks, and you should be good to go.
Here are the key features.
- Real-time sales tracking on QuickBooks
- Sales-wise data tracking
- Sales tracking under the default customer if no customer is attached.
- Detailed QB order receipt same as the POS
- Payments, Partial Payments, and Refund data tracking.
- Ability to display or hide the order surcharge value on the QB sales receipt.
- Ability to display or hide the tip value on the QB sales receipt.
 |
|---|
| QuickBooks module setup |
 |
|---|
| Orders in QuickBooks |
Click here to read the full documentation on how to set up QuickBooks.
ENHANCEMENT
Introducing the POS Launcher – A generic POS app for all new Whitelabels
Introducing the POS Launcher – a generic POS app for the upcoming Whitelabels.
POS Launcher will allow the merchants to access the specific Whitelabels via a unique code (unique for every white label).
Whitelabel partners will be provided with a unique code that they can share with their merchants to get a Whitelabel-specific theme.
ENHANCEMENT
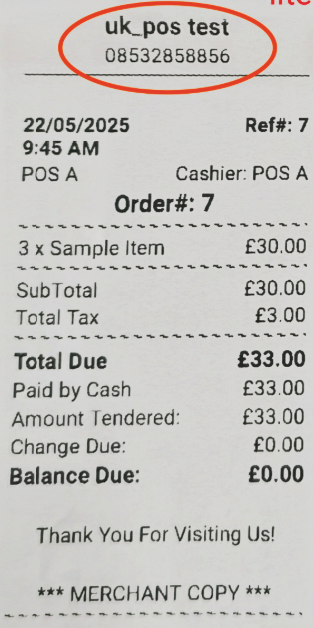
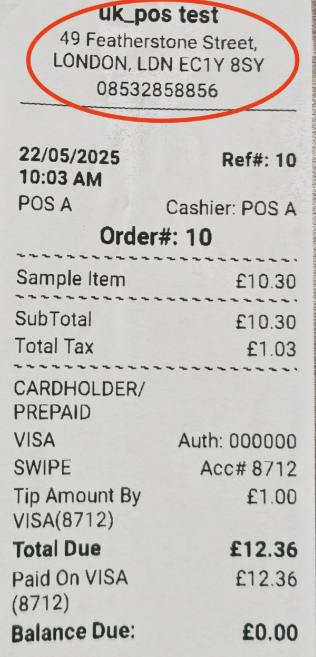
Hide Location Address on Receipts
Now you can hide the location address from the receipts using a setting – “Hide Location Address On Receipt”
 |
 |
|---|---|
| Setting Enabled | Setting Disabled |
ENHANCEMENT
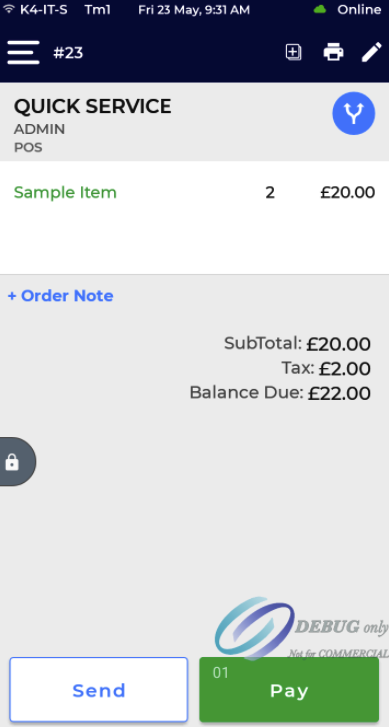
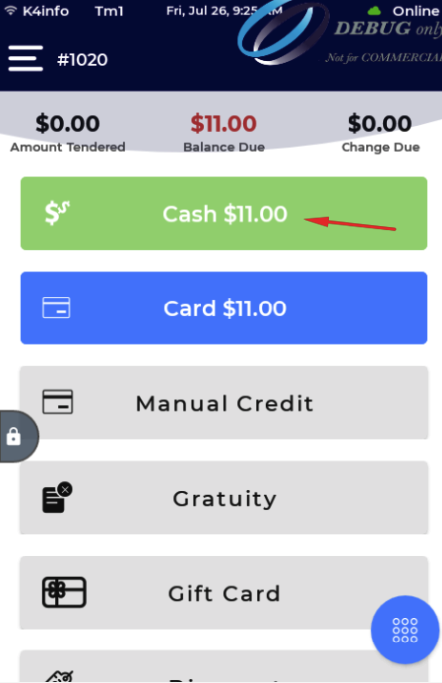
Pay Button Limited to Cash and Card Options
The Lite app now allows merchants to display only Cash and Card payment options on the Pay button.
This is controlled by the setting “Disable More Payment Options in Lite.”
When enabled, this setting hides all other payment methods, simplifying the checkout process for merchants who prefer to accept only Cash and Card.
 |
 |
|---|---|
| Tap Pay | Available payment – Cash and Card |
Quantic Lite Release Notes
Feature Updates
Version 2.3.6(Build 20250320)
We are pleased to announce the release of the Lite App with new features, enhancements, and bug fixes.
These features and fixes are live for all our customers and will revolutionize the way guests place an order on the Lite app.
Below are the takeaways from this release.
| ENHANCEMENT |
|---|
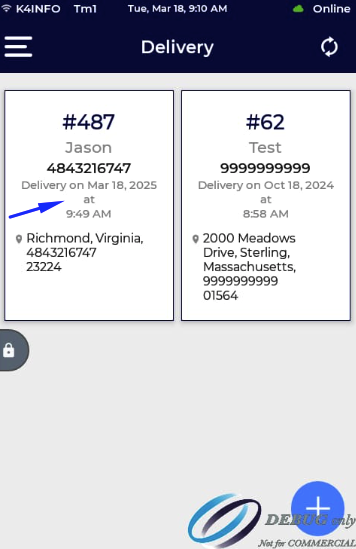
Enhancements in Takeout/Delivery Service Area
The Pickup or Delivery date and time will be displayed on the service area screen.
This will help the merchants to check the delivery/pickup date and time without opening the order.
 |
|---|
| Date and time added to the Takeout and Delivery service area |
| ENHANCEMENT |
|---|
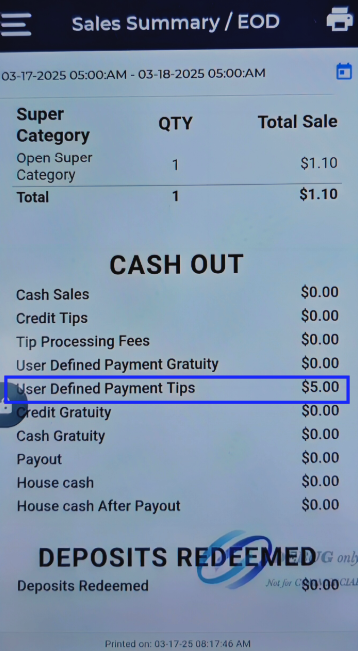
Tip adjustment implemented for user-defined payments
Merchants can now adjust the tips on the order paid via User-defined payments.
Tips can be adjusted from the Tip screen by selecting the Add Tip button next to the order.
Please make sure to enable the Tip checkbox next to the User-defined payment from the backend portal – Settings > Setup > User-defined Payment > Enable Tip checkbox.
Doing this will display the User-defined order in the Tip section (if Enable User Defined Tip Out is enabled).
The adjusted tip will be displayed in the EOD report.
 |
|---|
| Tip adjust on User Defined Payment |
| ENHANCEMENT |
|---|
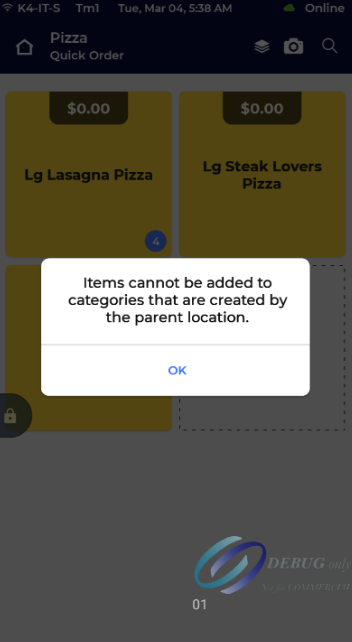
Child Enterprise – Item Cannot be Added to the Parent Category
We have added a popup in the Lite app indicating that the items cannot be added to the categories that have been created by the Parent location.
 |
|---|
| Restricted Add Item |
| ENHANCEMENT |
|---|
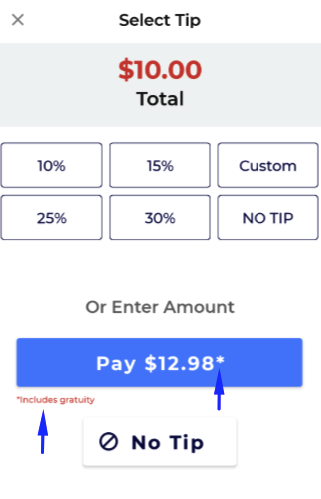
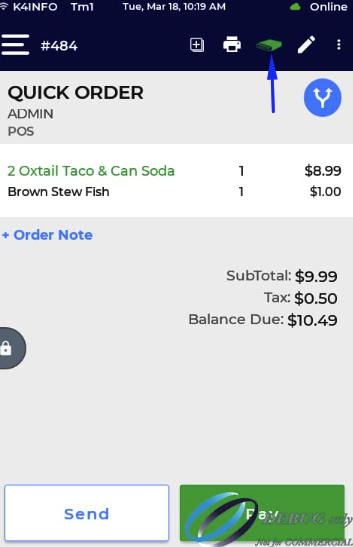
*Includes Gratuity message under Pay
Added the Includes Gratuity message at the bottom to indicate that the Pay button amount includes the gratuity amount (if any) as well.
 |
|---|
| Included Gratuity message added |
| ENHANCEMENT |
|---|
Cash Drawer in Lite app
Now you can open the cash drawer from the Lite app using the Cash payment and the Drawer option.
Please note that the Lite app will only be able to trigger the Cash Drawer and not manage it.
To have the Cash drawer icon on the Lite app, please make sure to connect the drawer to a receipt printer and enable the Enable External Printer from Partner Portal > Station > Payment Gateway.
 |
|---|
| Cash Drawer in Lite |
| ENHANCEMENT |
|---|
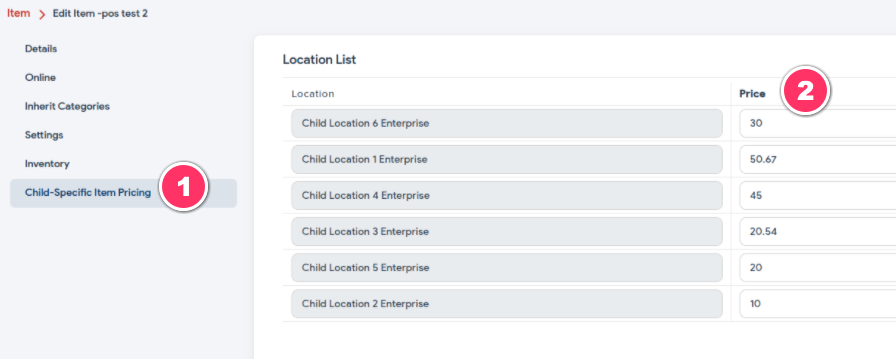
Ability to customize child-specific item pricing
The enterprise parent locations now have the superpower to customize child-specific item pricing.
This means all child enterprise locations can have different item pricing, and the Parent location can control that.
Here is how you can do that:
- Push the Item from the parent to the child from the Backend portal.
- The parent location will now have the child location’s name listed under Child-Specific Item Pricing under Item.
- Enter the item pricing and click Save. You can enter different pricing for different child locations.
- Once saved, the pricing will reflect on the child location’s catalog and Lite app.
 |
|---|
| Child-specific pricing for Lite |
| Note: This feature will be available for new Enterprise locations created after March 18th, 2025. |
|---|
Quantic Lite Release Notes
Feature Updates
Version 1.2.3 (Build 20250128)
We are pleased to announce the release of the Lite App with new features, enhancements, and bug fixes.
These features and fixes are live for all our customers and will revolutionize the way guests place an order on the Lite app.
Below are the takeaways from this release.
| ENHANCEMENT |
|---|
Introducing the Tips Report
A new printable Tips report has now been added to the Lite app.
This will allow the merchants to view the tips earned by all the employees during the selected time period.
Tips report can be enabled for a specific employee from the Employee > Report Management > Tips report.
| Tip = Gratuity + Tip House Cash = Cash Sale + Extra Charge – Credit Tips – Credit Gratuity – Cash Gratuity – Payout. Please note this report will only be applicable for the location created after Dec 4th, 2024. |
|---|
 |
|---|
| Tips Report |
| ENHANCEMENT |
|---|
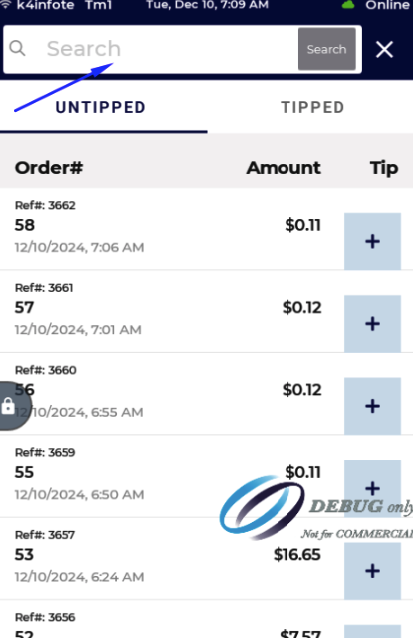
Improved order search added in the Tip section
The Tip Section order search has now been enhanced by adding a Search button on top of the tip listing.
You can put the ref number on the placeholder and tap the Search button to look for the order.
 |
 |
|---|---|
| Order Listing | Order Search with ref number |
| ENHANCEMENT |
|---|
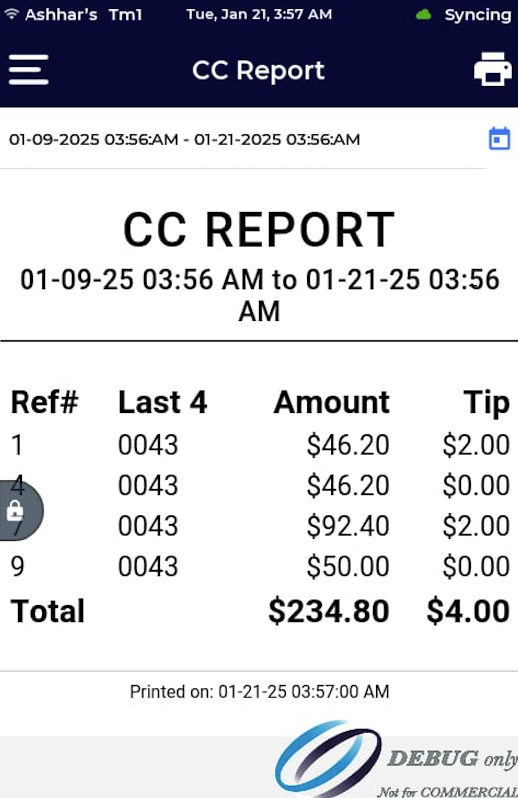
Printable CC Report added in the Lite app
Introducing the new printable Credit Card report (CC Report) in the Lite app.
This is an employee-specific report and has to be enabled for the specific employee from the backend portal, from Employee > Report Management > CC Report.
This report will display the Ref#, last 4, Amount, and Tip data for the required date range.
 |
|---|
| CC Report |
| ENHANCEMENT |
|---|
Invoiced order marked yellow
Orders invoiced from the Lite app will be marked yellow on the Service area screen.
This will allow the merchants to identify the invoiced orders from the regular orders.
 |
|---|
| Invoiced order marked yellow |
Quantic Lite Release Notes
Feature Updates
Version 2.2.2 (Build 20241029)
We are pleased to announce the release of the Lite App with new features, enhancements.
These features are live for all our customers and will revolutionize the way guests place an order on the Lite app.
Below are the takeaways from this release.
Product Enhancements
| ENHANCEMENT |
|---|
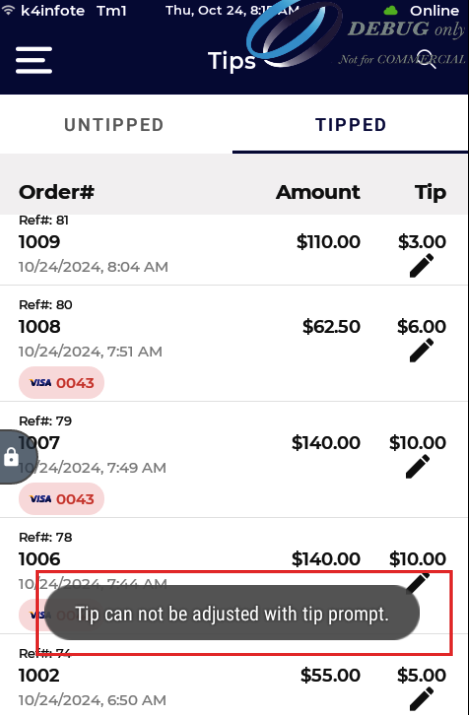
Tip Adjust restricted if already applied via Tip Prompts
We have now added functionality to restrict users from adjusting the tips if it has been added already via the Tip Prompt.
This will help us and the merchants streamline the tipping process in the Lite app.
 |
|---|
| Tip listing |
| ENHANCEMENT |
|---|
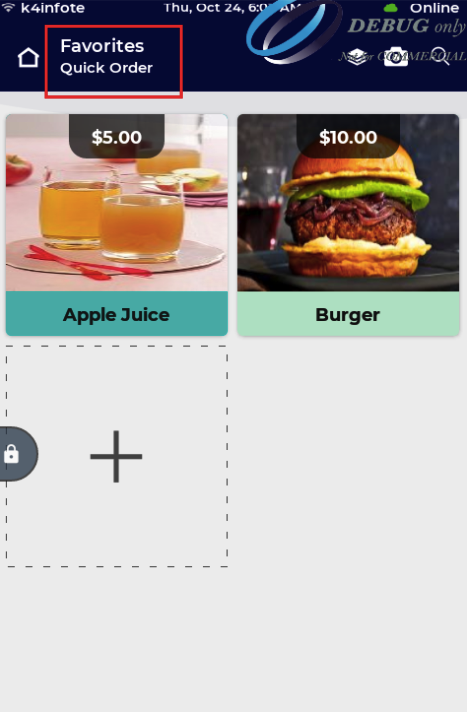
Now you can group all your favorite items in a single category
Your Lite app now supports the Favorite Items feature, which allows you to group all your favorite items in a single category regardless of their existing categories.
Say, the Burger is from the Breakfast category, and the Apple Juice is from the Desserts category.
Assuming both of them are the hot-selling products, you can group them in a single category and name that category as Favorites (or whatever you would like to call it).
How do you do that – Go to the portal > select Category > Settings > select Mark as Favorite.
Now go to the items (to be chosen as favorite) > Settings > turn on Enable as Favorite Category and select the category in the drop-down.
However, these items will be reported under their original categories in the Reports.
 |
|---|
| Favorite items |
| ENHANCEMENT |
|---|
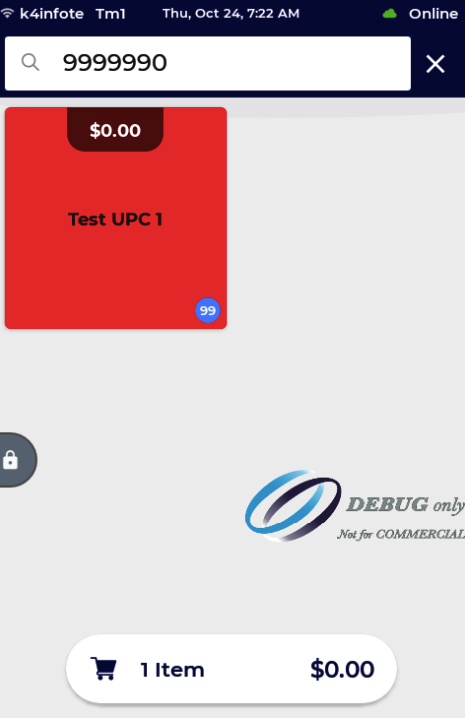
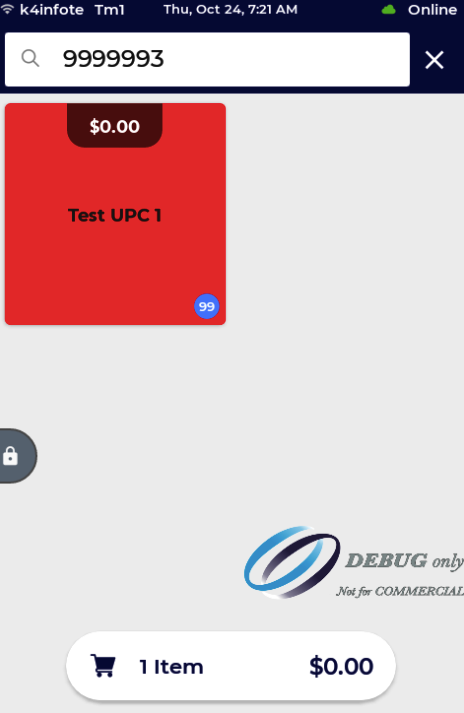
Introducing the Multi UPC
This feature allows you to assign multiple UPCs to an item. On scanning those UPCs, the same item appears in the cart.
Two ways an item can be assigned multiple UPCs: Via the CSV file or from the backend portal’s catalog section.
Here is the user manual to help go through the Multi UPC in detail.
 |
|---|
| Multi UPC in Portal |
 |
 |
|---|---|
| Different UPCs same item | Different UPCs same item |
| ENHANCEMENT |
|---|
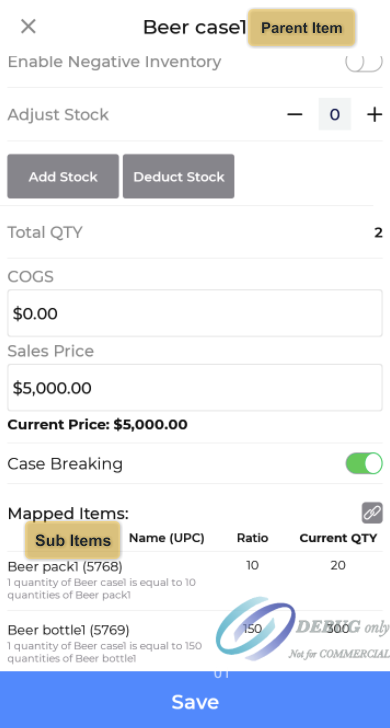
Introducing the Case Breaking
Case Breaking is a feature where you can break down the item into further smaller quantities to sell it as a different item with a different UPC.
For example, if you have a pack of beer bottles with 12 bottles, you can sell it as a case or as a single bottle.
They both will have different UPCs, so you know when it’s being sold as a single or as a whole case of 12.
A few prerequisites that need to be followed for case breaking – The Inventory module should be subscribed and Enable Case Breaking should be enabled.
Here is a user manual to help you go through the Case Breaking.
 |
|---|
| Case Breaking (Items mapping in Lite) |
Quantic Lite Release Notes
Feature Updates
Version 2.2.1 (Build 20240914)
We are pleased to announce the release of the Lite App with new features, enhancements.
These features are live for all our customers and will revolutionize the way guests place an order on the Lite app.
Below are the takeaways from this release.
Product Enhancements
| ENHANCEMENT |
|---|
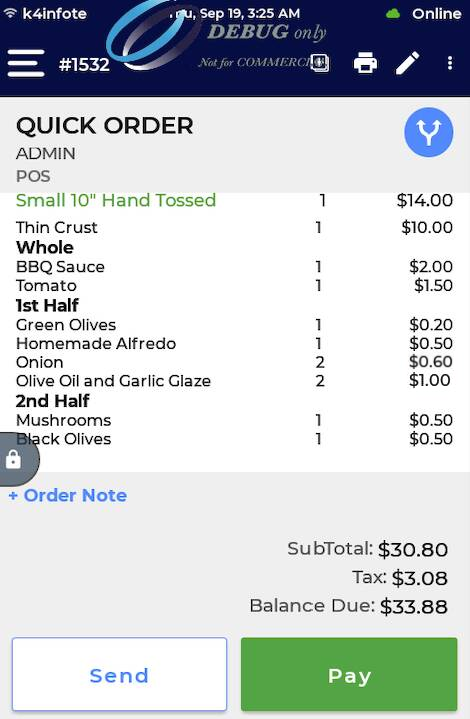
Improvements in the Pizza Topping cart display
If the combined half topping is disabled, the pizza toppings quantity for the 1st half and 2nd half will now display as 1, 2, etc (based on the qty selected).
Earlier, it used to display as ½ and then kept on multiplying based on the qty selected.
This change will impact the cart, receipt, and ticket.
 |
|---|
| Pizza topping 1st half and 2nd half |
| ENHANCEMENT |
|---|
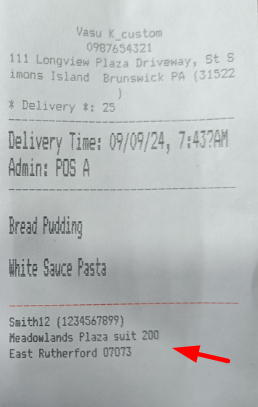
Delivery address formatted on the ticket
The delivery address will now appear formatted on the kitchen ticket as Street Address on the first line, then City and Zip on the next.
 |
|---|
| Formatted address on kitchen ticket |
Version 2.2.1 (Build 20240409)
- Added Reference Number on the Orders
- Ability to disable Cash payment on Lite app
- Automatic resend voided order to the kitchen from Select (+) or Pay
- Ignore Digits in Weight-Based UPC
- Hide Item on the Lite app
- Now track stock entry with Stock History
- Now you have an option to apply Tax on % based Gratuity
We are pleased to announce the release of the Lite App with new features, enhancements.
These features are live for all our customers and will revolutionize the way guests place an order on the Lite app.
Below are the takeaways from this release.
Product Enhancements
![]()
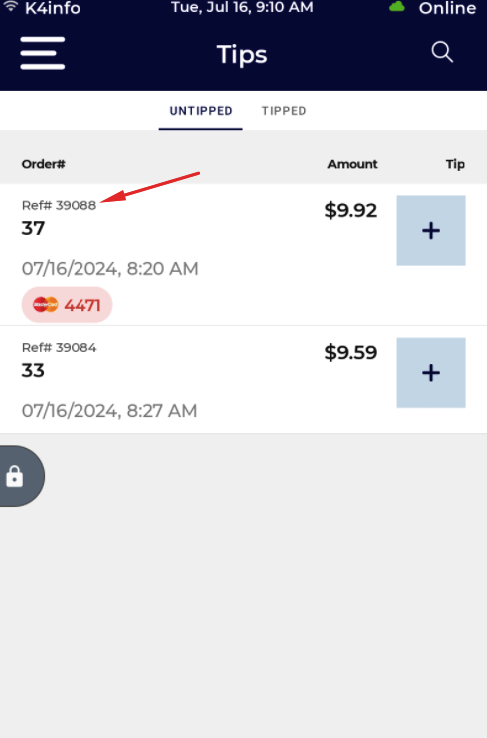
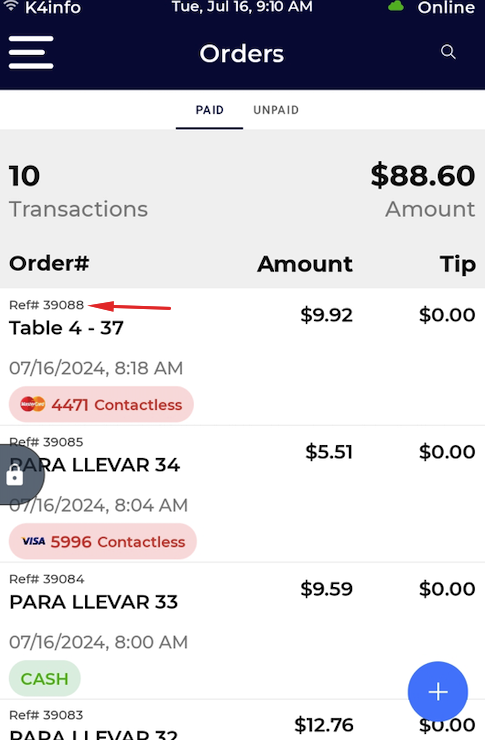
Added Reference Number on the Orders
We have now added the reference number to the orders in the Tip and Order section.
Ref number will now display on the top left side of the order as shown in the image below.
 |
 |
|---|---|
| Ref# on Tip screen | Ref# on Order screen |
![]()
Ability to disable Cash payment on the Lite app
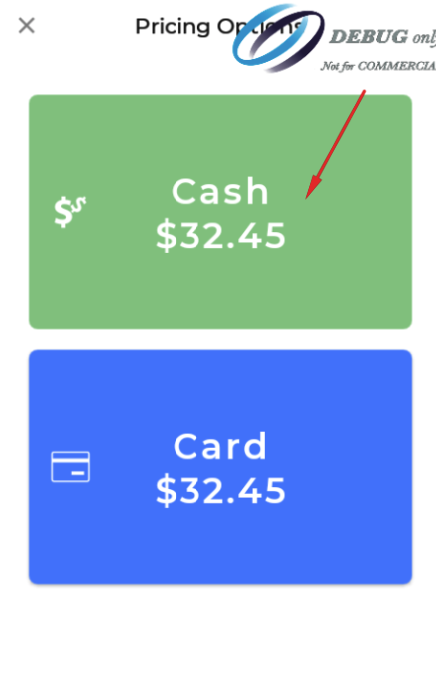
Now you can disable the cash payment from the Lite app. The cash option can be disabled using the setting “Disable Cash Payment”.
Available in the Backend/Lite app > Settings.
This is a Terminal-based setting and has to be enabled for a specific Terminal.
Once the setting is activated, the Cash button color will appear faded and unclickable.
 |
 |
 |
|---|---|---|
| As appeared on the Pay button | As appeared on the Pay button (when consumer choice is enabled) | As appeared on the Quick Charge screen |
![]()
Automatic resend voided order to the kitchen from Select (+) or Pay
Added a feature to allow you to auto-send the item to the kitchen when voided using the Select (+) option from the Lite app.
Now the order or an item will be auto-sent to the kitchen when it is voided either from the Pay button or the Select button.
This will help the kitchen staff know that they do not need to cook the item(s) since it has been voided.
Please make sure to turn on the setting – Automatic Send Void Ticket from the backend to send the voided item or order to the kitchen.
![]()
Ignore Digits in Weight-Based UPC
The weight-based UPC has now been added with the flexibility to ignore the digits in the UPC.
A new configuration – Ignore digits after the weighted UPC is added, which will allow you to ignore the digits after the UPC.
For example, if the UPC of an item is 70802658 34 1400 and you have set the following values in the UPC settings:
- Weight item UPC character count – 8 (What would be the UPC character count?)
- Ignore digits after weighted UPC – 2 (How many digits to be ignored after UPC?)
- Weight-based UPC price length – 4 (What would be the price length?)
840191230285
The breakup of the UPC will be as follows:
- 70802658 (UPC of 8 digits)
- 34 (2 digits to be ignored)
- 1400 (price length of 4 character count)
So, on scanning the UPC (70802658341400), the item added to the cart will have a price of $14.00
![]()
Hide Item on the Lite app
Now you have an option to hide an item from the Lite and keep showing it on the other platforms.
A setting – Hide For, has been added at the backend (item > online), where you can choose the platform to hide an item from.
For example, you can hide an item from the Lite but keep it unhidden for the POS app.
Once the item is hidden, you will not be able to search for that item on the selected platform.

![]()
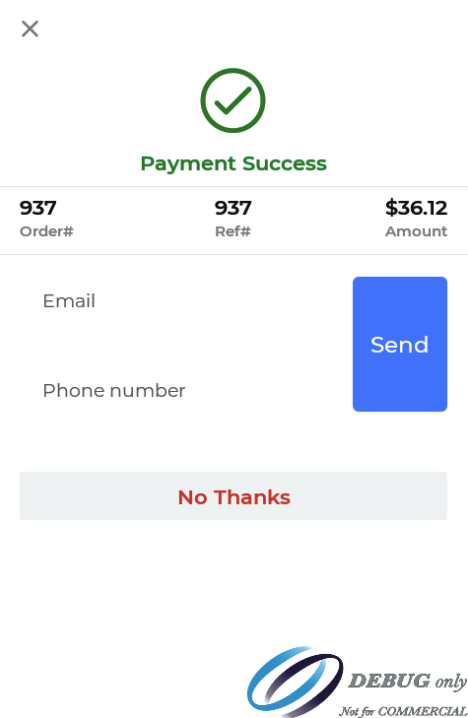
Now you can disable printing options from the Receipt pop-up
Receipt popup is enhanced with an additional feature to disable the print options.
So, the server can only share the receipts and not print them. Receipts can then be shared via text and email, but cannot be printed.
This is a setting-based feature and has to be enabled using a configuration – “Disable Print on Receipt Popup”.
 |
|---|
| Printing Option Disabled (Setting-based) |
![]()
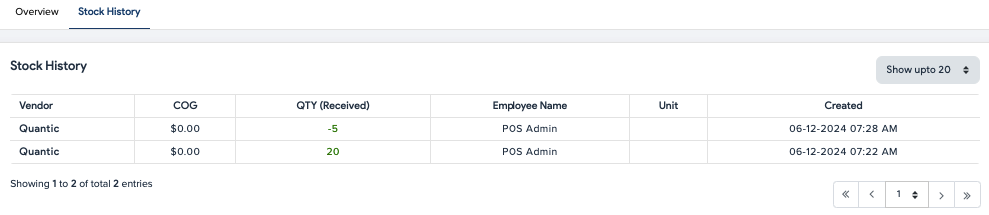
Now track stock entry with Stock History
Now you can track the stock updated from the backend or Lite to the Stock History section in the backend.
It is available under the Inventory module (backend) > item > Stock History.
Stocks entered from the following will track in the Stock History:
- Item added from Lite app (from inventory module).
- Item added from the backend portal.
- Item stock added/edited from the item screen (Lite/backend).
- Item stock added/edited from the Inventory module (Lite/backend).
 |
|---|
| Stock History tracking in the backend |
The following data can be tracked in Stock History:
- Vendor – If associated with an item
- Cost of Goods (COG)
- QTY (Received) and Date Stock Added on
- The employee who added the stock
![]()
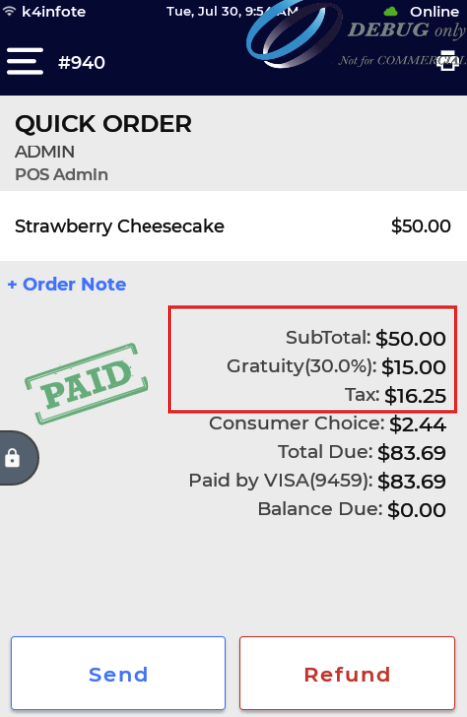
Now you have an option to apply Tax on % based Gratuity
We have added a new functionality where you can apply the tax on % based gratuity as well.
To have it work, you can enable the Enable Tax on Gratuity configuration from the backend portal.
When enabled, the tax will apply to Subtotal – Discount (if any) + Gratuity.
 |
|---|
| Tax on Gratuity (setting based) |
Version 2.2.1 (Build 20240409)
We are pleased to announce the release of the Lite app with new features, enhancements.
These features are live for all our customers and will revolutionize the way guests place an order on the Lite app.
Below are the takeaways from this release.
![]()
Enterprise on Lite – Now push the menu from Parent to Child without hassle
The enterprise module is the most beneficial feature for Quantic customers who have multiple locations.
All or some of the child locations can be linked with the parent location.
Once the locations are linked, you can push the menus from the parent to all the linked child locations in just a single click.
For example, your restaurant can share menus like super-categories, categories, items, modifiers, and so on.
Below are the exclusive benefits of using the Quantic Enterprise module.


 6.01.58 p. m.")
Version 2.1.4 (Build 20231009)
We are pleased to announce the release of the Lite app with new features, enhancements.
These features are live for all our customers and will revolutionize the way guests place an order on the Lite app.
Below are the takeaways from this release.
![]()
Reports – Cannot select a date range beyond 90 days
Now the merchants would not be able to see the reports beyond 90 days from the current date.
This has been done to improve the efficiency of your Lite app.
The dates beyond 90 days from the current date will be unselectable.

![]()
Loyalty will be taken as a discount
Now Loyalty will be taken up as a discount rather than a payment method.
Customers can redeem the loyalty to the order and pay the balance due using any payment method.
Some essential points to note for Loyalty:
- Points can be earned when an order is paid via card, cash, Gift Card, or user-defined payment method.
- Points can also be earned while settling the house account through any acceptable payment method.
- Points will be applied and earned on the subtotal.
- Points expiry (in days) can be set up from the backend (module).
- Max redeemable points per order can be set from the backend (module).
- Points are editable from the customer profile (not when the expiry is set).
- Points can be tracked from the Reward History (Customer Management in the backend)
- Manual entry of the points to redeem is also allowed on the POS.
- Points are non-refundable.


![]()
Now House Account payment can be refunded
Now the House Account payment can be refunded from the Lite app.
Servers can tap the refund button on the Lite app after the order is fully paid and get the refund initiated for the customers.
Please make sure to enable the refund for the house account from the User Defined section in Setup.


![]()
Debit Card Prompt on Card Payment
Now the merchants will see the debit card pop-up on the card payment screen.
Servers will be able to select the credit or debit option based on the card to swipe.
The surcharge will only apply to the Credit payment, while the Debit payment won’t have the surcharge applied to it.
This is a configuration-based setting (Enable Debit Pin) and can be enabled from the Station > Payment Gateway.


![]()
Total Spent (Loyalty) removed from Customer Profile
The Total Spent section has been removed from the Customer Profile.

![]()
Support for Weekly Time Report added in the Lite app
Now your Lite app is loaded with the Weekly Time Report.
Employees can get access to the Weekly Time Report from the Report Management module in the customer profile.
This reporting will help the merchants do the precise tracking of the clock-in and clock-out time, total hours worked, and hourly rate of all employees.
This report has been set to track the man-hours weekly that run by default from Monday 5:00 AM to the current time.

