Portal Dashboard
How to Create or Edit the Menu?
Note: Make sure you have backend/portal menu management privilege to add or make any changes to the Menu.

- In this section, our quick and easy steps will include, but not be limited to, Creating Categories, Items, Modifiers, and selecting additional preferences, which include Enabling web ordering.
- Click the left navigation button; from here, you can navigate to and from any section.
- From the Catalog section, you can create, add to, or modify your menu.
How to create a Super Category?
Super Category is the parent category that is created to track your revenue for various groups based on association.
This is used to consolidate groups into broader categories, such as Food or Alcohol, for high sales reporting purposes.
Please note: Super Category is primarily used for high-level reporting and will not reflect in the physical menu on POS.

- To create a Super Category, click on Super Category located on the top left of the Menu Management screen.
- Enter the name that you want to assign to the Super Category, select the Tax Class, and click the ➕ Add & Setup icon.
- Click ➕ Add if you do not want to set up the Super Category right now.

- Fill in all required fields as seen in the screenshot.
- Now select a Background and Font Color from the color grid.
- You may proceed to select other details if applicable.
- After all applicable details have been created, click on the Save button to create a Super Category.
How to create a Category?
Categories and subcategories should reflect how your actual menu is organized, or should be displayed or divided for easy navigation.
Categories will inherit all settings for the Super Category, and Subcategories will automatically inherit the Category settings, unless otherwise specified.

- To create a new Category, click the Categories tab at the top of the Menu Management screen.

- Enter the name that you want to assign to the Category, select the Super Category, select the Tax Class, and click the ➕ Add & Setup icon.
- Click ➕ Add if you wish to set up the Category later.
- In this example, we have created the Soup Salad category.

- Fill in all required fields as indicated in the screenshot. Add the image of the category in the image box. Enter the category name in the Category Name field.
- Tap the checkboxes next to Copy to Kitchen name, Copy to Receipt name, and Copy to Web name (if you want to keep the same name of categories at these places).
- Select the Super Category, Tax Class, and Other Tax Class from the dropdown.
- Set the Background color and the Font color for the sub-category name in the POS.

- Click the Assignment tab.
- Now select the Printer, KDS, and Course that you want to associate this category with.

- Click the Online Ordering tab.
- To activate this category for online ordering, turn on the switch next to Enable Web and enter the name in the Web Name field with which you want this category to be recognized in online ordering.
- To mark this as a featured category, ✔️ the checkbox next to Mark as Highlighted/Featured.
- You may also describe this category in the Web Description field. This description will show up on the location’s online platforms next to the category.
Note: On enabling web at category level, all the associated sub-categories and items will inherit the same setting only if the Inherit Online is enabled for that sub-category or item.
The sub-category will inherit the sub-category name as a web name.
The item will inherit the item price as web price, the item name as web name, and the item description as web description.

- Now go to the Additional Settings tab.
- Enter the name of the category you want to display in the Kitchen Printer and Receipt.
- Select the Terminal to be associated with this category.
- Fill in the other details and click Save in the bottom right corner.
How to create a Subcategory?
Creating subcategories will break things further for easier navigation of large categories.
Note: It may be important to minimize subcategories to reduce the number of taps needed to get to an actual item.

- Open the Catalog page as shown in the screenshot. Click the Categories tab at the top.
- Click on the ➕ Add Sub-category icon underneath the associated Category as displayed in the screenshot.

- Fill in all required fields as indicated in the screenshot. Add the image of the sub-category in the image box. Enter the sub-category name in the Category Name field.
- Tap the checkboxes next to Copy to Kitchen name, Copy to Receipt name, and Copy to Web name (if you want to keep the same name of sub-categories at these places).
- Select the Parent Category, Super Category, and Tax Class from the dropdown.
- Set the Background color and the Font color for the sub-category name in the POS.

- Click the Assignment tab.
- Now select the Printer, KDS, and Course that you want to associate this sub-category with.

- Click the Online Ordering tab.
- To activate this sub-category for online ordering, turn on the switch next to Enable Web and enter the name with which you want this sub-category to be recognized for online orders.
- To mark this as a featured sub-category, ✔️ the checkbox next to Mark as Highlighted/Featured.
Note: Enable Web will be enabled automatically for this sub-category if Enable Web is activated for its parent category and the Inherit Online is enabled for this sub-category.
In such a scenario, the sub-category name will automatically appear in the web name.

- Click the Inherit Properties tab.
- Here you will see that by default, all boxes are marked. If you do not want the sub-category to inherit a specific setting, uncheck the box next to that setting.
Note: If Inherit Online is selected, this sub-category will inherit the settings from the Online Ordering tab.

- Now go to the Additional Settings tab.
- Enter the name of the sub-category you want to display in the Kitchen Printer and Receipt.
- Select the Terminal to be associated with this sub-category.
- Fill in the other details and click Save.
How to add an item to the menu?
Adding an item to the menu is the same as creating a category.
Here you can now enable pricing, if applicable, and create more specific settings, such as adding custom colors, modifiers, images, or changing printers.
Note: Later, if you make changes to categories or modifier groups, items may or may not inherit those changes.
This ultimately depends on the type of changes being made or whether the inherited settings are checked or unchecked.

- Click the Item tab located at the top of the Menu Management screen.
- Now, enter the name that you want to add and the Sale Price.
- Click the box underneath the Category.
- On the drop-down list, select the category/subcategory to be associated with the item being created.
- Select the Tax Class and click the ➕ Add & Setup button (in Red).

- Fill in all required fields as indicated in the screenshot. Add the image of the item in the image box. Enter the item name in the Item Name field.
- Tap the checkboxes next to Copy to Kitchen name, Copy to Receipt name, and Copy to Web name (if you want to keep the same name of the item at these places).
- Enter the Sale Price. If you wish to keep the item price the same for the online orders, check the box next to Copy to Web Price.
- Now select the Super Category, Category, and Tax Class from the dropdown.
- Fill in other details, including the Background color and the Font color for the item name in the POS.
Please note: After creating the item and changing the item name, you can choose to keep the same changes for printer, POS, and Web names.

- Click the Assignment tab.
- Now select the Printer and KDS that you want to associate this item with.
- Enter the item name for the kitchen printer and receipt in the Kitchen Name and Receipt Name.

- Click the Online Ordering tab.
- To activate this item for online ordering, turn on the switch next to Enable Web.
- Enter the item name in Web Name with which you want this item to be recognized for online orders.
- Enter the item price for online orders in the Web Price field.
- To mark this as a featured sub-category, ✔️ the checkbox next to Mark as Highlighted/Featured.
- Enter the item description that you want to show up for online orders and select the Designer.
Note: If the Enable Web is activated for the parent category and Inherit Online is activated for this item, it will have Enable Web automatically turned on.
The item price will be reflected as web price, the item name as web name, and the item description as web description.

- Click the Inherit Properties tab.
- Here you will see that by default, all boxes are marked. If you do not want the item to inherit a specific setting, uncheck the box next to that setting.
Note: If Inherit Online is selected, this item will inherit the settings from the Online Ordering tab.

- Go to the Additional Settings, enable or disable the options to customize the POS as per your store’s requirements.

- Go to the Inventory tab, enter the existing in-hand quantity of an item in the QTY (in hand) field, and follow the steps below.
- Put the item-related details in SKU, MPN, and GL Account.
- Click Generate UPC. It will generate a unique 12-digit number in the UPC field.
- Select the item manufacturer from the Manufacturer/Brand drop-down.
- Tapping on the Enable negative inventory checkbox will allow you to put a negative value in the item quantity.
- Tapping on the Enable Purchase Order checkbox will enable the purchase order for this item.
- Tapping on Track Inventory will unhide inventory-related sections for an item.
- Vendor: Select the name of the vendor (who is supplying the said item) from the drop-down list. If you can’t find the vendor in the list, first add it from the Vendor tab under Inventory.
- Additional Vendor: Select the name of the additional vendor if an item has multiple vendors.
- Reorder Point: Put the item quantity at which you want the item to be reordered.
- Unit: Select the unit to measure the item, for example, number, kg, etc.
- Item Size: This field will tell the size of the item per piece if the unit is a piece.
- Item Size Unit: Select the item size measurement unit.
- Is Packet: Check this box if an item has been added as a carat or bundle.
- Packet Size: This field is enabled automatically when the Is Packet checkbox is marked. This field tells how many pieces are in one carat or bundle.
- Show pop-up for insufficient inventory: Tapping this checkbox will notify you whenever there is insufficient inventory.
- Once done, click Save.
How to associate modifiers with categories or items?

- Click the Catalog on the left navigation panel.
- Click the Categories tab at the top.

- Now tap the
 button next to the category to associate a modifier with this category.

- Select the modifier group from the Modifier Group drop-down. Click
 the button to add the modifier group in the section underneath.
 - This way, you can associate multiple modifier groups with the category.

- The added groups will be displayed underneath, where you can customize them as per your choice.
- Free Mod Count: Enter the number of free modifiers you want to offer with this item category.
- Multi Select: Tap this checkbox if you want the multiple modifiers to be selected at the same time from the same group.
- Mod Forced: Select the checkbox to make this a forced (mandatory) modifier.
- Min Forced Count: Enter the minimum forced modifier count.
- Max Forced Count: Enter the maximum forced modifier count.
- Status: Tap this checkbox under Status to enable all the modifiers in the group. To enable a specific modifier, you can click the Status box next to that particular modifier.
- Unhide the list of modifiers by clicking the
 icon adjacent to the modifier group.

- The list of modifiers will be expanded underneath. Here you can set the modifier price, choose to overwrite the existing price of the modifier, and enable or disable the modifier. Check the descriptions below:
-
- Price: Enter the price of the modifier. If Overwrite is chosen in the next field, the Price will overwrite the existing price of the modifier. On the contrary, if the % of the product is chosen in the next field, the new modifier price will be the x percent of the product, where x is the figure mentioned in the Price. For example, if 2 is mentioned in Price and the item price is $7, the modifier price will be 2% of $7 = $0.14.
- Quantity: This is the default quantity of the modifier. For example, if you enter 2, by default, the 2 number of modifiers will appear preselected on the POS.
- Included: Tap this checkbox if you want this modifier to be included automatically when any item of this category is chosen.
- Status: Tap the checkbox to enable this modifier.
-
- Once done, please click the
 button to save the changes.

- As we have associated two modifiers (Teriyaki and Sweet Chili sauce) with the Sandwich category, both of them will be visible on the POS screen under the parent modifier when any item from the sandwich category is chosen. The price of the Teriyaki sauce is $0.5 (overwritten price) and the Sweet Chilli sauce costs 2% of $7.00 (the price of Tangent Grilled Cheese), i.e., $0.14. The prices will be reflected according to the settings you have made at the backend. Similarly, you can associate modifiers with the items. Go to the Items section in the Catalog and follow the same steps as instructed above.
How to create a modifier group?
A modifier group will contain multiple related modifiers, which are leveraged to structure your menu.
It is recommended to use logical modifier groups, such as what type of dressing for the salad being ordered, which would be called Salad Dressing, or an alcohol preparation modifier group called Drink Prep, etc.
Note: It may be important to minimize the Modifier groups.
Also, it needs to be ensured that groups are structured and labeled correctly.
This will reduce the risk of replicating similar group types.
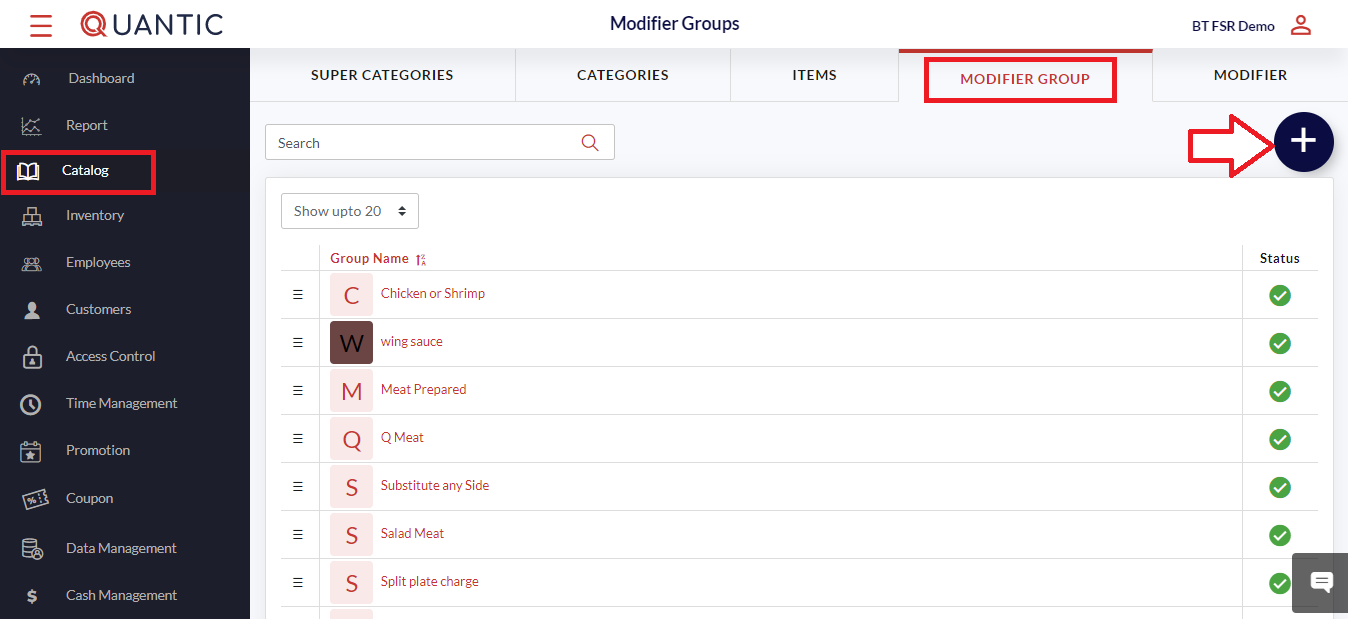
- Click the Modifier Groups tab on the top menu bar.
- Once this icon is highlighted, click on the ➕ icon on the right side of the screen.

- Click the Detail tab and enter the Name, choose the Background and Font color as well.

- Now, click the Settings tab. It is recommended to select the box adjacent to Mark as Forced Modifier.
- Then enter the Minimum and Maximum Forced Count in the respective field boxes. Once done, click Save.

- Finally, click the Pre/Post Modifier tab and fill in the required details. By setting pre/post on the modifier, the order accuracy is enhanced, leading to efficient restaurant operations. You also have the option to overwrite the price at the Modifier group level. Example: Extra Mustard can have a fixed price, or the price can be a multiplier. You also have the option to enter a different name for the POS and the Kitchen. Abbreviations can be used for the Kitchen if required. It will print the kitchen ticket with the abbreviations.
- Once done, click Save in the bottom right corner.
Example: Condiment option is a modifier group, and mustard and ranch are the modifiers under that group.
With the help of pre/post modifiers, you can now associate the modifiers with prefixes such as “No Mustard” or “Light Ranch”.
In this scenario, no and Light are the prefixes for the modifiers.
Another option will be to add the modifier with the suffix as “Ranch On the side” or “Mustard Extra”.
In this case, on the side and Extra are acting as a suffix for the modifier.
How to create a modifier?
Modifiers are the add-ons that a customer can choose while making a purchase.
To start creating a Modifier, you must first create a modifier group, as modifiers need to belong to a particular group.

- Click the Modifiers tab on the top-right menu bar.
- Hit the box below Modifier Group and select the modifier group for which you want to create the modifier. Click the ➕ button on the top right side of the screen.

- Click the Detail tab, enter the Modifier Name, and fill in the other details.
- If there is a fixed cost associated with the modifier being created, you may add the price in the Price field.
- Finally, select the Background color and the Font color.

- Now, click the Assignment tab, select the POS name, Kitchen name, and Receipt name.

- Similarly, fill in the details in the Online Ordering and Other Settings tab as well.
General modifier groups and associated items
Here are some modifier groups and associated items.
- Meat Temperatures: Blue, Rare, Medium Rare, Medium, Medium Well, Well Done, Black.
- Alcohol Prep Bruised, Rocks, Neat, Dirty, Double, Stirred
- Salad Dressings: Blue Cheese, Ranch, Creamy Italian, Oil, Vinegar, House Italian, Balsamic Vinaigrette
- Substitutions: Cheese Type Mozzarella Cheese, Feta Cheese, Cheddar Cheese, Provolone Cheese, Swiss Cheese
- Bread Type: Rye, Country, White, Multigrain, Sourdough, Whole Wheat
- Egg Prep: Scrambled, Sunny Side Up, Fried, Poached, Egg Whites
How to Update a Catalog Using a CSV File?
You can add or update the catalog on the backend portal and POS using a CSV file.
To begin with, you will need to download the catalog data import template from the backend portal, fill in the item details, and upload the file into the Data Management in the backend portal.
Below is the complete overview of how you can update the catalog using a CSV file.

- Log in to your location’s backend portal.
- Go to the left navigation and click Data Management.

- Now, click the Download Template button next to the Import Menu/Catalog Item. In case you wish to update the catalog items with modifiers, please click the Download Template next to Catalog Item With Modifier.

- The downloaded template will contain column headers that are required for uploading into the system.
- Not all of the information does not needs to be filled out. However, there will be an error if there is no product name.

- Once the appropriate information has been entered, we can return to the data management area and upload the .csv file.
- Once the file has been chosen, click the Upload button as shown in the screenshot, and a confirmation message will appear once the upload has finished.

- The uploaded items will appear in the Catalog. You can navigate to the Catalog on the left, click the Item tab, and search for the item that you have uploaded through the CSV file.
How to create combo meals in Quantic POS?
Now you can create combo meals in the Quantic POS and offer multiple items in a single meal.
For example, you can create a combo meal of a burger, French fries, and Diet Coke.
To get started, you simply need to go to the backend portal, choose the main product, and add more items as a combo to it.
Here we are going to create a combo meal that consists of Tangent Taco + Fries + Diet Pepsi. You can create your combo items by replicating these steps.

- Log in to the backend portal and click Catalog on the left navigation.

- Select the main item of your combo meal. In our case, it is Tangent Taco.

- Tap the Combo checkbox to start adding more items to this combo meal.

- Tap the Select Item field and select items from the drop-down.
- To add more items, click
 the button. Similarly, you can create as many fields and add new items to them.

- Enter the combo meal price in the Sale Price field. Here, we want our combo meal to be priced at $7.00.
- Once done, don’t forget to click the
 button to save the changes.

- Here, the Tangent Taco is clubbed with Basket Fries and Diet Pepsi. The revised price for this combo meal is $7.00.
Bulk Price Editor
Quantic backend portal allows you to change the price/web price of all the items in a category in bulk.
You can also select multiple items in a category and set one price for them all. Also, these prices can be increased/decreased by a set percentage.
Here is a high-level overview of how you can update the item prices in bulk.
How to update the price of a single item?
To update the price of a single item from a Price Editor, you can navigate to the Catalog section in the backend portal and proceed with the following steps.
Let us understand this with an example.
Suppose you want to set the price of Fried Mozzarella (which falls under the Appetizers category) to $8.
Here is how you can do it.

- Go to the Catalog on the left navigation bar.
- Click the Price Editor tab as shown in the screenshot.
- Tap the Category drop-down and select Appetizers (the category where you want to update the item price).
- The list of items under Appetizers will be displayed on the screen.
- Look for the item you want to change the price of, Fried Mozzarella, in our case.
- Tap the field under Price and update the new price. Similarly, you can also update the web price for any item.
- Don’t forget to click the Submit button once you have updated the item price.

- Once the price is updated, it will be reflected adjacent to the item name as shown in the above screenshot. Here we have updated the price and web price of Fried Mozzarella to $8.
How to update the item prices in bulk?
If you want to escape from updating the item prices one by one, you have an option to change the item prices at once using the Bulk Price Editor.
Suppose you need to change the price of the items in the Appetizer category to $5; here is how you can do it.

- Under the Catalog menu, click the Price Editor tab.
- Tap the Category drop-down and select Appetizers (the category where you want to update the item price).
- The list of items under Appetizers will be displayed on the screen.
- Select the checkbox next to the item(s) and click the
 button as shown in the screenshot. To select all the items at once, tap the checkbox next to Item Name.

- Tap the Set To option and set the price to $5.

- If you want to update the item(s) price on the eCommerce platforms as well, select the Web Price checkbox. Using this feature, you can keep different prices for physical stores and the web portal.
- Click the Update button to save the new price. Click Ok on the confirmation pop-up.
- Click the Submit button once you have updated the item price.

- Once the price is updated, it will be reflected adjacent to the item name as shown in the above screenshot. Here we have updated the price and web price of all the appetizers to $5.
How to increase/decrease the item(s) price by a fixed amount?
What if you want to change the item’s price by a fixed $ amount?
Let’s say, increasing the price of all the bottled beer by $2.
Here is what you need to do.

- Select Bottled Beer from the category drop-down.

- Tap the checkbox next to Item Name or select the specific item and click
 .
.

- Set the option to Increase By.
- Select the By Price option and enter 2 in the given field.

- Select the Price and Web Price checkboxes to update the prices across the offline and online channels.
- Click Update, and click Ok on the confirmation pop-up.
- Click Submit to save the prices.
How to increase/decrease the item(s) price by a fixed percent?
Users who want to change the item price by a fixed percentage can do it using the following steps.
Like decreasing the price of all the beverages by 1%.

- Select the Beverages option in the category drop-down.
- Tap the checkbox next to Item Name or select the specific item and click the button.

- Select the Decrease By option.
- Select the By Percent option and enter 1 in the field underneath.

- Select the Price and Web Price checkboxes to update the prices across the offline and online channels.
- Click Update, and click Submit to save the prices.
Employee Management
Quantic allows you to perform labor management from the backend portal. It runs in sync with the Quantic POS.
You can add new employees, assign privileges to them, or generate a unique QR code for them.
How to add an employee?

- Log in to the Quantic backend portal, click Employees on the list. It will open a new screen as shown in the above screenshot.
- Click the ➕ icon in the top right corner.

- Click the Information tab.
- Fill in the employee details – name, email address, phone number, select the assigned service area, and landing area.
- Click Add Role to select multiple roles for the employee under the Assigned Roles tab. Also, fill in the details under Address, Payroll Info, Details, and Settings. Once done, click the Save button to create a new employee on the portal.
How to give portal access to existing employees?

- Select the employee name to whom you want to give the portal access.

- Now, click the Access Management button in the top right-hand corner.

- A new screen will appear, where you can choose the type of portal access that you wish to assign to your employee.
- Once you are done with the selection, click Save.
How to generate a QR code from the backend portal?

- Log in to the Quantic backend portal.
- Click the Left navigation button.
- Click Employee as seen in the screenshot.
- Click the name of an employee for whom you want to generate the QR code.

- Here, you need to click on the QR code on the right side of the screen.
- The QR code will be downloaded in PDF format.
How to add a pay rate for an employee?

- Log in to the Quantic backend portal.
- Click the Left Navigation button and click Employees.

- On the Employee screen, click the Edit button on the top right-hand side.

- Click the Assigned Role field to expand the sections further.
- Now, simply update the current Hourly rate for a particular employee.
- Once done, click the Save button.
How to set up Only Clock In access for an employee?

- Log in to your Quantic backend portal.
- Go to the Employee section under the left navigation bar.
- Click Access Management on the top right-hand side of the screen.

- Search for Enable Only Clock in under the Access Management window (use Ctrl+F) and check the box that says Enable Only Clock in.

- If you could not find it, click +Assign Additional Privileges, and you’ll surely find it under the hidden settings.
- Select the appropriate checkbox as seen on the screen and click Save.
How to use Enterprise Data Management?
Using Data Management in the Quantic backend portal, you can upload a .csv file into the backend portal and push the data as well.
How to upload a .csv file to the backend portal?

- After logging into the portal, click the navigation button on the top left.
- Click
 the Data Management icon.

- Once at the Data Management section, a link is provided that will allow you to download the Excel template for
- Customer Data.
- Import Menu/Catalog Item.
- Modifier Group/Modifier.

- The template will contain column headers that are required for uploading into the system.
- Not all of the information does not needs to be filled out. However, there will be an error if there is no product name
- Once the appropriate information has been entered, we can return to the data management area and upload the .csv file.

- Once the file has been chosen, click the Upload button as shown in the screenshot, and a confirmation message will appear once the upload has finished.
How to push data to child locations?

- From the backend portal, navigate to the Catalog section.
- At the catalog/menu section, select the Super Categories or Categories that need to be pushed to the other locations.
- Then click on the chain symbol to select which locations the data will be pushed to.
- Click the Save button once the appropriate locations have been determined.
- Next, repeat the process for the categories, items, modifier groups, and modifiers that need to be pushed.
How to Transfer Sales?
The Transfer Sale section lets you transfer the sale after the order is closed/paid.
For instance, if by mistake another server closed the order, then s/he can transfer that sale to the correct server after the payment.
Here is how you can transfer the sales.

- Click the left navigation button and tap on the Transfer Sale button as seen in the screenshot.
- Enter the unfinished order’s Reference Number in the space provided.
- Click Next to proceed.
How to Track Inventory?

- Log in to the Quantic backend portal, click the Navigation button in the top left corner.
- Click the Catalog
 icon on the list.
 - Now, click the Items tab on the top header.
- The list of items will be displayed at the bottom. Click on any item for which you want to enable the inventory.

- Now, click the Inventory tab on the top header.
- Enter the item’s inventory count in the QTY (in hand) field.
- Fill in the required information in the field boxes and make sure the box adjacent to Track Inventory is check-marked.
- Finally, click Save. The inventory for this specific item is enabled now. Similarly, you can enable the inventory for other items in the store
Time Management
With Quantic POS, you can track the working hours of your employees with the help of the Clock-In/ Clock-Out feature.
Under Time Management, you will be able to see all the employees’ clock-in and clock-out times.
You can edit the clock-in/clock-out time or add clock-in and clock-out for an employee if he/she has forgotten for that day.
How to add Clock In/Clock Out time for any employee?

- Click on the left navigation bar main menu, and click on Time Management.
- To add a new time entry, click on the
 sign-in in the top right corner as shown in the image above.
 - To edit an existing time entry for an employee, click
 on the right-hand side of the employee’s name.

- Tap the Employee drop-down and select an employee from the list.
- Once an employee is selected, select the role for that employee from the Role drop-down that lists all the associated roles of the employees.
- From the Status drop-down, select the one for which you want to add the time entry.
- If it’s a Clock-In entry, the status will be Clock-in, enter the Clock-In time, and click on Save.
- If you want to enter Clock-Out entry, the status will be Clock-Out, and enter Clock-Out time only.
- Finally, click
 as seen in the screenshot.
How to Add Customers?

- Log in to the Quantic backend portal.
- Once you are logged in, click on the left navigation bar.
- Select Customers under the left navigation and click the ➕ sign as seen in the screenshot.

- A new window will pop up, enter the required fields like Name, email address, phone number, etc.
- If you wish to mark the customer as Tax-exempt, then Tax-Exempt should be enabled as seen in the screenshot.
- Click on Save to proceed.

- Click the Billing Address tab.
- Put the address in the fields as shown in the screenshot.
- The Country field will show the USA by default, but you can select any other country from the drop-down.
- To add more addresses, click
 .
. - Also, you can set an address as the default by tapping on the
 button.

- Click the Shipping Address tab. Here you should enter the shipping address of address. It may or may not be the same as the billing address.
- Put the address in the fields as shown in the screenshot.
- The Country field will show the USA by default, but you can select any other country from the drop-down.
- To add more addresses, click .
- Also, you can set an address as the default by tapping on the button.

- Tap on the Price List tab.
- Select the applicable price list for this customer.
- Every price list will have an expanded field where you can enter the items to include or exclude from the price list. At the most, you can add 100 items in the Included Items and Excluded Items field.
- Once done, click Save.
How to Create a New Role?
You can use the Access Management section in the Quantic backend portal to create a new role for employees.

- Begin by logging in to the Quantic backend portal.
- Click on the left navigation bar
 click on Access Control.
 - To add a new role, click on the
 sign-in button in the top right corner, as shown in the image.
- A new screen will appear, enter the role name that you want to assign to an employee.
- Select the privileges for this role by selecting the checkboxes on the screen.
- To edit an existing role, tap on the employee name and select an appropriate role on the new screen.
How to Create a Coupon?
A coupon is a piece of information that is issued by a restaurant or a retailer to customers to buy goods or services at a lower price than usual.
The restaurants or retailers that are using the Quantic POS can issue the discount coupons from the backend portal.
Once the coupon has been issued, a customer can take it to the restaurant and get it redeemed for the order.
Please go through the following document to learn about how to create a coupon and redeem it from the POS.

- After logging in to the Quantic backend portal, click the Coupon menu on the list.
- You will see the list of existing coupons on the screen. If you have not added any coupons, you will see nothing over here.
- To add a new coupon, click the ➕ icon on the top right of the screen.

- The Add Coupon screen appears, where you need to follow the steps below.
- Tap on the Coupon Name field and enter the name of the coupon, such as – 10%Off.
- Coupon Code – Enter the coupon code that customers can use to redeem the coupon.
- Available Quantity – Here, you can put the available quantity of such coupons.
- Issue Date and Expiry Date – Here, you can set an eligible period for the coupon. During this period, the coupon code can be used, and it expires beyond this time limit.
- Now choose the Discount Type as % or $. Enter the value in the box underneath.
- In Included Items, enter the item names for which this coupon code shall be applicable.
- In Excluded Items, enter the item names for which this coupon code shall not be applicable.
- Customize Coupon Message – Here, you can enter the message on the top and bottom of the coupon. Expand the Customize Coupon Message field by tapping on it, fill in the Line 1 and Line 2 fields with a message that you want to appear on the top and bottom of the coupon.
- Once done, click Save.

- Once you have created the coupon, it will appear under the coupon list as shown in the above screenshot.
- You can download the coupon, send it to the customers via text or email, and activate or deactivate the coupon as well.
-
- Tap under PDF to download the coupon.
- Tap to email the coupon to the customer.
- Tap to text the coupon to the customer.
- Tap

- This is how a standard coupon will look. It has a coupon name written at the top and a QR code printed at the centre that customers can scan to redeem. The coupon also mentions the expiration date at the bottom. Once a guest has been issued a coupon, s/he can take it to the restaurant/retail and get it scanned to avail of the discount.
Redeeming the Coupon
Once the coupon has been issued, a customer can show that coupon to the cashier.
The cashier/server will scan that coupon through the POS, and the available discount will be offered to the customer.
Please be informed that the coupon will only be redeemable at the location where it was created.

- Log in to the POS app using the same username and password that you have used to create the coupon.
- Now add items to the cart.
- Click the Pay button at the bottom of the POS.

- Scroll the list and click the Redeem Coupon button.

- Tap the Camera pop-up, and the POS camera will open.
- Now bring the coupon QR code in front of the POS camera, and it will be scanned, and the coupon will be applied to the order.
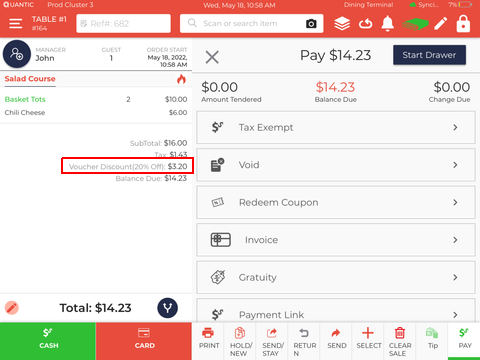
- On successful validation, the applicable Voucher Discount will be displayed on the order screen.
- The customer can pay the balance due via cash or card, and the order will be closed.
Inventory Management
With Quantic POS, you can now track your inventory in real-time so you know what to reorder and when.
Easily find thousands of items by organizing them in their respective categories.
Quantic can update inventory count for you, send automatic stock alerts, and generate purchase orders so you remain stocked always.
Creating a new Vendor

- Go to the left navigation and click Inventory.
- Now, click the Vendors tab as shown in the screenshot.
- The existing vendor list will appear on the screen.
- You can tap on any vendor’s name to review or edit the vendor information.
- Click
 to add a new vendor.

- Enter the vendor information like name, address, and contact number.
- Click the Net Terms field and select the net payment term.
- Once the information is filled in, click Save.
Adding a Designer
Note: The Designer tab is only meant for E-Commerce Enterprise users.
It will appear in the Inventory section when the E-Commerce Enterprise module is enabled for that location in the backend portal.

- Go to the left navigation and click Inventory.
- Now, click the Designers tab as shown in the screenshot.
- The existing designers’ list will appear on the screen.
- Click to add a new designer.

- A new window will appear, enter the designer name, write a description, and insert an image.
- Once done, click Save.
Adding a new Manufacturer

- Go to the left navigation and click Inventory.
- Now, click the Manufacturer tab as shown in the screenshot.
- The existing manufacturer’s list will appear on the screen.
- Click to add a new manufacturer.

- A new window will appear, enter the manufacturer name in the Manufacturer field.
- Turn on the toggle switch underneath Enable Brand if you wish to mark this manufacturer as a brand.
- Enter the manufacturer’s description in the given field.
- Click the ➕Add Image button to upload the manufacturer’s brand logo.
- Click Save.
How to add Inventory?
You can add stock or inventory from the Quantic backend portal.
Once stock is added, the portal also allows you to filter the inventory by Stock Status (over or under), Category (item category), and Status (active or deactivated).
Here are the steps you can follow to add inventory in the Quantic backend portal.

- Log in to your Quantic backend portal.
- Click the Hamburger button on the top left corner.
- Click Inventory (make sure you are on the Inventory tab) and click the ➕ icon on the top left.

- The Add Stock screen appears. Here you can add item details with Item name, Sale Price, and QTY (In Hand) being the mandatory fields. The descriptions for other fields are as follows:
Note: The stock can only be created for those items that are already added in the backend portal.
To add stock for any new item, you will need to create the item from the Category section by following this path: Catalog > Super Category > Category > Items.
Note: Before creating the item stock, make sure you have added the vendor and manufacturer in the Vendors and Manufacturers tab in the Inventory section.
- Vendor: Select the name of the vendor (who is supplying the said item) from the drop-down list. If you can’t find the vendor in the list, first add it from the Vendor tab under Inventory.
- Manufacturer: Select the name of the manufacturer (who is manufacturing the said item) from the drop-down list. If you can’t find the manufacturer in the list, first add it from the Manufacturer tab under Inventory.
- Item: Select the name of the item from the drop-down list. If you can’t find the item in the list, first add an item in the Catalog section.
- UPC: Unique Product Code.
- SKU: Stock Keeping Unit.
- COG: Cost of Goods
- Margin%: Put the margin in %.
- Sale Price: Put the item’s sale price. If you want to set the sale price the same as the item price, click Same for Item Price.
- QTY (In Hand): Put the existing in-hand item quantity.
- Reorder Point: Put the item quantity at which you want the item to be reordered.
- Unit: Select the unit to measure the item, for example, number, kg, etc.
- Item Size: This field will tell the size of each piece if the unit is a piece.
- Item Size Unit: Select the item size measurement unit.
- Is Packet: Check this box if an item has been added as a carat or bundle.
- Packet Size: This field is enabled automatically when the Is Packet checkbox is marked. This field tells how many pieces are in one carat or bundle.
- Note: Here you can add any note for the item you’ve added.
- Once done, click Save.

- The item stock will be added to the Inventory section. See the screenshot.

- You can filter the inventory by applying the appropriate filter:
- Stock Status: Based on the over-inventory or under-inventory.
- Category: Based on the item category.
- Status: Based on the Active or Inactive items.

- Moreover, you can also download the inventory in CSV
 or PDF by selecting the appropriate option.
 - Just filter the inventory by any of the three categories and click the CSV or PDF button to download the file to your system.
How to Generate a Purchase Order?
A purchase order is a legal document that a buyer sends to a vendor or supplier to authorize a purchase.
Here are the steps to be taken to create one from the Quantic backend portal.
Note: PO can only be generated for the items that exist in the backend portal.
To create a PO for any new item, make sure to add the item and the vendor in the backend portal. Follow this path to add a new item: Catalog > Super Category > Category > Items, and associate it with a vendor in the Inventory tab.

- Click the Hamburger button on the top left corner.
- Click Inventory on the left navigation menu.
- Click Purchase Order and click the ➕ icon.

- Enter the details in the Create PO form.
- Put the Vendor PO No., Bill To, and Ship To.
- Select the vendor from the Select Vendor drop-down list.
- Select the item that you want to add to the PO from the Select Item field.
- Once done, click Add Item.

- Enter the details of the item you are creating the PO for.
- In the QTY section, enter the item quantity that you want to order from the vendor.
- In the Cost/Unit section, enter the per-unit price of an item.
- Enter the UPC, MPN, and ALU details of an item.
- To add more items, repeat the steps from selecting the vendor till the above step.
- Click Generate PO, or if you do not want to generate now, click Save & Hold.
- On clicking the Generated PO button, the PO# Generated Successfully message will appear. Click the Download PDF button to download the PO in your system, or you can click ✖️ if you do not want to download it now.
Generating a Negative PO: You can create a negative purchase order by entering the negative quantity for the number of items (that you are returning, transferring, or crediting to the vendor for any reason) in the QTY column.
Negative purchase orders are also called reverse PO or credit PO.

- Once the PO is generated, you will be sent back to the Purchase Order section. Here you can review the purchase orders under the Purchase Orders List tab.
-
- Clickto edit the PO.
- Click
 to email the PO.
 - Clickto receive the item(s).
- Clickto delete the PO# from the list.
- Click
- Click the Purchase Orders Received tab to review the purchase orders that have been received in the past.
Receiving a Purchase Order
After receiving the items ordered, you need to enter the actual quantity received in the backend portal.
Doing this will update the item quantity (in-hand) in the portal.
Here are the steps to receive the purchase order.

- Once you create a purchase order, you will land on this screen. If you didn’t, make sure to click the Purchase Order List tab.
- Clickto receive the PO.

- Enter the items received in the QTY Received field.
- Click the Receive button in the top right corner.
- Click Ok on the confirmation screen.

- The purchase order pop-up will appear.
- Click
 to print the purchase order or click
  to download the purchase order.
How to apply auto-gratuity based on the balance due?
Now the auto-gratuity (in $ or %) can be applied if the total amount due exceeds the preset Gratuity Amount Limit.
This feature can be implemented from the Configuration > Service Area in the backend portal.
Here are the steps.

- Log in to the backend portal.
- Click the Hamburger button on the top left and click the Configuration option on the left navigation menu.

- Expand the Setup navigation.
- Click Service Area.

- Here you can edit the service areas to customize as per your needs.
- Click
 on the service area where you want to implement the auto-gratuity based on the amount due.
 - As an example, we have chosen the Quick Order service

- In the Gratuity Amount Limit field, enter the amount due, which, if exceeded, the gratuity will apply automatically.
- Select the Gratuity Type– % or $.
- Enter the gratuity value that should be added to the total amount due.
- Click Save.
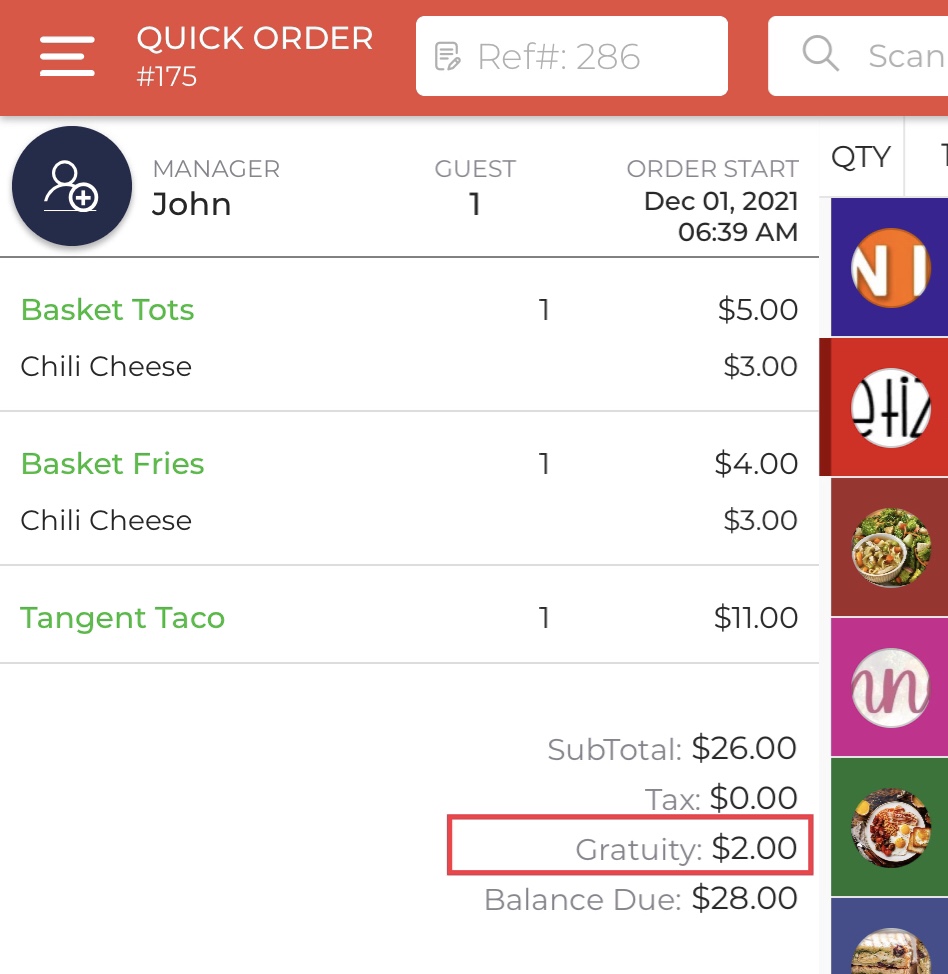
For example, you have set $20 as the Gratuity Amount Limit and $2 as the Gratuity Value.
Now, if the total amount due is $26 (exceeds $20 Gratuity Amount Limit), the $2 gratuity will be added automatically to the bill, and the new balance due will be $28 (amount due + gratuity).
However, if the total amount due remains $19 (less than the Gratuity Amount Limit), the auto-gratuity won’t apply, and the balance due will remain the same, i.e., $19.
Adding General Information in the backend portal
You can add or edit your location name, upload brand logo, change address, time zone, and business name, all by yourself from the backend portal.
Follow the steps below, navigate to the General Information section, and edit your business information.

- Log in to your Quantic backend portal.
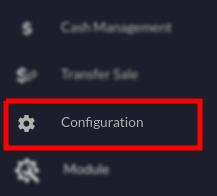
- Go to the left navigation and click Configuration.

- Click the
 symbol in front of Setup. Doing this will explore further sections underneath the setup.

- Click the General Information tab as shown in the screenshot.
- The Business Information will be displayed on your screen.
- Here, you need to click the
 button in the top right corner.

- Now you can tap on any field to edit or add the relevant information.
- To edit or add your business logo, click the Browse button, select the image from the location in your system, and upload it.
- Click the Time Zone box and select the time zone from the drop-down based on where your business is located.
- Similarly, you can add other details such as email, address, phone number, website, etc.
- Once you are done with the changes, click Save Changes.
Note: Boxes marked with an asterisk ”*” are mandatory fields and cannot be left empty.
Adding and Setting up the Service Area
Here you can add the service areas and customize them for better functioning.
Let’s first begin with adding the service area.
Adding the Service Area

- Begin by navigating to the Service Area under Setup.
- See the screenshot for visual interpretation.
- To add a new Service Area, start by clicking
 on the top right corner.

- Click
 on the bottom right below the service areas.

- A new field will appear, tap on it, and enter the name of the service area that you want to create.

- Tap the Select drop-down in the Service Area Type column and pick the service area type.

- Tap these checkboxes only if you want to enable them; otherwise, leave them unchecked. Their description is given below.
- Enable Online: Check this box if the service area has to be enabled for online orders.
- View Only: Check this box if the service area is meant just to display the menu online and not for accepting orders. (This setting will hide the Add to Cart button).
- Enable Self-Order: Check this box to enable this service area for self-ordering.
- Status: Check this box if you want to activate this service area.
- Click
 to save the settings.
 - Click
 to delete the service area.
Setting up the Service Area

- Click in front of a service area under the Action column to start setting up that service area. The Setting screen will appear with lots of customization options. These options may vary for different Service Area Types. For example, this screen appears for the Main Dining service area. The description for the fields is given below.
- Call In Name: Enable this toggle switch (turn it red) to show the customer call-in name input option for this service area.
- Default text message for delivery/pickup: Enter the default text message that you want to display for delivery/pickup.
- Disable Position: Turning on the toggle switch (turning it red) will disable the position selection for this service area.
- Enable Course: Turning on the toggle switch (turn it red) will enable the course selection for this service area.
- Enable Shipping Tax: Turning on the toggle switch (turn it red) will enable the additional shipping tax for this service area.
- Extra Charge List: Here, you can select the extra charges that should apply to all orders under this service area.
- Reserved Display Time (in minutes): Enter the table reserve time (in minutes).
- Reservation Hold Time (in minutes): This is the holding time for a reserved table.
- Suggested Tip List: Enter the tip amount that you want to show on the payment screen. To enter multiple tip amounts, separate them with a comma “,”.
- Tax Class ID List: Select the applicable tax classes for this service area.
- Disable Tax Class List: Select the not-applicable tax class(s) for this service area.
- Gratuity Amount Limit: Here you can set the maximum amount due limit, which, if exceeded, the gratuity will apply automatically.
- Gratuity Type: Select the gratuity type- % or Amount.
- Gratuity Value: Enter the gratuity amount that should apply when the Total Amount Due exceeds the Gratuity Amount Limit.
- Once you are done with the settings, click Save in the top right corner.
Adding the Tax Class
Here you can add the tax class, set the tax rate (%), and mark the default tax or smart tax.

- Go to the Tax menu on the left navigation.
- Click on the top-right corner.

- Click
 the button.
 - A new field will appear. Enter the tax class name, and set the tax rate (in %).
- Tap on the Default Tax checkbox if you want to set this tax as a default.
- Tap on the Smart Tax checkbox if you want to set this tax as a smart tax.
- Tap on the Status checkbox to activate the tax class.
- Click
 to save the settings.
 - Click to delete the tax class.
Set up the User Defined Payment method
User -defined payment method section allows you to set up the most popular payment methods and customize them to fit the restaurant’s needs.

- Go to the left navigation menu, expand the Setup section, and click the User Defined Payment Method.
- Click
 the button on the top right.

- Click
 as shown in the screenshot. A new field will appear; enter the name of the payment method that you want to add.
- Tap the Exclude Gratuity checkbox if you want this payment method to be free of Gratuity.
- Tap the Enable Favourite checkbox if you want to set this payment method as a favourite.
- Tap the Enable Customer House Account checkbox to enable a payment method for the customer’s House Account.
- Tap the Status checkbox to activate a payment method.
- Click to delete the payment method.
How to create a new Terminal?
User defined payment method section allows you to set up the most popular payment methods and customize them to fit the restaurant’s needs.

- Go to the Terminal tab on the left navigation menu.
- To edit the existing terminal, click in front of the terminal.
- To add a new terminal, tap
 on the top right corner.

- Click the
 button on the bottom right.

- On the Add Terminal screen, fill in the details as shown in the screenshot.
- Enter the terminal name in the Name field.
- Enter the short name.
- Select the payment gateway from the Gateway drop-down.
- Select the Receipt Printer to which you want to send the receipts for the orders received on this terminal.

- Select the Terminal Type from the drop-down- POS, Self-ordering, QST, and QLite.
- Add the description in the Description field that you want to display underneath the terminal name on the POS.

- Once you have filled in all the details, you can perform the terminal-based settings. Please be informed that altering any of these configurations will change the settings for a particular terminal only. To change the settings for a particular terminal, go to the Terminal section and edit the terminal of choice. Below are the detailed descriptions of these settings:
- Enable Batch Close Terminal – Enabling this setting will allow you to close the batch for this terminal.
- Enable Online Order Notify – Enable this setting to be notified about the online orders. You will receive a notification on the POS as soon as a guest places an order on the online platform.
- Disable Redirection Until Tip Applied – Turn on this setting to disable the redirection until the tip is not applied on the credit orders. Enabling this setting won’t let you exit the order screen until the tip is not applied.
- Disable Print on Receipt Popup – Turn on this setting if you do not want to see the Print button on the receipt popup.
- Display Item Price in Ticket – Turn on this setting if you want the item price to be displayed on the ticket.
- Disable Auto Batch Print Report – Enable this setting to prevent the auto batch report from printing.
- Disable Cash Payment – Enable this setting to stop accepting cash payments for the orders from this terminal.
- Enable Terminal-Based Service Area – Enable this setting to activate the terminal-based service areas.
- Print Receipt After Batch Close – Enabling this setting will print the receipt once the batch closes.
- Enable Tip Signature – Enabling this setting will allow the tip signature pad to appear on the screen.
- Enable Scale Measurement Automatically – Enabling this setting will open the scale measurement system automatically for the items to be sold by weight. The Scanning weight pop-up appears on the order screen, which shows the item weight measured on the integrated scale. You can also enter the weight manually, but you need to enable the Allow Manual Weight settings to see this feature.
- Allow Manual Weight – Enabling this setting will allow you to enter the item weight manually on the weight measurement pop-up screen. If you want the item weight to be shown automatically, please turn on the setting Enable Scale Measurement Automatically.
- Enable Meal – Enable this setting to activate the terminal-based meal.
- Customer Copy for Non-Cash Payment – You can print the customer receipt copy for all non-cash payments by enabling this setting.
- Enable Honeywell Scanner – Enabling this setting will activate the Honeywell scanner for this terminal. With the help of a scanner, you can add an item to the cart by scanning the barcode.
- Customer Copy for Cash Payment – You can print the customer receipt copy for all cash payments by enabling this setting.
- Redirection After Full Order Payment – Choose the option from the drop-down where you want the screen to redirect after a customer makes a full payment. You can either set the redirection to the PIN pad screen or the landing service area. You can also disable the redirection from the drop-down.
- Redirection After Processing Send Command – Choose the option from the drop-down where you want the screen to redirect after clicking the Send button (to send an order to the kitchen) on the order screen. You can either set the redirection to the PIN pad screen or the landing service area. You can also disable the redirection from the drop-down.
- Once done, click Save.
How to set up the Store Hours?
Quantic allows you to set the restaurant’s daily hours of operation. You can set the store opening time and closing time, or set the closing day(s) of the restaurant.

- Go to the left navigation menu, click Store Hours, as shown in the screenshot.
- Click the
 button in the top right corner.

- By default, all the days are disabled
 . Tap on the toggle switch in front of the day to enable it when your restaurant is open for business. Enabling the toggle switch will display the empty fields to add store operational hours.

- Tap on the first field to open the time picker. Scroll the list and select the time you want your restaurant to open.
- Tap on the second field to open the time picker. Scroll the list and select the time you want your restaurant to close.
- You can add more working hours to the day by clicking on
 the button.
 - Be sure to click the Save Changes button to publish the recent changes.
How to create a meal period-based menu?
A typical meal period could be breakfast, lunch, dinner, Sunday brunch, happy hour, etc.
You can even create special meal periods for special events like New Year, Valentine’s Day, etc., and enable those meal periods to show up during a particular period.
Suppose you want to create a special Lunch meal period, and you want the server to see it only on Saturday between 09:00 PM and 10:00 PM; here is what you need to do:
- Go to the backend portal.
- Create a meal period.
- Associate the items/categories with that meal period.
That’s it. Check out the detailed steps below.
Create a meal period

- Navigate to the Configurations in the left navigation menu.

- Search the configuration for Enable Meal Period Based Menu and turn on the toggle switch next to it.

- Log in to the Quantic backend portal.
- Tap the hamburger icon to open the left navigation menu.
- Click the Configuration as shown in the screenshot.

- Expand the Setup menu.
- Scroll down and click the Meal Period.

- Here appears the Meal Period screen, where you can add a new meal period and edit or delete the existing ones.
- To create a meal period, click the
 button.

- Click the
 button as shown in the screenshot.

- A new screen will open; here you can name the meal period and set the start time and end time.
- Tap on the toggle switch next to the day for which you want to enable the meal period. Symbol means the meal period is disabled for a day, and symbol means the meal period is enabled.
- The Start Time and End Time fields will open next to it. Tap on the Start Time field and select the time at which you want the meal period to begin. Similarly, you can choose the end time as well. Or, you can enter the time manually in HH: MM AM/PM format.
- Once done, click Save.
- For example, in the above screengrab, we named the meal period “happy hour” and set its availability for Friday and Saturday from 8:00 pm to 10:00 pm.
- Repeat steps 7-12 to create a new meal period.
Associate the meal period with an item
Note: You can associate multiple meal periods with an item, but please make sure that you have added all the needed meal periods by following the steps explained above.

- Click the Hamburger icon and tap Catalog on the left navigation. Check the screenshot.

- Click the Items tab.

- Click on the item that you want to associate the meal period with.

- Tap on the Additional Settings tab as shown in the screenshot.

- Locate the Meal Period field, and click on it.
- Select the meal periods from the drop-down to associate them with this item. Click Select All to associate all the available meal periods with this item.
- Once done, click Save in the bottom right corner.
In the above example, we have associated the “Well Whiskey” drink with the “Happy Hour” meal period.
Doing this will make the Well Whiskey drink available during the Happy Hour meal period only, on Friday and Saturday from 8:00 pm to 10:00 pm.
Similarly, you can create a unique meal period for some special events like New Year, Valentine’s Day, etc.
Associate the meal period with a category
- Click the Hamburger icon and tap Catalog on the left navigation. Check the screenshot.

- Click the Category tab.

- Click on the category that you want to associate the meal period with.

- Tap on the Additional Settings tab as shown in the screenshot.

- Locate the Meal Period field, and click on it.
- Select the meal periods from the drop-down to associate them with this category. Click Select All to associate all the available meal periods with this category.
- Once done, click Save in the bottom right corner.
In this example, we have associated the “Bottled Beer” category with the “Happy Hour” meal period.
Doing this will make the Bottled Beer category available during the Happy Hour meal period only, on Friday and Saturday from 8:00 pm to 10:00 pm.
Similarly, you can create some unique categories and make them available for specific meal periods.
Note: Please note that the meal period setting for an item will override the category’s meal period setting for this specific item.
Table Management
Quantic backend portal allows the clients to replicate the table positions of their restaurant.
The tables can be added as per their exact specifications, such as shape, size, and position in the restaurant. The tables can be allocated serial numbers for easy identification.
The tables can also be modified or relocated at any point in time. Once the table layout is created, the server can tap on a table (in the POS) to take orders on that table.
It helps the servers take and serve orders with zero errors, especially when their shift changes.
The new server knows which table is occupied and which is not just by seeing the color coding on the table layout.
The occupied table goes red, the partially paid table goes green, while the unoccupied table remains grey.
Below are the steps for adding, editing, and modifying tables at your convenience from the backend portal.
- Log in to your backend using the username and password.
- Tap the hamburger icon on the top left.
- Click Configuration on the left panel.

- Tap on the Service Area under the Setup menu.
- The Service Area Configurations page will open up.
- Tap under Actions in the Main Dining row. Please note, the icon will be visible only for the Main Dining service area type.

- The Manage Table page will appear. Here you can see the existing table layout, modify the table and add a new table.
- Tap the Revenue Center tab and select the dining area where you want to set up the tables.
Adding a new table

- To add a new table, tap
 on the top right of the Manage Table screen.
 - The Create New Table pop-up will appear. Fill in the table details as given below:
- Table number – Enter the table number. Please make sure to assign different numbers to the tables for streamlined ordering. Similar table numbers may create unnecessary confusion for servers.
- X Position – This is the position of the table on the horizontal axis.
- Y Position – This is the position of the table on the vertical axis.
Note: You can set any default position for now and drag and drop the table to the desired position later on.
- Select Size for Table – Select the table size from the drop-down. You can choose from these options: normal, medium, or large.
- Select Shape – This setting allows you to choose the shape of the table. The available options are circle, square, rectangle, triangle, etc.
- Click Save to save the table layout settings.
Modifying the existing table
You can edit the shape and size of the virtual table at any point in time. Below are the detailed steps.

- Hover your cursor over the table that you want to edit.
- Tap as shown in the screenshot.

- The Edit table screen will open.
- Modify any of the given fields, and once done, click Save.
- You can also delete the table by clicking the
 button.
How does the table layout appear on the POS?
The table layout on the POS is a replica of the backend portal table management.
Below you can see the backend portal table layout on the left and how that reflects in the POS, on the right.


-
- You can review the table positioning at Main Dining under the Service Areas tab.
- Please make sure to log in to your POS using the same username that you have used to access the backend portal for table creation.
- Navigate to the Service Area menu, tap the Main Dining (or the Revenue Center where you have created the table).
- The replica of the backend portal table management will be displayed on your POS screen (Check out the screenshot on the right).
- Now the server can tap on any table and start taking the orders right away.
- Below is a cutout of a table similar to tables 2 and 3 as shown in the above illustration. The table in red means it is occupied, and the green table symbolizes that the table is vacant. The following is a detailed observation of the layout.

- The red table indicates that the table is occupied. Below is the detailed observation.
- The timer on top is in HH: MM format. This is the time the guests have spent at the table. In the above example, the guests have been at the table for the past 04 hours and 18 minutes.
- John D is the name of the employee serving the guests.
- 2 is the table number.
- The number 2 in the brackets ahead of John D is the number of guests at the table.

- The table in green shows that the order placed is partially paid, and some balance due remains to be paid.
- The grey tables are unoccupied.
How to Set Up the Promotional Price from the Portal?
Restaurants can offer special promotions or discounts to guests for special events.
The promotional pricing can be applied to the entire group of items in the store.
Rather than changing the price of items individually, you can create a promotion rule that will apply to all the items in a category.
Also, you can apply the promotion rule to the individual items and set the start and end dates of the promotion rule.
Set up the Promotion Rule
You can customize the promotion rules here, such as the start and end date/time of the promotion, price of the item during the promotional period, and whether the promotion should keep repeating without any end date.
For example, you can offer promotional prices for summer holidays, weekends, clearance sales, etc.
Below are the steps to set up the promotion rule in Quantic.

- Navigate to the Promotion in the left navigation menu.

- Select the Promotion Rule tab as shown in the screenshot.
- Click
 to create a new promotion rule.

- A new window will appear here. You can create a new rule and customize it the way you want. Below are the descriptions.
- Rule name: Enter the name of the promotion rule, such as 10% off on cakes, Happy Hours, Friday 20% off, etc.
- Start Date: Select the start date of this promotion rule. From this date onwards, the promotion rule can be applied to items. So if you select April/17/2022, as the start date, the promotion rule will come into effect from the 17th of April.
- End Date: Select the end date of this promotion rule. The promotion rule will end on this date. If you select April/24/2022, as the end date, this promotion will end on the 24th of April.
- Repeat: Tap the Repeat button if you want the promotion rule to keep repeating every day, without any end date. This will apply the same promotional price every day on the associated items.
So, for example, you want the “10% off on cake” promotion rule to be applied every Sunday from 10:00 am to 5:00 pm, here’s how you can do it.
Set the start date, tap the Repeat button to make it red ![]() , enter 10 in the Amount section, set PCT in Amt Type, and select (➖) in the Operator field.
, enter 10 in the Amount section, set PCT in Amt Type, and select (➖) in the Operator field.
Now select the Start Time as 10:00 am and End Time as 5:00 pm.
Select Yes in Affect Modifier if you want the discount to be applied on the modifier as well, select No if you want the discount to be applicable on item price only (modifier excluded).
Finally, click Save to save the changes.

- Enter the amount next to the day. The amount should be in numbers. So, if you want to offer a 10% off on cakes, enter 10 next to Friday, select PCT (percent) in Amt Type, and select (➖) in the Operator Type. Below are some important abbreviations to help set up the rules.
- PCT: Percentage. For example, 10%.
- AMT: Amount. For example, $10.
- Operator (➖): Apply this operator when you want to offer a discount. For example, to activate the 10% off on items, simply put 10 in Amount and (➖) in Operator.
- Operator (➕): Apply this operator when you want to increase the price of items. For example, to raise the price of items by 10%, simply put 10 in Amount and (➕) in Operator.
- Operator (=): Apply this operator when you want to override the existing amount of the item. For example, if you put 10 in the Amount field and select the (=) operator, the existing price of the associated item will be overridden to $10.
- Next, you should select the start and end time to choose the duration during which you want the promotion rule to remain in effect during the day. For example, you want the 10% off on cakes promotion rule to stay active between 10:00 am to 11:00 pm, so select 10:00 am as the Start Time and 11:00 PM as the End Time.

- Select Yes in the Affect Modifier field if you want the promotion rule to be applied to the associated modifiers as well. Let’s understand this with an example of an item – Hot Wings. It is usually served with a Sweet Chili modifier. So, there can be two scenarios – first, you want the promotion rule to be applied on the modifier as well, and second, you want to exclude the modifier from the promotion rule. Let’s see the calculations in both scenarios.
Scenario 1. Applying the promotion rule to the item and the modifier.
You apply a 10% off promotion rule on Hot Wings and select Yes in the Affect Modifier field; the final price will be calculated on Hot Wings + Sweet Chilly, as given below.
Price of Hot Wings = $5.00
Price of Sweet Chilly = $1.00
Total Price = $6.00
Final price after applying the promotion rule (10% off) = $5.40.
Scenario 2. Applying the promotion rule to the item only.
You apply a 10% off promotion rule on Hot Wings and select No in the Affect Modifier field; the 10% off will be applied on the item only, and the modifier will be excluded from it. The final price will be calculated as given below.
Price of Hot Wings = $5.00
Price of Sweet Chilly = $1.00
Final price after applying the promotion rule (10% off) = $5.50.
Don’t forget to click the Save button to save the changes.
Note: Please note the promotion rule will only apply to the modifier when Amt Type is selected as PCT(%).

- The added promotion rules will appear under the Promotion Rule tab, as shown in the screenshot above.
- The Start and End Date will also appear next to the promotion rules.
- The
 under Status symbolizes that the promotion rule is active, and means a promotion rule is inactive. You can tap on the or to reverse the action.
Set Up the Promotion
Once you have set up the promotion rules, it’s time to create an event and associate a promotion rule with it.
This section will allow you to choose employees who can apply the promotion rule to an item and the service areas and terminals where the promotion rule can be applied.
For example, you have an Easter Event around the corner. And you want to offer 10% off on chocolate truffles.
Here is how you can do it: create a promotion rule called 10% off on chocolate truffles, create a promotion called the Easter Event, and associate the chocolate truffles item with the Easter Event.
Follow this path to associate an item with a specific promotion – Catalog > select chocolate truffles cake > Additional Settings > Enable Event.

- Tap the Promotion tab as shown in the screenshot above.
- Click to create a new promotion.

- A new window will appear, where you can create an event and customize it the way you want.
- Event Name: Enter the event name. For example, Easter Event.
- Select Rule: Tap this field and select the promotion rule from the drop-down. This will associate the event with the selected promotion rule, and the preset prices will apply during the promotional period. For example, you can select a 10% off cake promotional rule for the Easter Event.
- Employees: Select the employees to authorize them to apply this promotional price. Other employees won’t be able to apply for the Promotion.
- Service Areas: Select the service areas where you want this promotion to be applicable.
- Terminals: Select the terminals where you want this promotion to be applicable.
- Once done, please click the Save button.

- The added events will appear under the Promotion tab as shown in the screenshot above.
- The under Status symbolizes that the promotion rule is active and means a promotion rule is inactive. You can tap on the or to reverse the action.
Associate an item with the promotion
Once you have created the promotion and set up the rules, the next step is to associate the items with an apt event.
It allows you to offer the items as per the rules set in the promotional rule.
For example, you can set the chocolate truffle to be associated with the Easter Event (10% off promotion rule).
Note: You can also associate the entire category with a promotion. This will apply the promotion rule to all the items in that category.
To apply the category-level promotion, go to the Catalog > Category > select category from the list > Additional Settings, and tap the checkbox next to Enable Event.
Now select the event to be applied and click Save.

- Navigate to the Catalog section on the left panel.

- Click the Items tab and tap on the item that you want to associate with an event.

- Go to the Additional Settings tab, select the Enable Event option, and select the promotion from the Event List. The preset rules of the promotion will apply to this item. In this example, we have associated the chocolate truffle cake with an Easter Event promotion, and during that period, the chocolate truffle cake will be offered at a 10% lower price.
- Once done, click Save.

- Take a look at this POS screen, the chocolate truffle cake has been ordered during the Easter Event promotion period. The Easter Event name will be displayed at the bottom of the item on which it is applied. The revised item price will be displayed next to the item. Here, you can see that the actual price of the chocolate truffle cake was $6.00, but during the Easter Event (10% off on cakes), the new price comes out to be $5.40.
How to Create a Terminal-Based Menu?
Restaurants can create terminal-based menus from the backend portal. This new feature will allow them to set different menu items for different terminals.
For example, you can create a Bar Terminal and display only the bar-related items in that terminal, or you can create a specialized menu for the Main Dining Terminal using this feature.
Below are the steps you may follow to enable the terminal-based menu on your POS.
Enable the Terminal-Based Menu Configuration

- Login to your location’s backend portal. Or you can visit the www.myquantic.com website and use your login credentials to access the backend portal.
- Tap the Hamburger icon on the top left and click Configurations.

- Tap the search box on the top, enter the terminal-based menu, and click the option “Enable Terminal-based menu” that appears underneath.

- Select the checkbox next to Enable Terminal-based menu.
- Click the Back to Dashboard button.

- Again click the Hamburger icon on the top left and click Catalog.

- Now tap the Categories tab. The list of categories will appear on your screen.
- To assign a terminal to a category, you need to navigate to the category of choice and assign terminal(s) to it.
- Tap the Category name.

- Click the Additional Settings tab as shown in the screenshot.
- Tap the Terminal field and select the terminal from the drop-down. You may select multiple or all terminals where you want to display your category.
- In the end, please don’t forget to click the Save button to save the changes.
Filtering the Categories by Terminal

- Once you have assigned the categories to specific terminals, you can filter them by terminal and review which Terminal has which Categories.
- Go back to the Categories section in the Catalog and tap the Filter by Terminal field.

- So, if you choose the Dining Terminal, the associated categories will appear on your screen. Similarly, you can select any terminal and review the associated categories.
- You can also change the sorting order of categories by pressing the
 button and dragging it to the desired position. The same order will reflect on the location’s POS. Below is the representation of how the above sorting order for the Dining Terminal looks in the POS.

- The category sorting order in POS will replicate that of the backend portal for a particular terminal. Please make sure that you have enabled the terminal-based menu configuration in the POS.
How to Set Up and Display Suggested Tip Amount on the Receipt?
Suggested Tips are displayed on the receipts, generally at the bottom.
Tip suggestion makes it easy for your guests to select any of the suggested tip amounts and pay for the services of the waitstaff.
Quantic allows you to configure the suggested tip amounts from the backend portal.
You can set as many Suggested Tip amounts to display on your receipts. Here’s how you can do it.
Enabling the Suggested Tips on Receipt
The suggested tips can be displayed on the receipts by following the steps given below.

- Log in to the backend portal.
- Go to the Configurations.

- Tap the search box on top, enter “Show Suggested Tip On Receipt,” and select the option underneath as shown in the screenshot.

- Turn on the toggle switch next to “Show Suggested Tip On Receipt” to enable this setting.

- Similarly, search for the “Show Suggested Tip On Initial Receipt” configuration and turn on the toggle switch next to this configuration. Check the screenshot.
Customizing the Suggested Tips for Each Service Area
Now, as the Suggested Tip is a service area-based setting, you will have to configure it separately for each service area.
So, if you want the suggested tips to be shown on the Main Dining service area receipts, you will have to visit the Main Dining service area in the backend portal and set up the suggested tips from there. Below are the steps.

- Go to the Configurations.
- Under Setup, click the Service Area.
- Click Edit and tap the icon next to the service area where you want to set the suggested tips.

- Tap the field underneath the Suggested Tip List and enter the tip percentage separated by a comma(,). In this illustration, we have set up three suggested tip percentages- 1, 5, and 10.
- Click Save to save the changes. Now onwards, your receipts will contain a section that displays your suggested tip % with the tip amount.
Selecting Tips from the Suggested Tips

- After paying for the order, a receipt will be generated with suggested tips mentioned on it. The guest can select from the suggested tips displayed on the order receipts.
- The tip amount is mentioned on the receipt based on the percentage set at the backend. So, if you have set 1%, 5%, and 10% as the suggested tip percentage in the backend portal, the suggested tip amount will be calculated accordingly, and the same amount will reflect on the receipts as well.
- Now the guest will select the tip from the receipt, sign the receipt (authorizing the restaurant to deduct the chosen tip amount,) and the same amount will be deducted by the server from the saved card. Please save the order number, you will require it while adding tips in the POS.
Applying Tip Amount on the POS
Once the tip amount is deducted, the same has to be applied to the POS for that order.

- Log in to the location’s Quantic POS app.
- Go to the left navigation menu and select Tips.

- Locate the order number for which you have received the tip. Click Add Tip next to that order.

- Enter the tip amount received in the field.
- Once done, click Apply, and the tip amount will be saved for this order.
How to Set Up and Display a QR Code on the Receipt?
QR codes can be printed on the receipts to accept payments from the guests.
Once the items are added to the cart, the server can click the Print button at the bottom of the POS, and the receipt printer will print the receipt with a QR code.
Guests can scan that QR code from their mobile scanner and pay the balance due online.
A few configurations need to be enabled from the backend portal to display the QR on the receipts.
Below are the steps to help you set it up on your own.
Enabling the QR Code on the Receipt
- Log in to the location’s backend portal.
- Click the Hamburger icon on the top left and click Configurations.

- Go to the search bar on top and enter “Enable QR Payment On Receipt”.
- Now click the option that appears underneath.
- Turn on the toggle switch next to “Enable QR Payment On Receipt” to enable this setting.
Printing a Receipt from the POS

- Log in to the location’s POS app.
- Go to the order screen.
- Add items to the cart and tap the Print button at the bottom of the POS.

- Now the order receipt will print from the receipt printer. The QR code will be printed at the bottom of the receipt, which the guest can scan to pay the balance due.
Scanning the QR Code to Pay

- On scanning the QR code, the payment gateway browser will open on your screen with the balance due mentioned on it.
- Customers can click the Card button to proceed to the next screen.

- Guests can also pay the tip by entering the tip amount on the screen.
- Once done, click the Pay button to apply the tip to the order.
- Apply No Tip if there is no tip to be paid.

- Finally, the card payment screen will appear, where guests can enter the card details and click Pay to complete the payment.
How to Push Inventory from Master to Child Location?
Quantic allows you to send the inventory from the Master location to the child location.
Moreover, the child location’s item-level inventory will be visible at the master location.
Below are the steps on how you can add the inventory at the child location directly from the master location.

- Open the master location’s backend portal, and click Catalog on the left navigation panel.

- Click the Item tab on the top and select the item that needs to be pushed to the child location.

- Go to the Inventory tab, enter the QTY (In Hand) – the in-hand item quantity, and ensure the Track Inventory option is checked.
- Click Save to save the changes.

- Click
 next to the item under Action to push that item to the child locations.

- Select the child locations from the list and click Save.
- Once the item is pushed to the child location, a pop-up appears stating, “Item has been successfully pushed to the child location.”

- Now open the child location’s backend portal.
- Go to the Catalog on the left navigation, select the item that you have pushed from the master location.

- Click the Inventory tab, select the Track Inventory checkbox, and click Save.

- Open the Master location’s backend portal, tap Inventory on the left navigation.

- Search for the item and tap the
 button.
 - The child locations will be displayed underneath the item that has been pushed.
- Now tap the
 icon next to that item under the QTY In Hand section.

- Enter the quantity with which you want to increase or decrease the item quantity.
- Don’t forget to click the Save button.


- Once done, the item quantity will start displaying next to the item name, and the same quantity will get updated at the child location’s backend portal.
- Similarly, you can manage the inventories of all child locations from the master location.
